|
|
|
|
|
|
|
|
|
|
|
|
M1A2 SEP Abrams TUSK
kit comparison
Academy 13298 - M1A2 TUSK II
Meng TS-026 - M1A2 SEP Abrams TUSK I / TUSK II
Rye Field Model RM-5004 - M1A2 SEP TUSK I / II
Tamiya 35326 M1A2 SEP Abrams TUSK II
Dragon 3536 - M1A2 SEP
Legend LF1177 M1A2(A1) Abrams TUSK upgrade set
for Dragon
Legend LF12A5 M1A2 Abrams TUSK II upgrade set for Dragon
Dragon 3535 -
M1A1 AIM (to compare with M1A1 parts in RFM kit)
Dragon 3556 - M1A2 SEP V2 Abrams (to compare with V2 parts in the Academy kit)
1/35 scale
Go to PAGE 2 PAGE 3 PAGE 4 PAGE 5 PAGE 6 PAGE 7.
THE END!
(2017.08.27)
I regret to inform you that I have made a decision today not to continue my Abrams kits comparison article. I have not added anything to it in well over a year now, so it's time to finally admit that it will never happen... I started it a couple of years ago with a lot of enthusiasm, but it quickly evaporated when I realized the enormity of the task. Preparing parts, taking photos, processing them, adding my comments, editing the article... It was simply not fun for me anymore at all, and this is supposed to be a hobby after all - if it is not fun, what's the point of doing it?... Also a couple of new Abrams kits have arrived in the meantime, the improved RFM ones in particular, that would have to be included in my article to make it complete - and that would mean rewriting the part of the article that seemed to be finished already... Nope, not going to happen. Sorry folks...
So just to give some general summary:
- Tamiya Tusk kit: only good if someone needs a quick and simple build. Accuracy and detailing is far behind any other kit.
- Dragon AIM/SEP kits - still good accuracy and details, but fiddly to build and fit is not great, particularly now that molds deteriorated somewhat. Also comparison with newer kits revealed a few minor accuracy issues.
- original RFM M1A2 SEP kit - odd mixture of Tamiya and Dragon "inspired" design solutions and features with some original (good and bad) RFM ideas mixed in. Unfortunately many inaccurate features were transferred from the Tamiya kit... Not recommended considering other available choices.
- later RFM M1A1/A2 (1991 and w/Interior) kits - much better than the original release, as many errors have been corrected (with a little help of your truly :) ). Still some minor issues here and there, but pretty solid releases now.
- Meng kits - very good overall. There are some small things I don't like much (an think others did the better), but nothing really important.
- Academy kit - very good as well. Small issue with the suspension geometry and a couple of other minor things, but not a deal breaker.
Each kit has some flaws and some advantages, but each: Meng, Academy, newer RFM and old DML kits, can be build into a respectable replica with little effort.
INTRODUCTION
A lot has changed in
the market since I wrote my first Abrams kits comparison article in 2004... The
biggest change for me personally (modeling-wise) was that I "switched sides":
I'm no longer just a modeler and a reviewer, but also "a consultant" for several
model kit manufacturers. This adventure started after I got in contact with
Ralph Zwilling, who at that time was helping Dragon Models Ltd. to design a M1
Panther II kit, who in turn contacted me with the Dragon team. Then I took
Ralph's place as the principal technical consultant in Dragon M1A1 AIM project
and then M1A2 SEP. I had very big influence on the final shape of both kits,
reviewing practically every part in CAD before they were molded and then every
test shot (a lot of UPS packages were sent from HK to Poland during that
time...). I focused mostly on accuracy, so some build and instructions quality
issues have slipped my attention... Also molding quality in the final product
was not as good as it could have been - Dragon decided to use cheaper mold
making process than the one they used for their Panzer kits at that time. So
details are not quite as sharp as in some of those German WW2 armor kits from
the same year...
While my name was still in the instructions of M1A2 SEP V2
kit released by Dragon several years after the original SEP kit (after all most
parts in the new kit came from the earlier release - from "my" kit), I was not
involved in any way in that kit design. But I still help Dragon with many other
projects, so from time to time you can see my name in instructions of their
various kits.
Recently I also provided some assistance to Liang Sun of T-Rex Studio while he was working on the Meng TS-026 kit design (so my name appeared on this page: http://www.meng-model.com/new.php?id=536). Later I also helped him a bit more on some other related Meng projects, but they were not announced yet, so I cannot say anything more...
Finally I would like to mention that, while I had nothing to do with the RFM RM-5004 kit design, I currently provide some assistance to RFM as well in their other projects.
Am I objective then? Well, many readers will assume that I'm not... Indeed I sometimes treat the original Dragon AIM and SEP kits as my "kids", so obviously tend to defend them fiercely from unfair criticism. But I also realize that AIM kit is 10 years old now, and it and the SEP one are not free of faults. Some of which were eliminated from some of the new kits, but at the same time some features of those "old" Dragon kits are in my opinion still done better than in any of the other M1 tank kits, including the newest ones.
But in this article I will do my best to stay as objective as possible and illustrate all my comments with clear images. This should allow anyone to decide which of the kits they prefer, even if they wouldn't agree with my comments and my choices.
Please note that I do not plan to build all the kits included in this comparison! At least not before this article is finished. I will only assemble as much as necessary for meaningful comparisons, but mostly I will compare individual parts. And I will focus on ACCURACY (if this word annoys you, you better stop reading now. I am a RIVET COUNTER! You have been warned.). Of course other qualities like molding quality and sometimes even fit of parts, will be mentioned from time to time, but it is not a build review, so they will not be my primary focus. I will not compare kit instructions, but it is possible that I will post some parts of them to illustrate my point.
Back to the kits.
Originally modelers who wanted to build a model of TUSK or TUSK II equipped
tanks, as used by the US Army in Iraq between 2007 and 2010, had only one
choice: to buy one of the Legend resin "Upgrade sets" released in 2009. They
offered sets for Dragon and Tamiya Abrams kits. The sets were expensive, but
very well designed and comprehensive and... well, the only game in town at that
time. Other aftermarket manufacturers, like Voyager and E.T. Models soon
followed with their own TUSK sets for available Abrams kits.
In 2012 Tamiya
released their 35326 kit - while the TUSK parts in it were somewhat simplified
compared to those in the Legend kit, the TUSK equipped tank model could have now
been built for much less money. And it was MUCH easier to build too!
Then for a few years things got quiet... And BOOM! In 2016 we've got not one, not two, but THREE newly tooled M1A2 kits with TUSK parts included!
With so many new Abrams kits on the market now, I decided that it is time for a new version of my Abrams kits comparison article. I chose to include not just plastic kits but also two Legend conversion sets, as Dragon does not offer TUSK version of their kit and obviously I had to include the Dragon kits in the pool!
In my stash I already had two Legend TUSK sets, Tamiya TUSK kit (bought with my own money) and obviously all three Dragon "new generation" Abrams kits (received as free samples from DML). I also received the Meng kit free from this manufacturer in gratitude for my help. Then I received a free sample of the RFM kit to analyze and provide my comments back to the manufacturer. And recently I received a free sample of the Academy new kit from Korea from a friend: Hyun Jin Kim (Def.Model owner). As I received six of seven plastic kits included in this comparison free, it will not have any influence on my opinions.
Just as I did in my original article 13 years ago, I will start my comparison from the ground and move up. So I start with tracks...
TRACKS
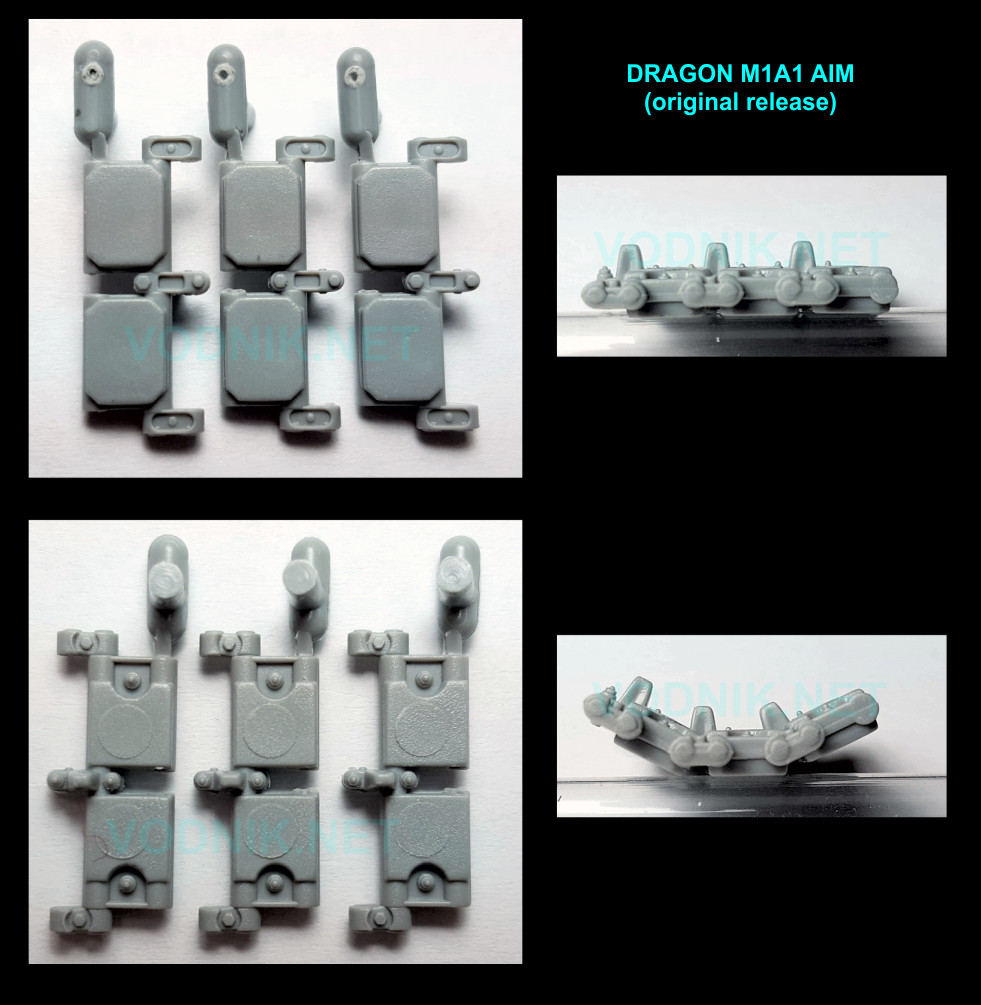
The original Dragon M1A1 AIM kit release included so called Magic Tracks. They were individual link tracks with end connectors molded on. These were the only parts shared between this kit and the earlier M1 Panther II kit - everything else was newly tooled. As can be seen in the photos below, while each link has only one sprue gate on it, it has two big ejector pin marks on the "wheel side". The links are easy to assemble, but they are not workable - glue has to be used to hold them together. Unfortunately end connectors are molded in the same straight position on all links, so around idler and sprocket wheels they don't look good, as they don't properly follow the wheel curvature. If you compare the guide horns molded on these parts to those on other tracks below, it is clear that they are noticeably too small. As the guide horns are solid, the tracks represent the T158 type - suitable for early M1A1 AIM tanks. I have photos of M1A2 SEP tank with T158 tracks, but it is rare. Normally T158LL tracks were used on SEP tanks, as they were designed specifically for this tank version.
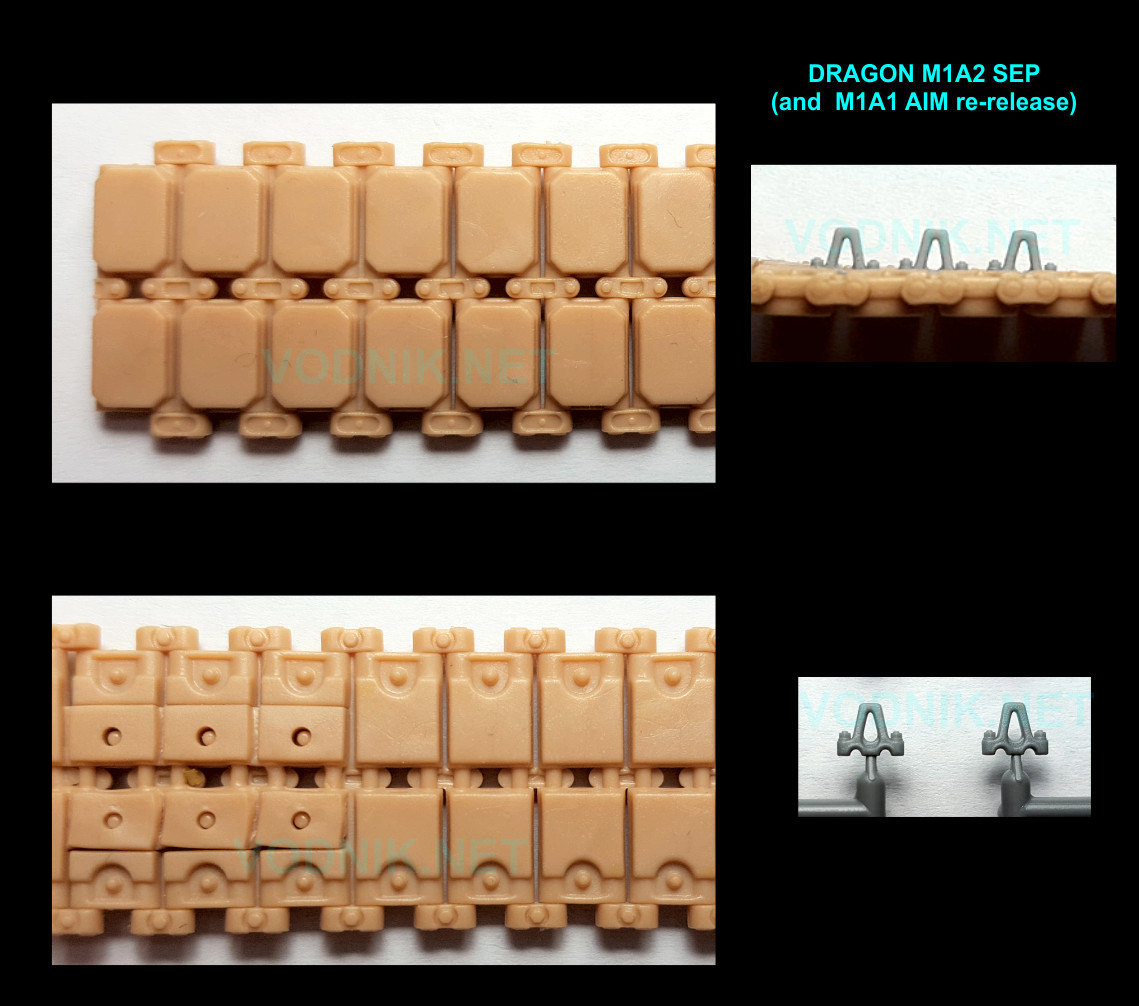
When Dragon M1A2 SEP kit was being designed, Dragon started experimenting with so called DS (Dragon Styrene) tracks. DS is a mixture of styrene and vinyl. Tracks are molded in one piece ("rubber band"), well detailed, more flexible than most vinyl tracks and can be glued with standard plastic cement. Dragon used this feature to create T158LL tracks for their kit providing hollow guide horns as separate plastic parts to be glued to DS links. As can be clearly seen below, the guide horns are now correct size. Flexible material means that end connectors "work" properly around idlers and sprockets. Except for guide horns and different material used, the design of track links is identical as in Magic Tracks shown above. There are no ejector pin marks or other blemishes on parts. There is no flash on my example, but I know that sometimes some flash can appear on DS tracks. These were the first T158LL tracks on the market - appropriate for the M1A2 SEP tank variant. Dragon includes these tracks now also in re-releases of the M1A1AIM kit instead of Magic Tracks, what is perfectly correct, as T158LL tracks are now used on all Abrams versions. Some modelers complain about DS tracks and long for Magic Tracks - they shouldn't as the DS tracks are really better of the two. Attaching all the guide horns takes some time, but it is nothing compared to multipart assembly of tracks in the Meng or RFM kits. Usually DS tracks are slightly too long, but can easily be shortened by cutting off a link or two from each side (there are three "connecting" links on each track, so two can safely be removed and the remaining single connecting link is still enough to hold track ends together securely (glued with regular styrene cement). The area where track ends meet is not pretty on the "wheel side", but it is easy to hide it behind the side skirts.
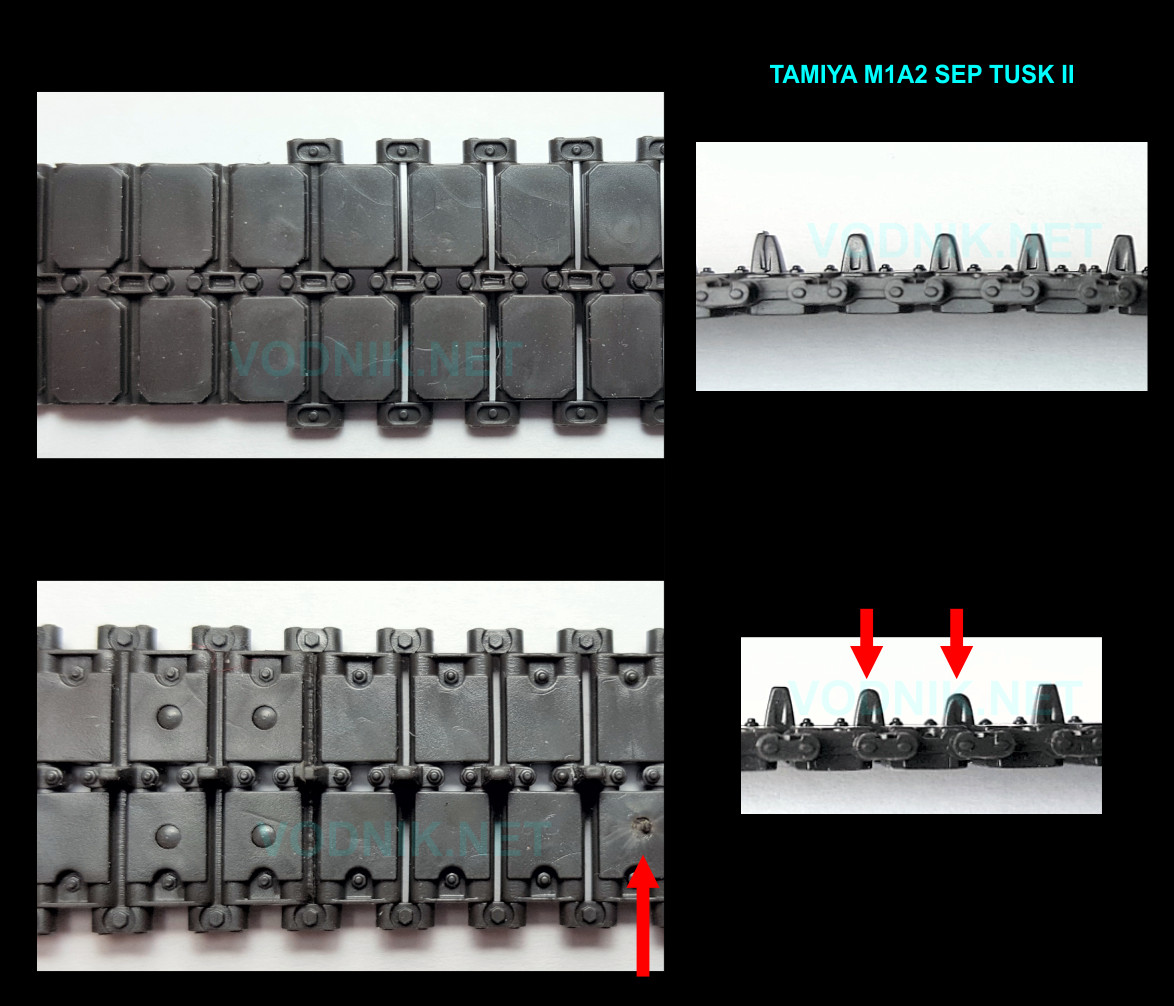
Tamiya kit includes "classic" glueable vinyl tracks. Details are quite sharp. Solid guide horns mean that the track can only represent the T158 type and this means that it isn't really suitable for typical M1A2 SEP tank. There are noticeable injector marks on the "wheel side" - six on each truck run. Some are quite smooth, some more rough (as in the photo below). Tracks are flexible and easy to use. There is no flash on my parts, but unusually for Tamiya there is a few "short shot" guide horns on each truck run. Track end have to be glued together with standard plastic cement.
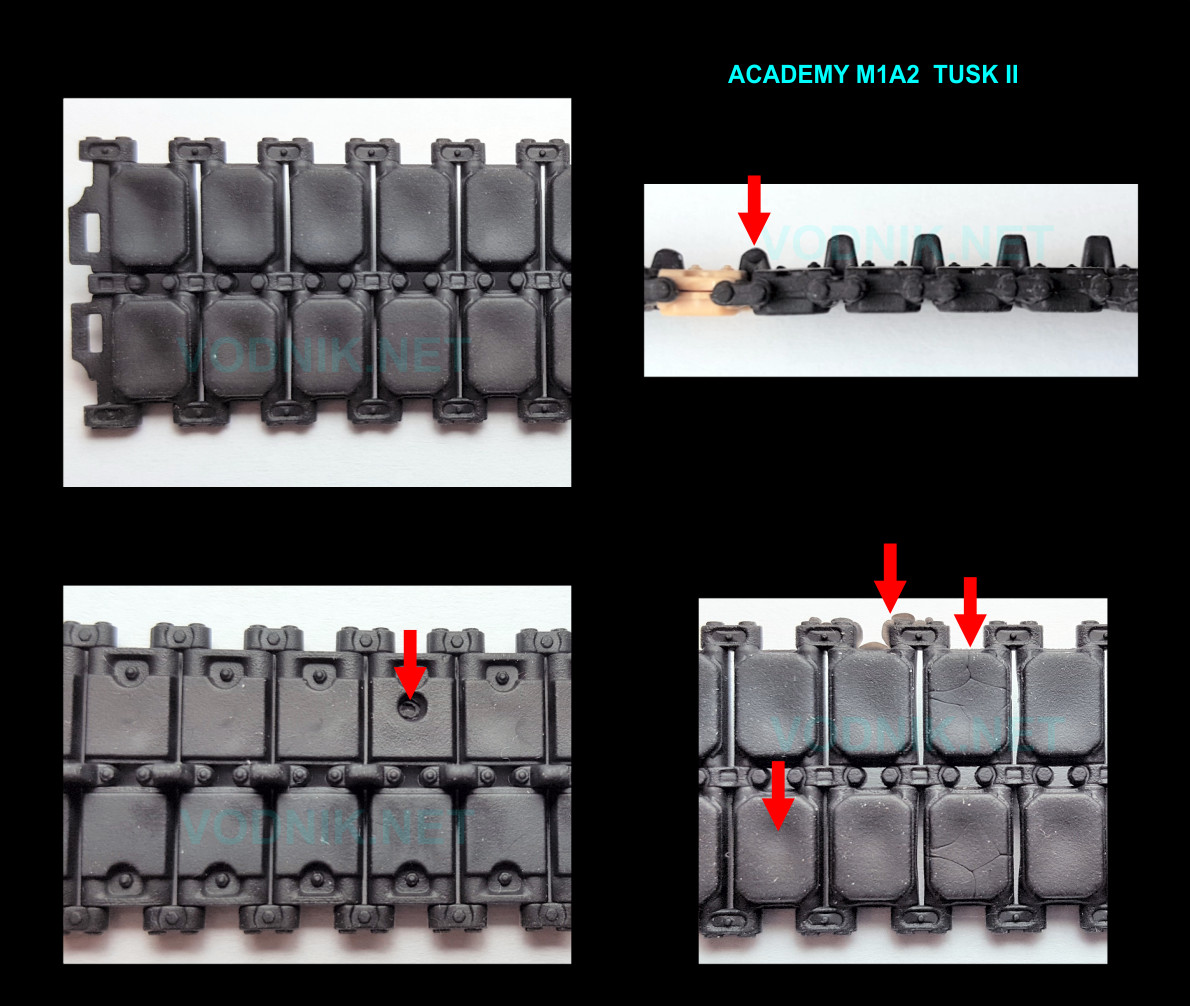
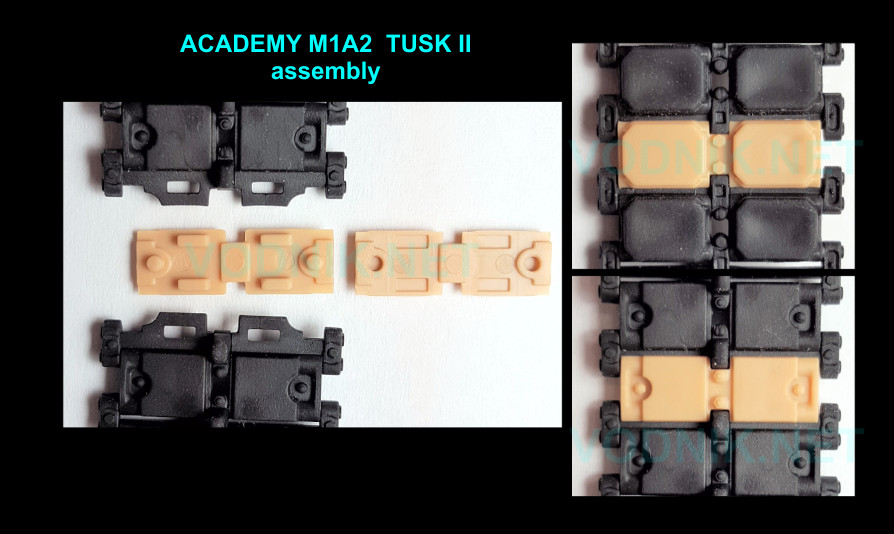
Academy finally decided to include T158 tracks in their kit (all their previous Abrams kits included poor vinyl representation of T156 tracks). They are provided as one piece vinyl "bands". As guide horns are solid, they represent T158, not T158LL type that would be correct for M1A2 SEP kit. Guide horns seem to be a bit too small too. Academy used quite innovative way to connect vinyl track ends - they use two styrene pieces that "catch" the vinyl ends between them creating a single styrene link inside the vinyl track. Of course regular plastic cement is used to connect two styrene parts. Unfortunately the molding quality isn't very good. In my tracks I have: flash, shallow sink holes on most track pads, injector marks as deep holes and material flow lines on some links. Guide horns near the track ends are not fully molded.
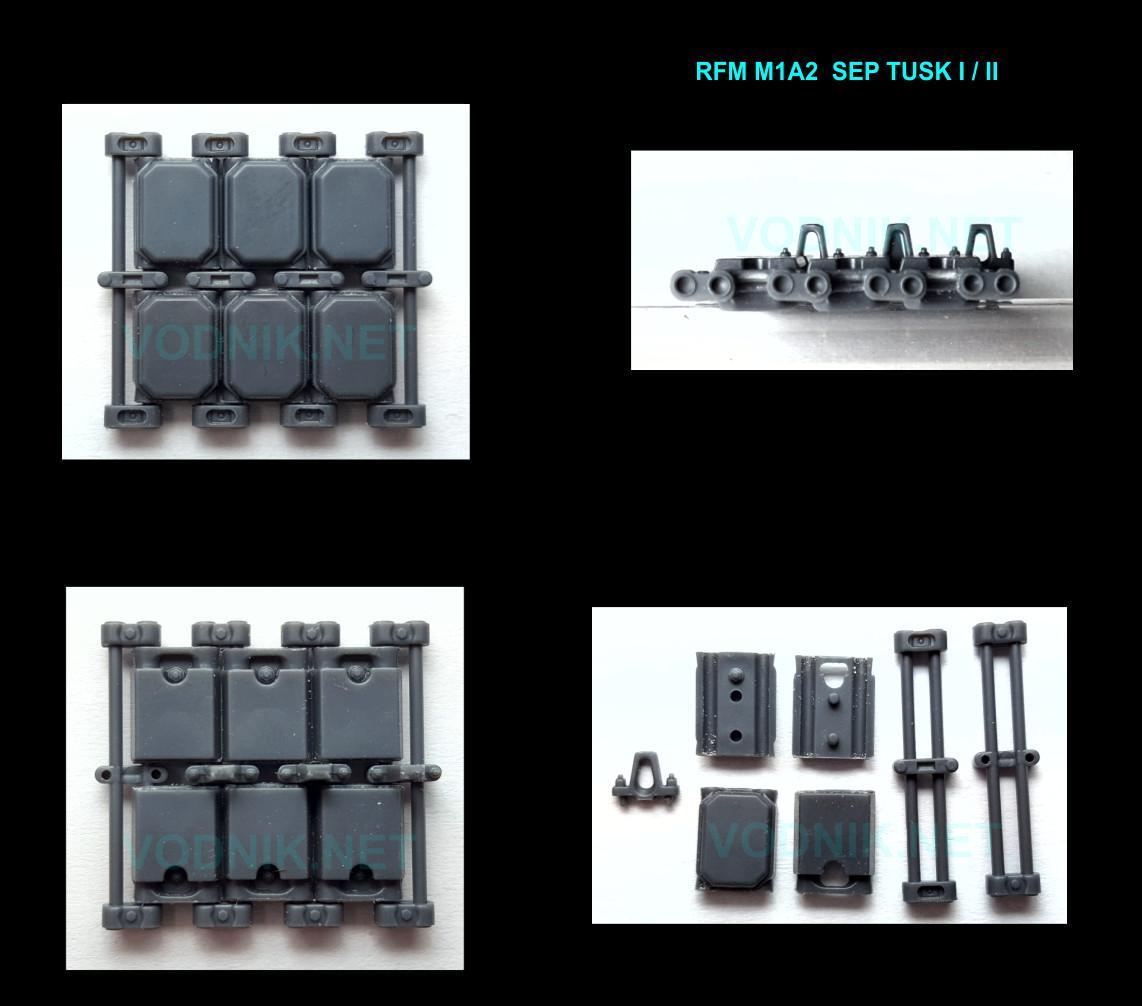
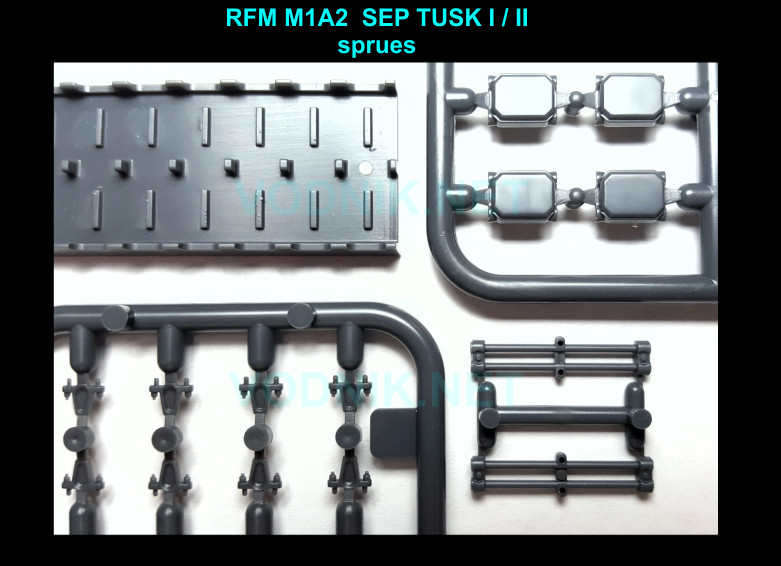
RFM included hard styrene individual link tracks in their kit. Each link is made of six separate pieces. Two kinds of correctly sized guide horns are provided: solid and hollow, so tracks can be assembled as either T158 or T158LL type (in my photo I mixed guide horns - I have never seen it done in real tank photos, but it doesn't mean that it never happened). The cleanup takes a while, but once the sprue gates are removed (two from each part), no further "processing" is required. Tracks are very well molded and fit perfectly. There are no blemishes on parts - no pin marks, no sink holes and sprue gates in places where they are easy to remove cleanly. RFM included a very useful jig to help in assembly (or to make it possible at all, as without it it would be a nightmare). If you are careful with glue, tracks will remain fully workable after assembly.
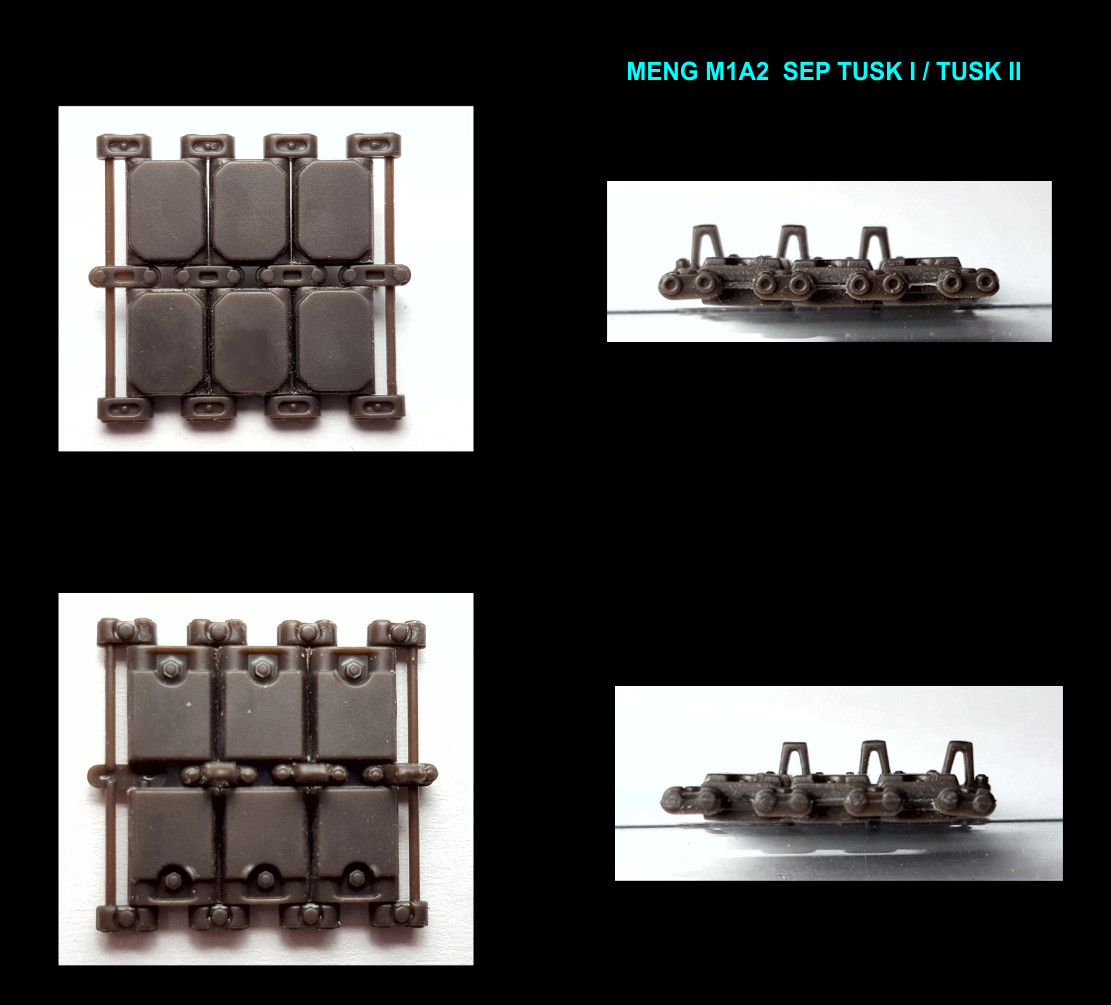
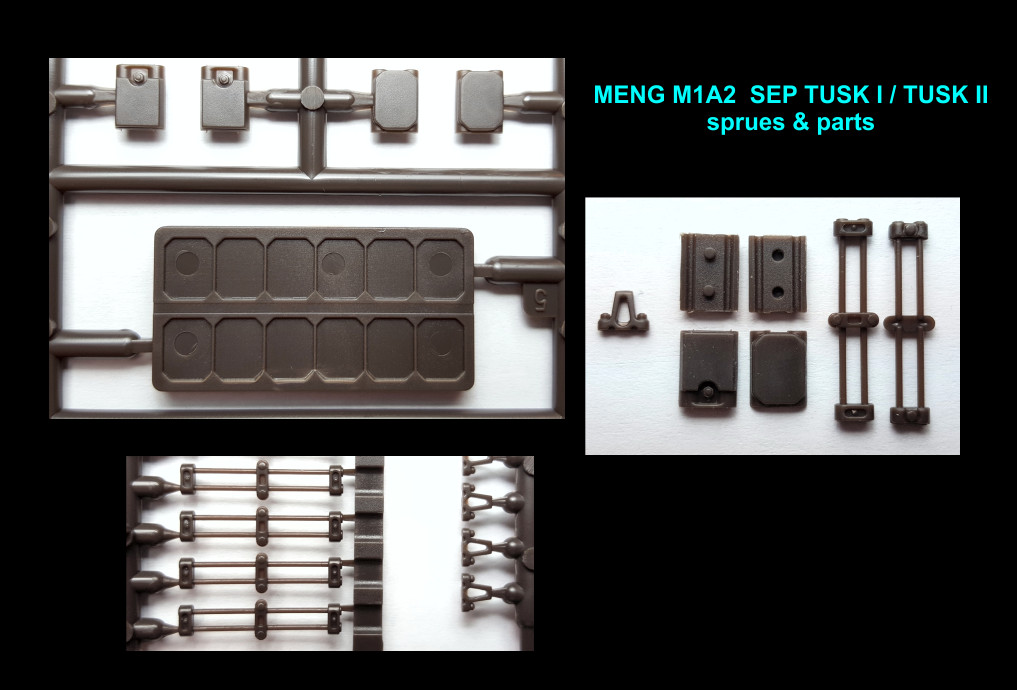
Tracks in Meng kit are quite similar to those from RFM in their design. Here we also have six parts for each link. Meng only included hollow guide horns, so only T158LL tracks can be built, which is perfectly suitable for this kit. Theoretically the cleanup should be easier than in the RFM kit, as there is only one sprue gate on each pad piece and each guide horn. But in reality the gates on pads turned out to be a bit more difficult to remove cleanly. The styrene used by Meng is also more brittle than the one used by RFM, or simply pins are a bit too thin, as one of them broke when I was carefully cleaning up the part. Meng also provided a jig, but it is simpler and a little less effective than the one in the RFM kit. Also the fit of parts is not as good: pads didn't fit well to end connector/pin parts. I had to swipe each pad piece with a fine sanding stick on both ends a few times to make parts fit properly. This means that assembly of these tracks will take longer that their RFM equivalents. Other than that, the molding is very clean with sharp details.
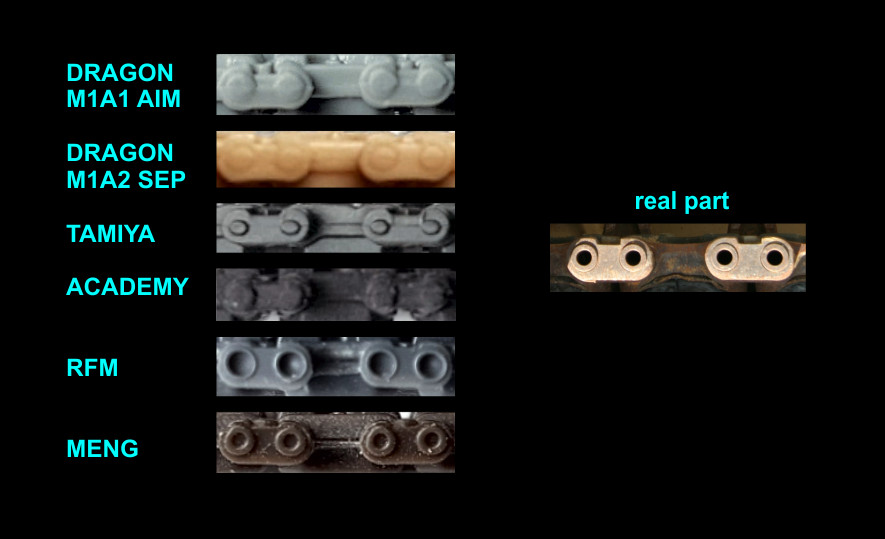
Now I will make a few direct comparisons between track parts in various kits. First I compared guide horns for T158LL type tracks. As you can see below all are reasonably close to the real thing. The outer shape of the horn itself is closest in the RFM kit, but the whole part most resembles the real think in the Dragon kit. I like the Meng version the least. The shape of the hole is not quite correct.

Now end connectors: The overall shape in the Dragon parts is good, but pin ends are molded solid. In Magic Tracks it is theoretically possible to drill the holes in pin ends, but it doesn't make sense considering other flaws of these tracks. Drilling in DS tracks is impossible, so there is no way to improve this detail. In Tamiya tracks pin ends and solid and too small. End connectors seem to be slightly too thin too. Academy end connectors are a mess - poorly defined with solid pin ends. Clearly the worst of the pack. The overall shape of the end connector in the RFM part is good, but the hole in the in end is way too big. Finally we have Meng end connectors, which are most accurate with properly sized holes in pin ends. The only problem is that Meng molded these holes only on one end of each pin... The other end is molded solid. It isn't a problem for most of the track run, as solid pins can be hidden on inner side of the track. Only around sprockets and idlers the solid pins can be more visible, but as the tracks are molded from hard styrene, it is possible to drill a few holes in them to improve the appearance in these areas.
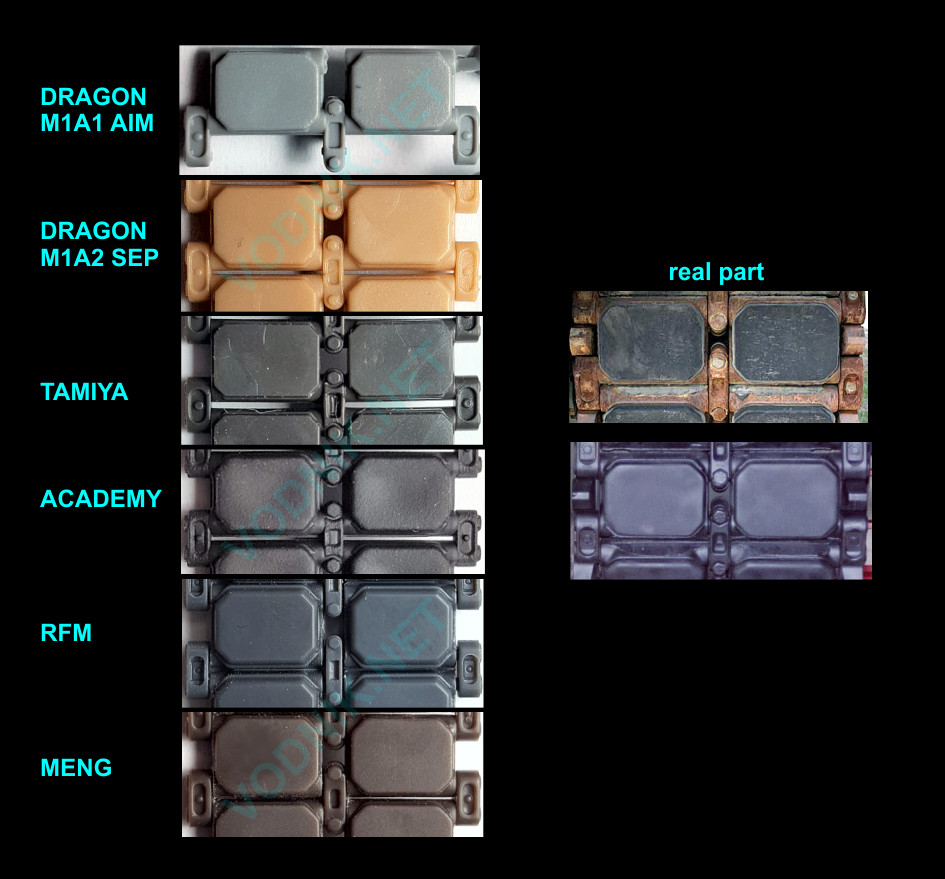
And finally the "face" of each track link compared to the real thing (well used and weathered one on top and brand new painted one below). The shape of Tamiya pads is the worst in my opinion - too rectangular (corners not cut enough). RFM links are closest to the new track, with the metal "frames" around the rubber pad represented best, but the shape of the pad isn't entirely right (too "soft" edges). I like Meng links most for more worn tracks, although Dragon ones are very close too. Academy ones would be very acceptable too if not for the molding flaws (shallow sink holes in almost each pad).
GO TO NEXT PAGE
PAGE 2
PAGE 3
PAGE 4
PAGE 5
PAGE 6 PAGE 7
![]()
![]()
![]()
Copyright © 2016 VODNIK, email: pawel.k at vodnik dot net