|
|
|
|
|
|
|
|
|
|
|
|
ROAD WHEELS
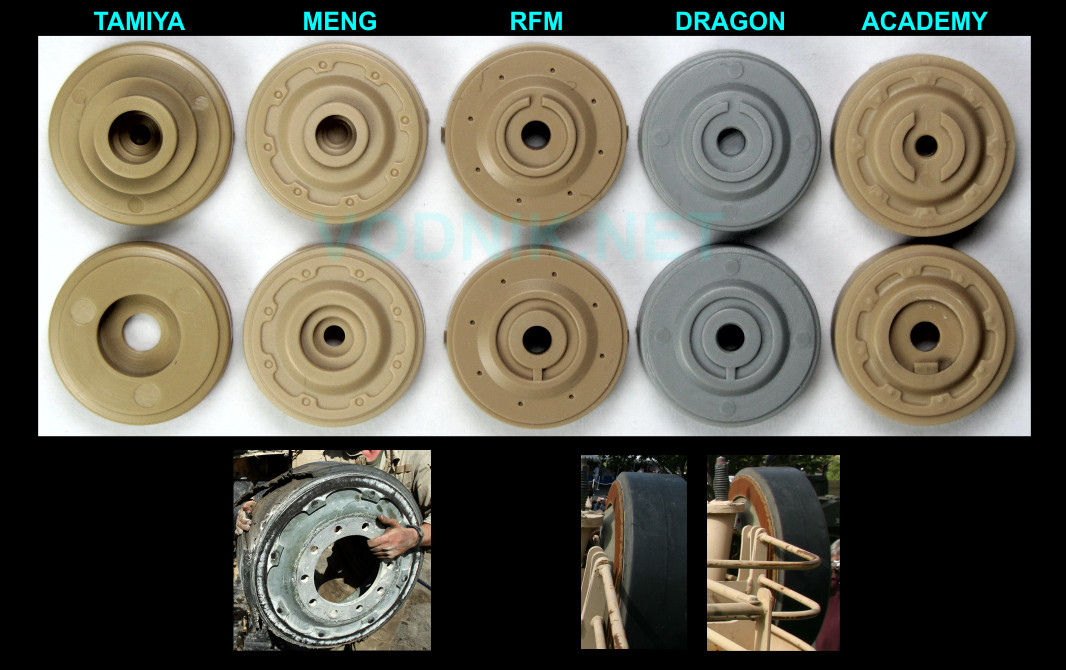
Let's start with a little known history bit: original road wheels in XM1 and M1 tanks differed slightly from those introduced in M1IP tanks and used on all subsequent variants. While the diameter of the Abrams road wheel was always 25", the original wheels had thicker tires and slightly smaller rims. The difference isn't big, but it is noticeable when you know what to look for, particularly when you have both types of wheels on a single vehicle and I have photos of M1IP tanks with new and old wheels mixed. Newer wheels have noticeably thinner - really thin - tire. The original wheels were also slightly narrower - early tire was 5.18" wide, while later wheels had 5.69" wide tires. I don't think I've ever seen early type wheels on M1A1 or a later variant.
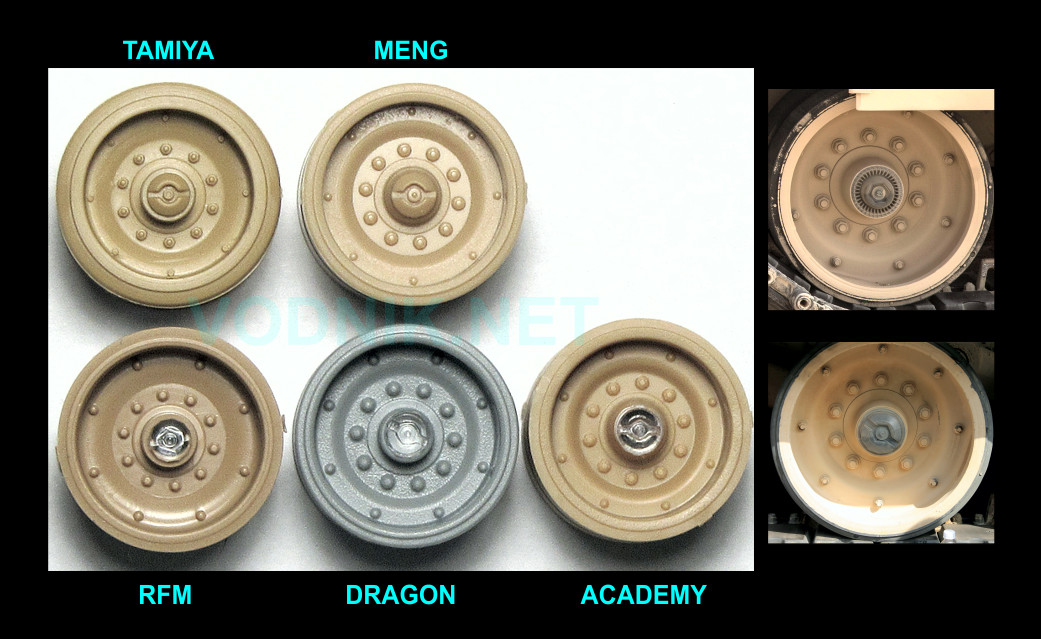
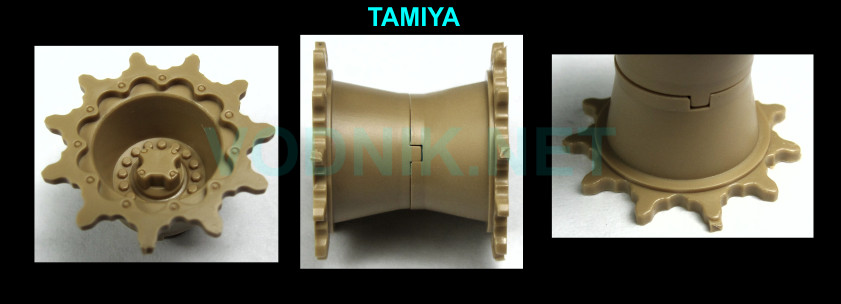
In the image below you can notice that Tamiya wheel has noticeably smaller rim and thicker tire. Inaccurate? No and yes... It was correct when Tamiya used those wheels originally in their M1 kit, as they have correct tire/rim proportions of early wheels. But this type of wheel is no longer correct when used in M1A2 kit (or M1A1).
All other manufacturers wheels represent the later type - correct for M1A1/M1A2.
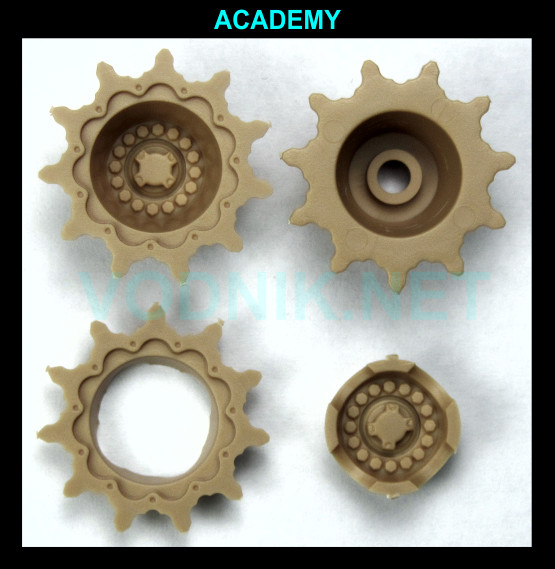
Tamiya and Meng molded the center hub caps integrally with the whole wheel, from opaque styrene. The real hub caps are made of transparent plastic to allow for checking the lubricant level inside. The remaining three manufacturers decided to mold the caps separately from transparent styrene (Dragon M1A1 AIM kit was the first one with this feature). Some modelers think that it is a useless gimmick and the same result can be achieved with painting the caps black. I personally like to have these parts separate and transparent, as with careful painting on the back side (or using transparent paints - like Tamiya smoke on the outside) a convincing result can be obtained of oil level visible inside the part. Having caps separate also allows for replacing them with later type that started appearing in recent years (most common on M1A2 SEP V2 tanks, but also on other variants, including USMC M1A1). On the right side of the picture below you can see two photos of real wheels - the upper one with the new style cap and the lower with "traditional" cap as used since the XM1 days. Only Academy provided both styles of caps in their kit - quite appropriately as their kit includes the option to build it as SEP V2. You can see both Academy caps in the next picture. Dragon M1A2 SEP V2 kit unfortunately does not include the late type caps, but they are included in the DEF.Model SEP V2 conversion set for Dragon earlier M1A2 SEP kit
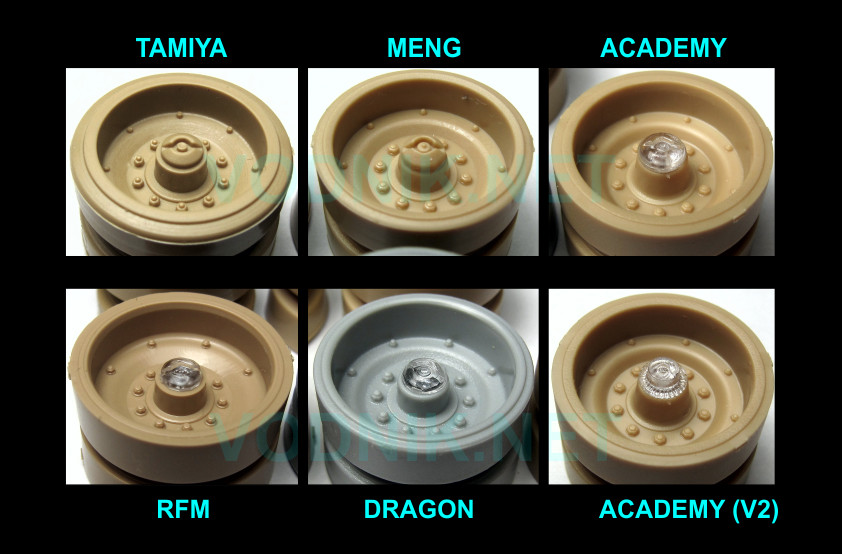
There are small differences between wheels in the shape of the dished rim, but they are small and all wheels look generally correct. Only RFM wheel curvature starts a little too close to the outer ring of bolts. Also on the RFM wheel bolts in the inner ring, around the hub, seem to be slightly too small.
None of the wheels has the undercut profile of the rim reproduced - even the wheels from newest kits have straight inner "walls"... A bit surprising considering that most other modern armor kits these days include separate parts for the outer rim ring that allow for accurate reproduction of the undercut profile.
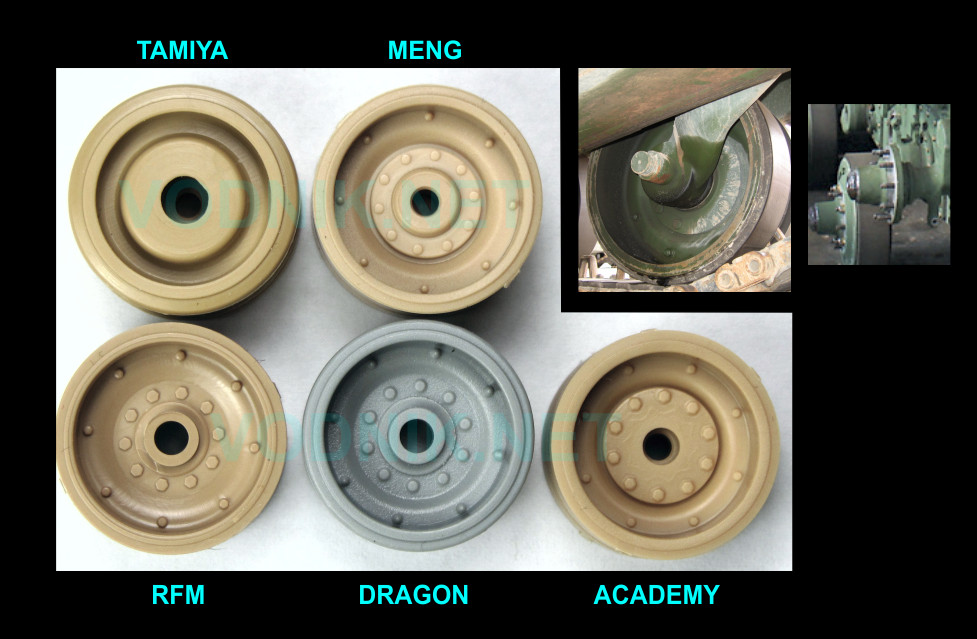
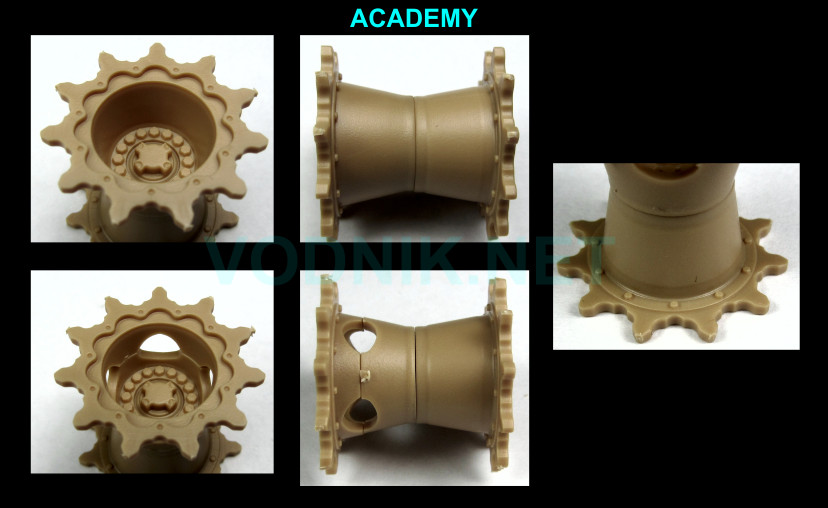
In the image below you can see the back side of the wheels - where they attach to swing arms. Tamiya wheel has no details whatsoever and a large "cylinder" housing a poly cap. Other wheels have correct bolt details, but only Meng and Academy wheels have correct raised circular plate represented, used to actually attach the wheel to the swing arm in the real tank (see photos in the upper right corner). Dragon and RFM kits lack this details - this is just the first of MANY similarities you will see between Dragon and RFM kit parts...
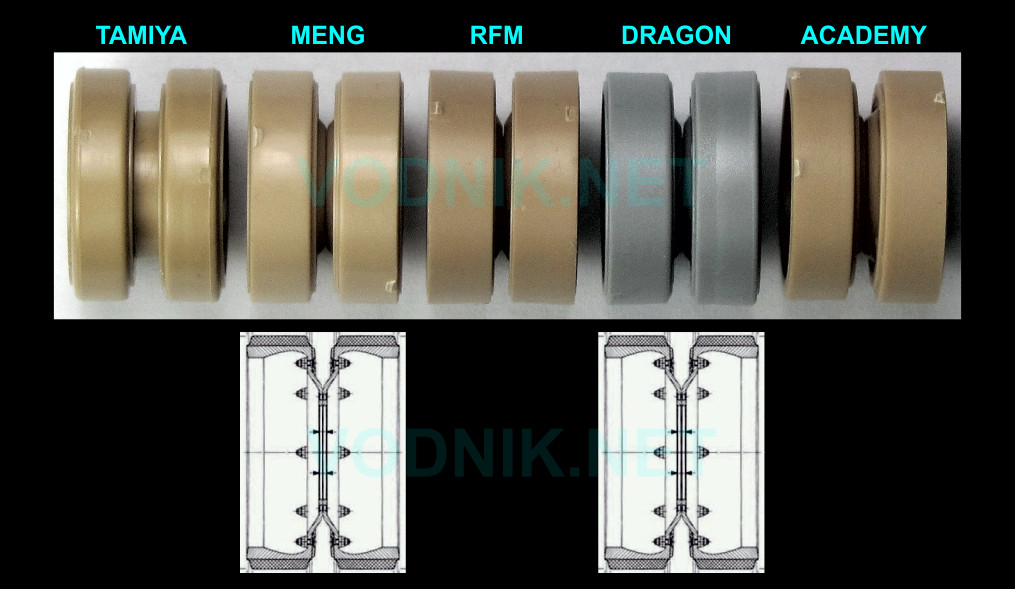
Next image shows the side profile of the wheel. Tamiya
parts look really bad. While the difference in tire width can be contributed to
the fact that these wheels were meant to represent the early M1 type, which was
half inch narrower in reality, the ugly cylinder in the center is caused by the
need to fit the poly cap inside. The Tamiya inner and outer road wheels are also
spaced too far apart. If you compare the distance between wheels in the
technical drawing (which also shows the undercut rim clearly!) and kit parts, it
seems that Meng and Dragon wheels are closest with Academy wheels a fraction of
millimeter too far apart and RFM wheels a tiny bit too close. As long as guide
horns fit between the wheels, these differences don't really matter.
You can
also notice that none of the tires have really cylindrical walls - it is a
molding limitation. They have to be slightly conical to avoid getting stuck
inside the mold. The conical tire shape is most visible in RFM and Dragon
wheels.
Next picture shows the back side of the wheel - the side
that faces the other wheel in a pair. In a real tank there is a replaceable wear
plate bolted there. In photos of real wheels below you can see that there were
two types of wear plates used - simple flat rings and "fancy" plates with curved
cutouts. I believe this weight saving measure first appeared about the same time
as T158LL tracks. The very rusty early style wear plate was photographed by me
in 2005 on a USMC tank, but at that time "fancy" plates were already common.
Today the "fancy" plates are most common - I'm not sure if there are any old
style plates still in circulation.
As you can see only Meng and Academy kit
wheels have the latest wear plate type details molded on. RFM and Dragon kit parts are supposed to
represent the earlier simpler wear plates and have very similar shape (including
the way the wheels are connected together), but RFM has holes that are meant to
represent flush bolt heads, while Dragon kit part has no bolt detail at all (as
you can see in a rusty wheel photo, the flush bolt heads are practically
invisible). It does have a few ejector pin marks though... I will not even
bother to describe the Tamiya wheel...
The fact is that the wheels in Abrams
tank are so close to each other means that it is quite difficult to see what type of
wear plate is used. In my opinion this detail only really matters for spare
wheels, which are often carried on the bustle rack or turret side rails with the
back side clearly visible.
SPROCKET WHEELS
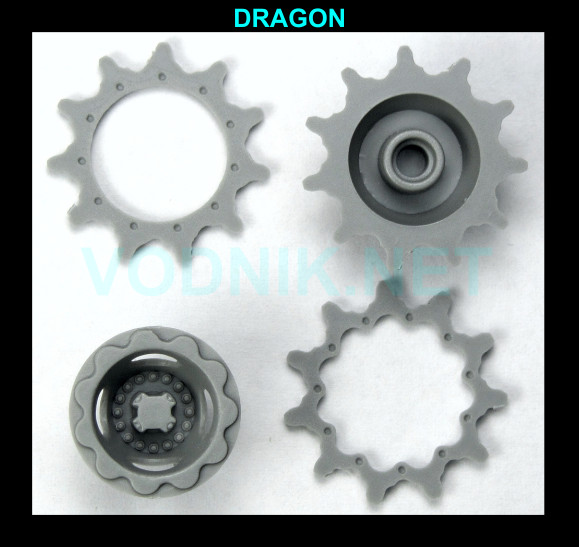
Dragon M1 Panther II kit was the first M1 model to have the mud release holes molded on sprockets, although they were slightly too big. This feature was then included in Dragon M1A1 AIM kit, but it was slightly improved with hole size reduced. But adding this details requires certain compromise - while inside the wheel we get quite nice holes, on the outside there is a mess caused by the molding limitations. These could have been eliminated if slide molding was used, but none of M1 kit manufacturers used slide molding for these details.
Dragon kit includes two styles of sprocket wheels - the older one with simple circular hole and the newer "fancy" one. Once again this is a weight saving measure that started to appear on M1 tanks in late 1990s. Dragon designer decided to use interesting way to attach the sprocket ring to the hub. There is a shallow raised shape of the opening in the "fancy" sprocket molded on the hub surface. When "fancy" sprocket is installed, this raised shape fits inside the sprocket opening. When simple sprocket is attached, the raised shape fits inside the recess molded on the rear side of the sprocket. I'm not sure why Dragon made it this way, but it works quite well.
The inboard side of the sprocket is devoid of any details, but it doesn't matter as it cannot be seen on the model. The back sides of sprocket rings have correct bolt details.
There is one noticeable inaccuracy in the Dragon sprockets - Dragon molded tiny bolt end cylinders and hex nut details around the hub cap. But in reality these should be flat hex bolt heads. Also the details around the hub cap base are not well represented and the cap itself is a bit too tall. All other kits, including the old Tamiya one, have better details around the hub cap.
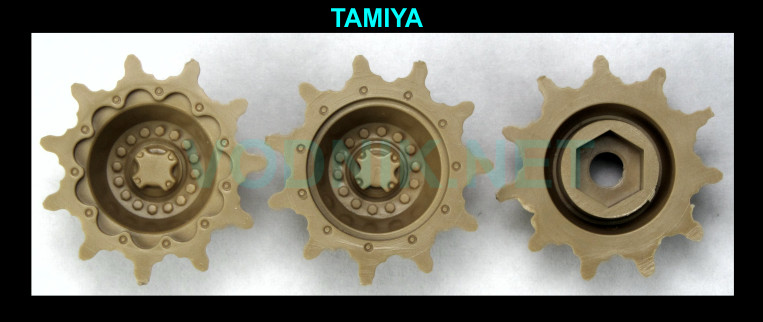
Taimiya sprockets do not have mud relief holes . Separate sprocket halves are included for simple and "fancy" sprockets. No bolt detail is present on the back side of sprocket rings, but at least the bolts around the hub cap have correct flat heads.
Academy kit only includes the newer "fancy" type sprockets, but they also include two options: outer wheel half molded in one piece, but without the mud relief holes; or molded in two parts, but with holes represented (parts split across the hole centers). The fit of these parts is very good, but eliminating the seam visible inside the wheel hub can be difficult. On the outer side it is easier, but this side is practically not visible with side skirts on the tank. Bolt details are correct inside the hub and on the back sides of sprockets.
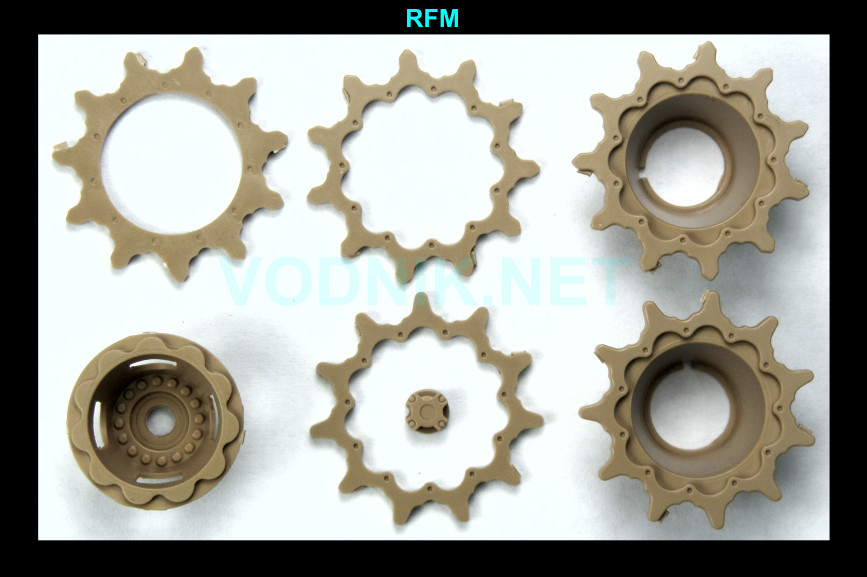
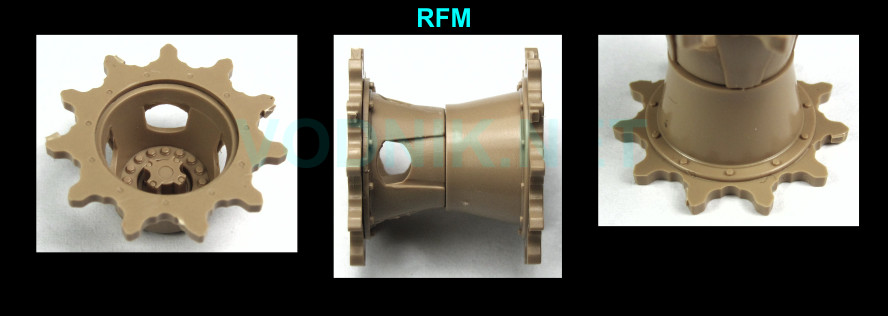
RFM surprisingly (or not...) used the
same design of sprocket-hub interface as Dragon. But they corrected Dragon
mistake and their bolts have correct flat heads. RFM kit is the only one to
include the separate hub caps. This feature can be useful just for one thing -
to replace the cap with a simple circular one used on early XM1/M1 tanks! Does it
mean that RFM plan such kit? Who knows... It is a pity that the hub cap has an
ejector pin mark in the center, that has to be eliminated.
RFM kit includes
three types of sprocket rings: the early simple type, the later "fancy" type and
the latest type with simplified teeth shape. It is very nice addition, as it is
very common type in use today and no other kit includes it.
While RFM decided to mold the mud release holes the same way Dragon did, the quality of the work is not as good at all... Unfortunately the insides of hubs look quite ugly - as can be seen in the photo below - and it isn't going to be easy to correct it.
Another problem with RFM wheels is incorrect placement of bolts on plain older style wheels. In this style of wheel, they should be aligned with sprocket teeth, not placed between teeth. (Thanks Liang Sun for pointing out this error in RFM part!)
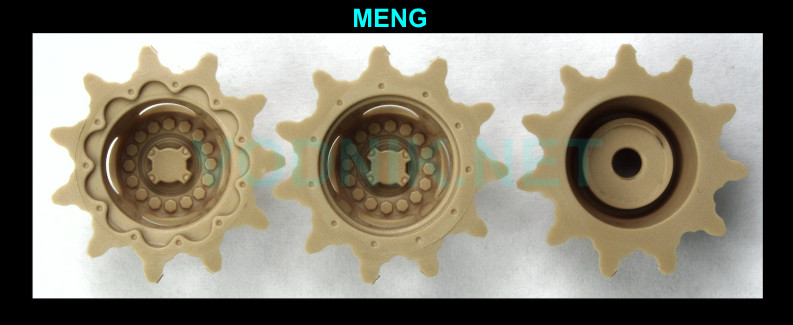
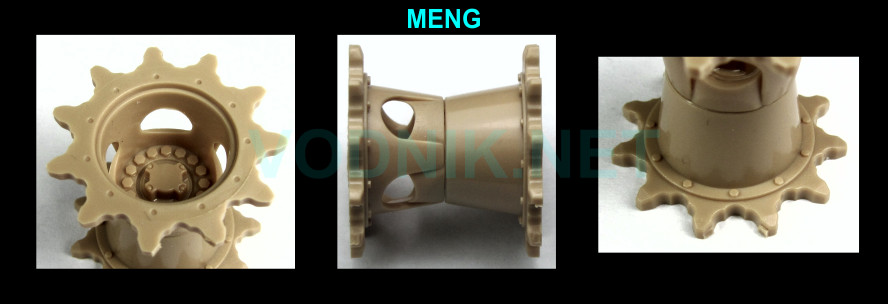
Meng decided to use a simple approach, the same as
Tamiya, with complete outer halves of sprockets molded as single parts in two
versions with simple and "fancy" rings molded integrally. Unlike Tamiya
though, Meng added mud relief
holes and they are done the same way as in the Dragon kit with similar - quite
clean - result on the inside of the hub.
All the correct bolt details are represented.
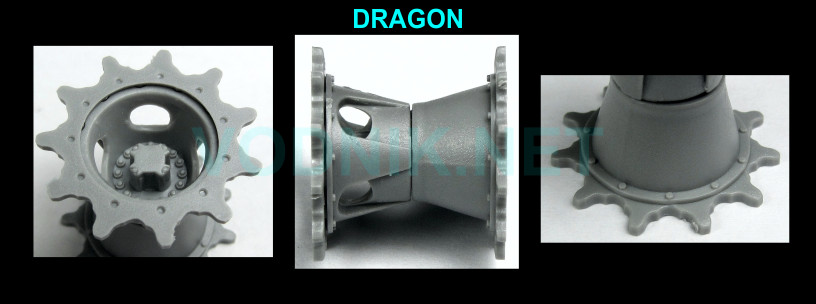
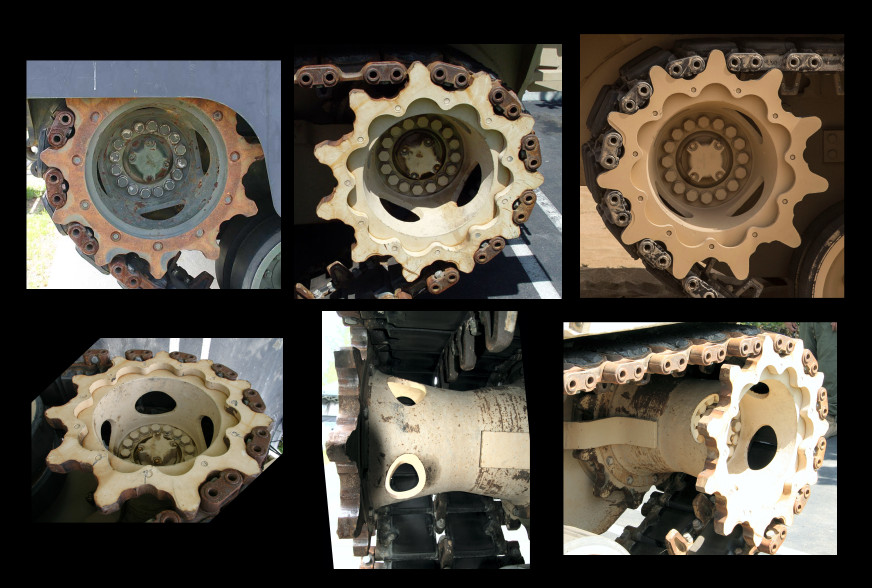
Below you can see a few photos of the real tank
sprockets. All three types of sprocket rings are shown. Yoou can see the
difference in placement of bolts between older plain and newer "fancy" wheels.
Looking at these
photos and comparing them to model kits parts I think that Meng made a small
mistake and molded bolts around the hub cap a bit too big and put them on a ring
of too large diameter. It could be contributed to the perspective error in the
photos, but if you look at the side profile of the Meng sprocket you can also
see that its "waist" is not as thin as in the real wheel and other kit wheels -
what is obviously caused by the too large diameter of the bolt ring inside...
Very small error, but it is there.
All in all, all wheels are perfectly useable, although for best results those without the mud release holes should have them added.
GO TO NEXT PAGE
PAGE 1
PAGE 3
PAGE 4
PAGE 5
PAGE 6 PAGE 7
![]()
![]()
![]()
Copyright © 2016 VODNIK, email: pawel.k at vodnik dot net