|
|
|
|
Comparison
of M1A1/M1A2 Abrams kits.
Tamiya
M1A2
Italeri M1A2
Dragon / Revell M1A1
Trumpeter M1A1
Academy M1A1
1:35 scale
Note: This article was written many years ago. After I had published it, I was invited by Dragon to help them in creating the M1A1AIM kit. That kit and the M1A2SEP released afterwards were designed under my supervision, and are far superior to any of the kits described in this article.
PART 1
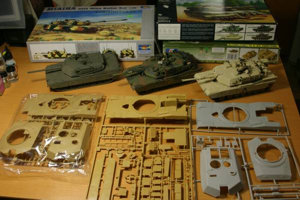
I decided to write an article, which would compare most of Abrams tank model kits available in 1/35 scale. I used kits that I already had in my collection. I wanted to compare models of the same version of tank, but Italeri didn't release their M1A1 model yet at the time of writing, so I used their M1A2 kit. Tamiya latest M1A2 kit contains all the parts necessary to build M1A1 variant (including appropriate decals for both USMC and Army version), so I was able to use M1A1 specific parts to compare them with parts from Academy, Dragon and Trumpeter kits, and M1A2 specific parts to compare them with Italeri kit parts. Most parts are common for M1A1 and M1A2 variants however, so in most cases I compared parts from all five kits. I used following kits:
- Academy M1A1
Abrams (#1345)
- Revell (Germany) M1A1 Abrams (#3004, re-boxed Dragon M1A1 Abrams
with TWMP)
- Trumpeter M1A1 Abrams (#35336, also available in Hobby Craft box)
- Tamiya M1A2 Abrams (#35269)
- Italeri M1A2 Abrams (#6390, also available in Revell Germany box).
All kits except Academy one were new, still in their boxes. Only Academy model was built long time ago and I modified it quite extensively, so in most cases I was not able to take pictures of original parts for the article. In a few cases I used photos of old Tamiya M1 Abrams kit parts, instead of Academy kit parts, as they were the same (Academy kit was based on early Tamiya M1 kit and most parts were copied from this kit. Only some were modified to make the tank look like M1A1 variant).
Academy model is also the only model of original early M1A1 tank in the comparison set. All other kits portray later M1A1 HC (Heavy Common, known also as HA - Heavy Armor in modeling world) or M1A2 tanks. This means that some parts in this kit will differ from parts in other kits simply because it is different variant of tank. Tamiya M1A2 kit however also includes most of parts for older M1A1 variant - they are not meant to be used in any of options, which can be built from the kit (M1A2, USMC M1A1HC or US Army M1A1HC), but are on the sprues, as those came from Tamiya older M1A1 kits, which were also replicas of early M1A1's. In a few places in the article I also mentioned how those older Tamiya M1A1 kits looked like, although I don't recommend buying older Tamiya M1A1 kits now, when much better M1A1 can be built from their M1A2 kit. Even if you want to build early M1A1 tank and want to use Tamiya kit, buy new M1A2 and Armour Track individual link T-156 tracks. All other parts to build early M1A1 tank are still present in the box of new M1A2 kit. Minor modification to upper turret is required to backdate the M1A2 kit part to early M1A1 configuration, but it is not particularly difficult (turret mounted APU cable guards behind loader's hatch have to be removed).
Only one of the kits I have (Tamiya) contains parts to build US Marine Corps variant of Abrams tank. Both Dragon and Trumpeter sell kits of Marine variant, but in the kits I had those parts were not included. This meant that I only compared US Army tank models.
I will start my comparison from the ground and will move up. This means that tracks are first...
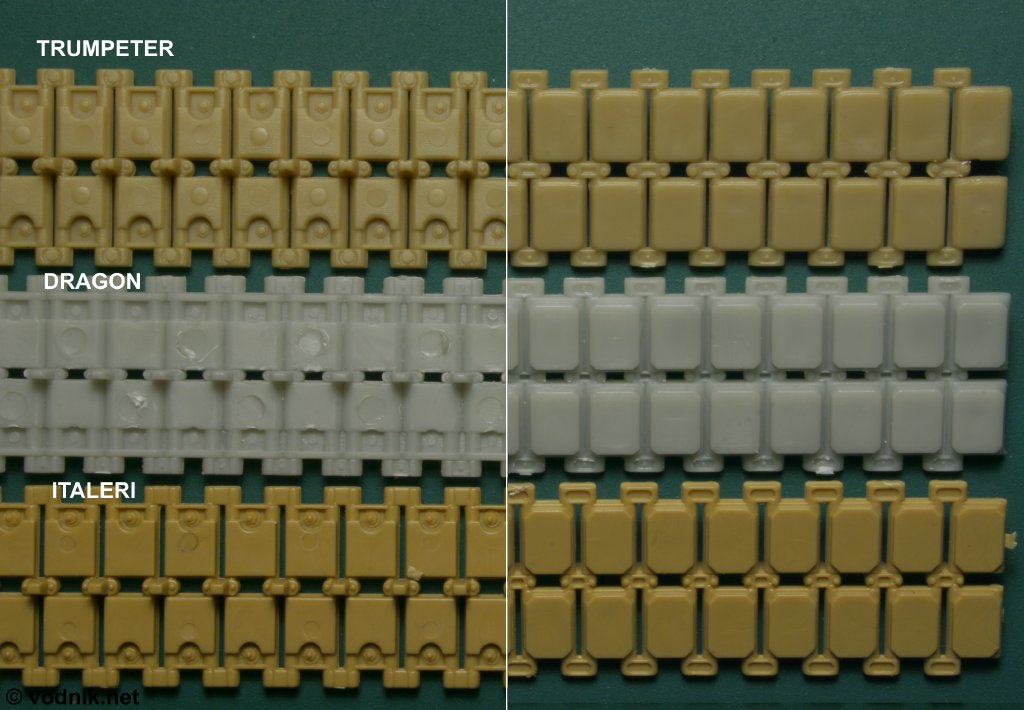
TRACKS
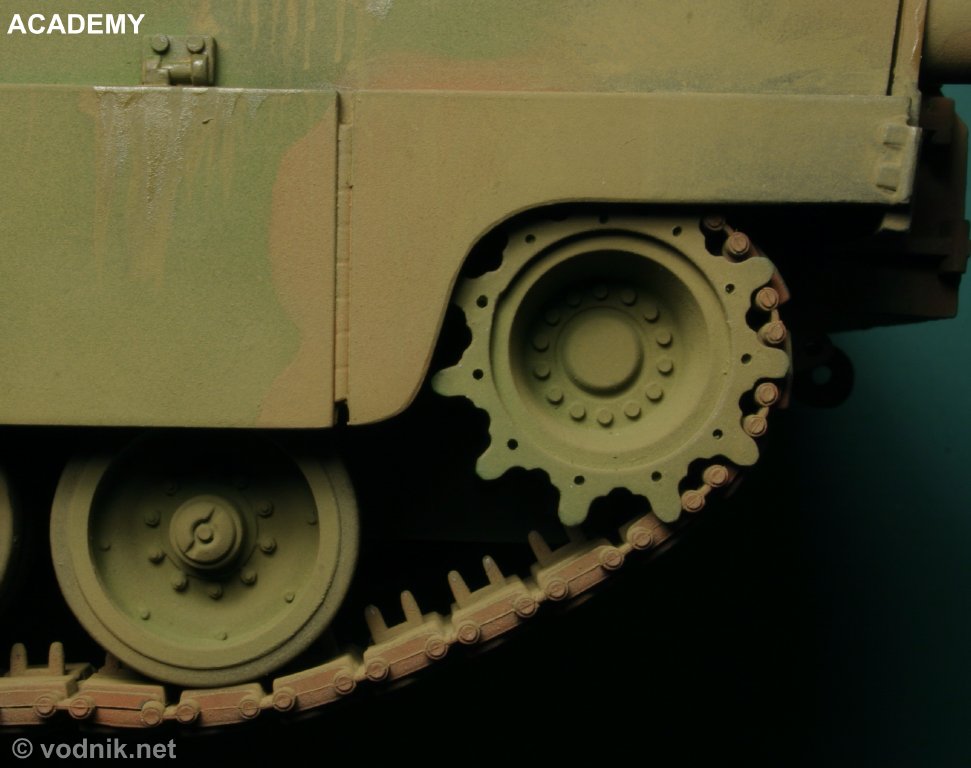
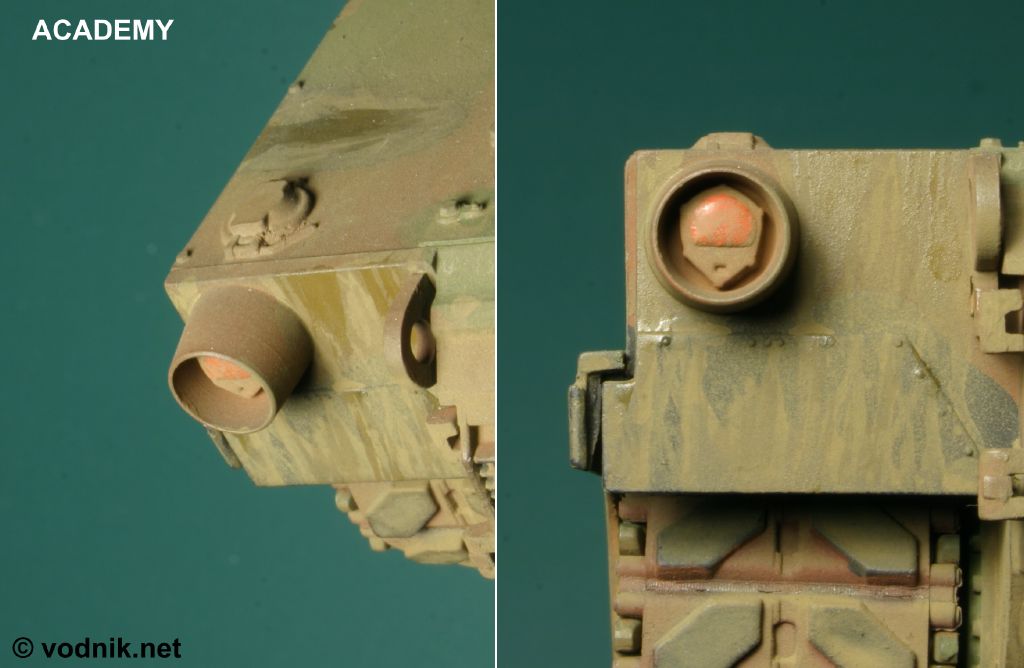
Trumpeter Abrams is the only kit in the set to come with two types of tracks in the box: one piece vinyl tracks and plastic link and length ones. Tamiya and Academy kits come only with glueable vinyl tracks and all other kits come with link and length plastic tracks. Academy model is the only one, which came with older T-156 tracks, as used on early M1A1 tanks. Those tracks are copies of tracks from old Tamiya M1A1 kits and have all the same accuracy problem as old Tamiya tracks: guide horns in the middle of each link, instead on link connectors between links. All other models in the set (including Tamiya M1A2) are equipped with newer T-158 style tracks.
|
|
 |
| Trumpeter and
Tamiya vinyl tracks. Tamiya tracks are better detailed and are more
flexible. Trumpeter tracks have some strange bumps on inner side of each
link - they are hard to remove from vinyl tracks. Click on the picture to enlarge it. |
Trumpeter, Dragon
and Italeri plastic
tracks. Trumpeter tracks again have those bumps on each link - it is easier
to remove them from plastic, but it is a lot of work. Italeri tracks seem to
be the best of those three, but in my opinion Tamiya vinyl tracks look much
better then any of those plastic tracks. Click on the picture to enlarge it. |
 |
|
| This
photo shows built Academy M1A1 model - tracks are of older T-156 type, but those dual guide horns should be between links, not on the middle of link. Those are old generation poorly detailed vinyl tracks, copied from old Tamiya M1 kit. Note the circular shape of center hub in the sprocket wheel - more about it later in the text. Click on the picture to enlarge it. |
|
WHEELS
All wheels in Tamiya, Academy and Trumpeter kits are held in place by small vinyl caps. In Tamiya and Academy kits those caps are hidden inside the wheel, while in Trumpeter kit they are installed from the outside of the wheel and feature wheel hub details on one side. This ruins the appearance of wheels in Chinese kit - there are visible gaps around those vinyl caps, and there may be a problem with paint adhesion to vinyl surface. Dragon and Italeri wheels are just glued in place.
 |
| Vinyl center hub
in Trumpeter wheel ruins its appearance. If you look at previous photo, you may notice that road wheel on Academy model is identical to that from Tamiya kit on the photo above. I leave it to you to decide which wheel looks best, but I prefer Tamiya/Academy wheels. Click on the picture to enlarge it. |
In Dragon, Italeri and Trumpeter kits return rollers are attached directly to the side of the lower hull part. Only in Tamiya kit there are separate mounting plates parts for return rollers. The problem is that in reality there are no mounting plates there and Italeri way of attaching return rollers is the most accurate - with short tubes molded on sides of lower hull (see this photo). Also only Italeri molded holes in return rollers, other manufacturers molded shallow depressions instead.
 |
| Return rollers
and mounting plate from Tamiya kit. Academy model has identical return rollers and mounting plates as Tamiya kit. |
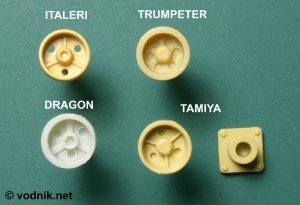
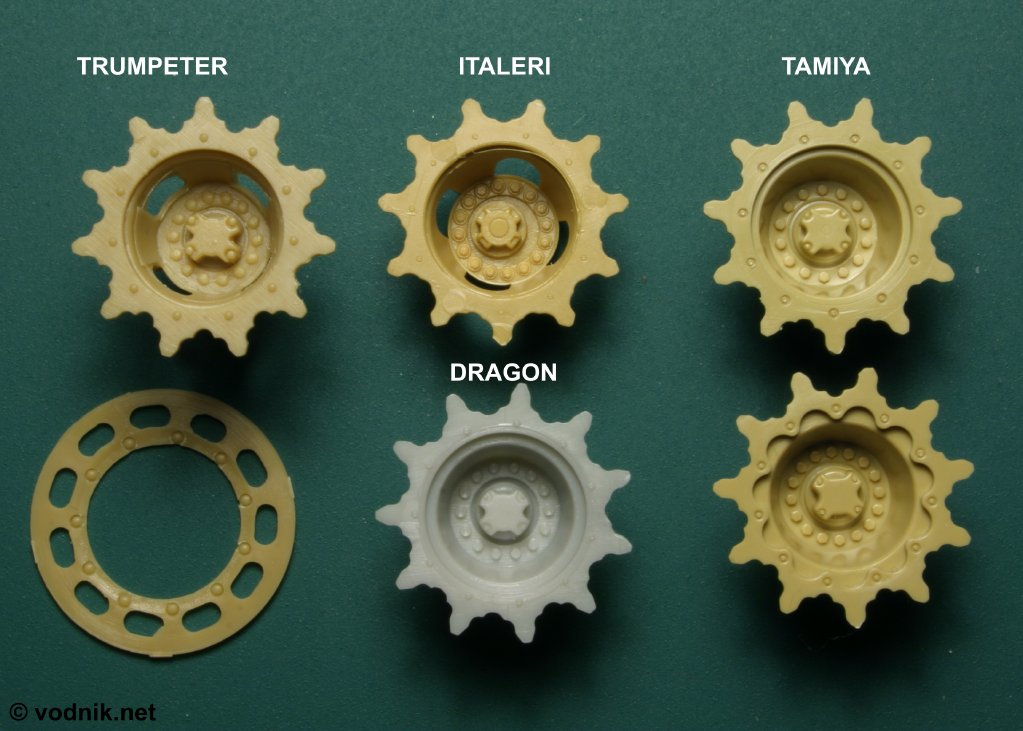
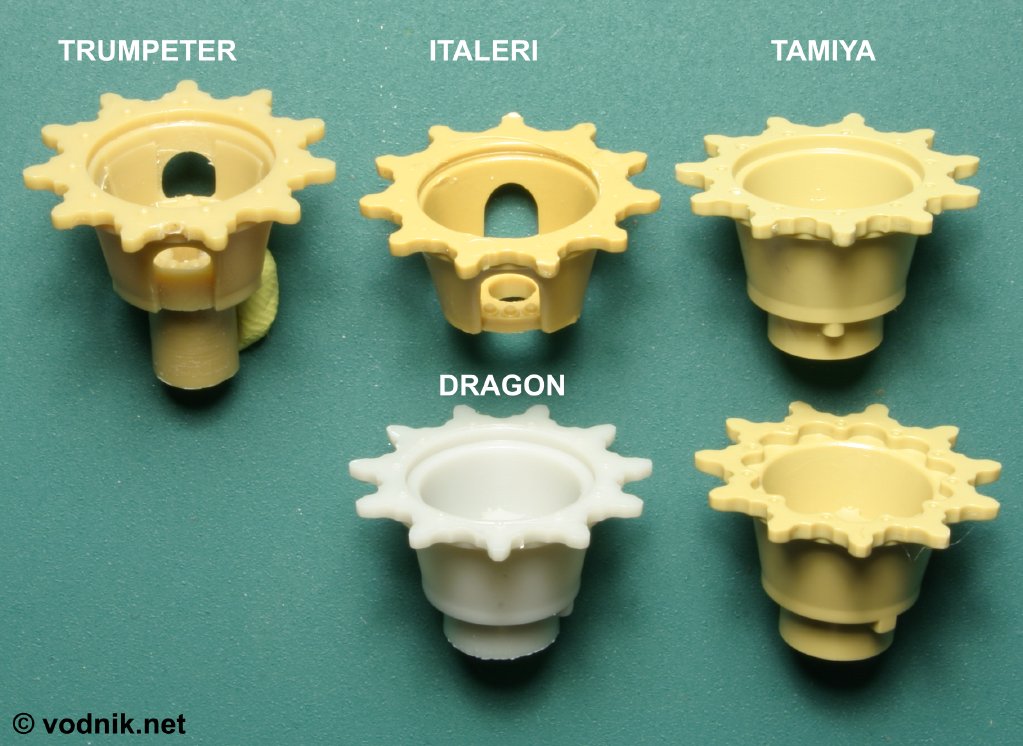
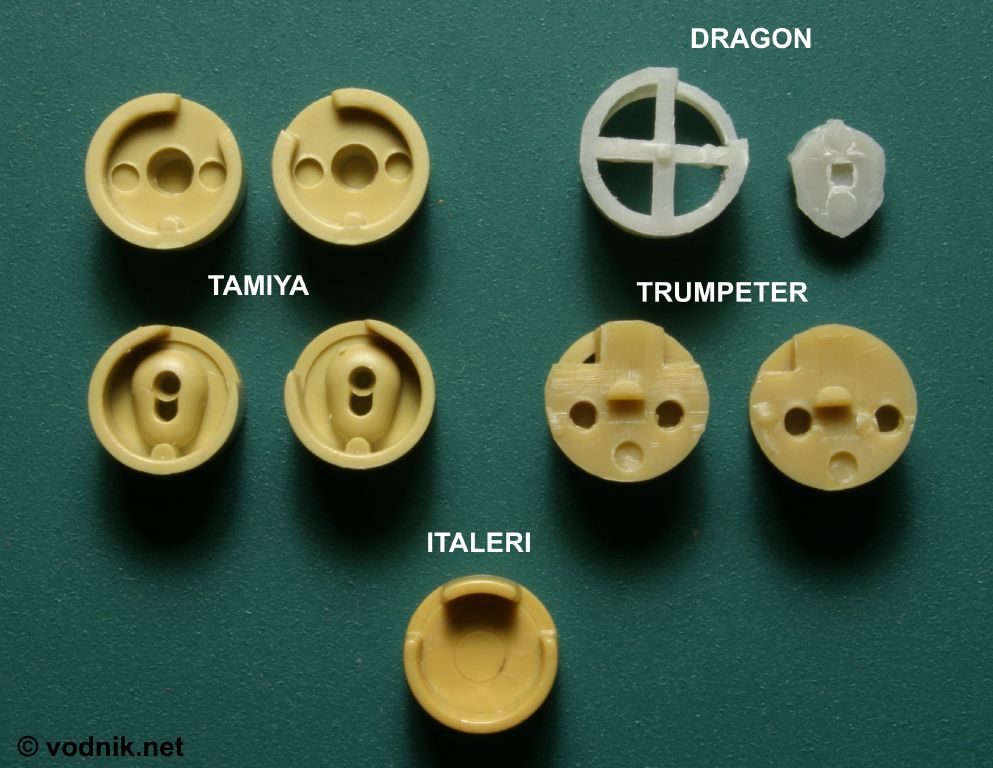
Trumpeter and Italeri made an attempt to mold four mud relief holes in their sprockets, but they are not the right shape - they should be oval, but in both wheels are semicircular. Academy, Tamiya and Dragon wheels do not have any holes in them, but it is actually easier to make correct shape holes using drill bit and round file in those wheels, than to correct shape of holes in Italeri and Trumpeter wheels. All sprockets, except for Academy, feature "X" shaped center hubs, as seen in all M1A1 and later tanks. In Italeri kit those center hubs are molded as separate parts. Academy wheel is the only one with circular center hub - this part is a copy of sprocket from old Tamiya M1 kit, and while it was correct for that old tank (although bolt head details were missing from this circular hub), it is wrong for M1A1. Tamiya M1A2 kit comes with two styles of drive sprockets - original design (the same as in Dragon, Italeri, Trumpeter and older Tamiya M1A1 kits) and modified design with lighter outer sprocket ring. Only Tamiya sprockets have bolt heads on the outer ring correctly molded as flush with its surface. Trumpeter kit includes a track retainer ring - it was used on original M1 and early M1A1 tanks, but later US Army stopped using them. USMC tanks however still have those rings attached.
 |
 |
| Sprocket wheels
and a retainer ring (from Trumpeter). On the right are two types of sprockets included in Tamiya M1A2 kit - only the upper one was included in their earlier M1A1 kits. Click on the picture to enlarge it. |
Here you can see
the shape of mud relief holes in Trumpeter and Italeri sprockets. You may
also notice that in Italeri wheel, the center hub is a separate part. Click on the picture to enlarge it. |
LOWER HULL
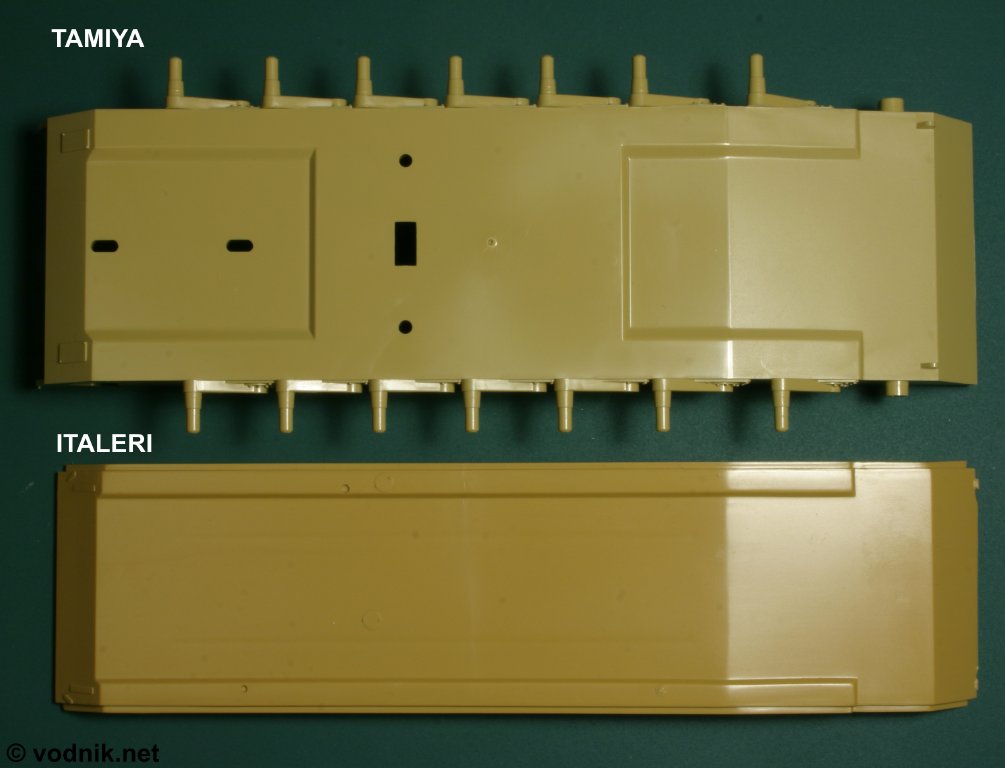
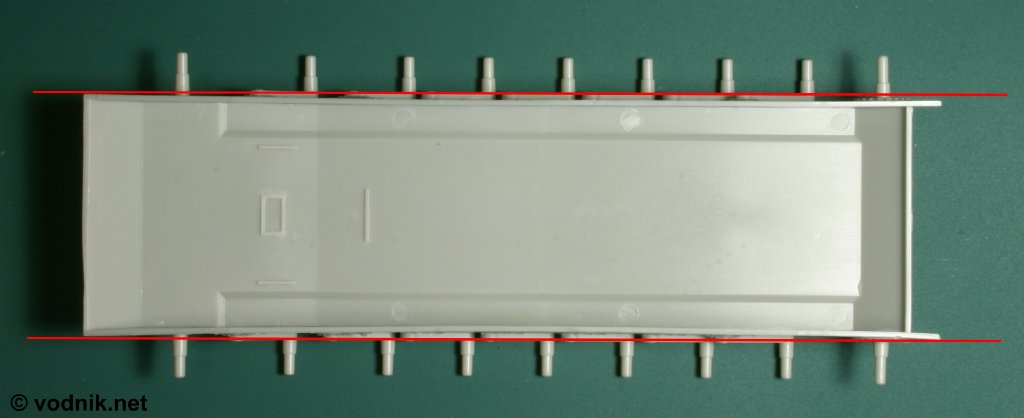
Italeri kit is the only on with the lower hull molded in three parts - with separate "floor" and side walls. This complicates the assembly, but allow Italeri to use cheaper two part molds. All other manufacturers had to use multi part molds to mold details on sides on one-part lower hull. Trumpeter kit comes with one piece lower hull, but is the only one in the set with separately molded suspension arms - this allows for articulation of suspension (you just need to remove locating pins that hold arms in their neutral position). All other kits have suspension arms molded with the lower hull part. There are quite significant differences in representation of suspension arms and their mounting plates in all kits. Only Tamiya and Academy parts are almost identical, but again this is because Academy part is a copy of Tamiya one. I think Italeri and Trumpeter version are the most accurate, but I'm not quite sure. Good thing is that this all will be almost invisible one you attach side skirts to your model. Academy, Tamiya and Trumpeter kits have motorization holes in lower hull parts, but Trumpeter provides plastic plugs to cover those holes, while in other two kits you have to take care of making them yourself. The shape of the bottom of Tamiya and Academy hull parts is inaccurately flattened to make more room inside for motorization parts.
In my Revell model parts of lower and upper hull are badly warped. It will be difficult to fix them, but I hope with the help of hairdryer I manage to do it. I don't know if similar problems are common to original Dragon kits now, but this is something that you should pay attention to when buying original or reboxed Dragon Abrams. I must admit however that original Dragon M1A1 kit I built a few years ago didn't have this problem.
I know that many people consider using lower hull and suspension parts from Trumpeter kit to articulate suspension in other Abrams kits. Word of caution here: the width of lower hull parts is not identical in various kits. The Trumpeter part is probably the narrowest of all, but assembled Italeri lower hull should be similar in size. Tamiya (and Academy) part is slightly wider, but it should still be possible to fit Trumpeter part to upper Tamiya hull if someone really wants to do it. The biggest problem however is with Dragon kit - upper hull parts have similar outer dimensions, but lower hull in Dragon kit and corresponding parts of upper hull are some 3 mm wider. So using Trumpeter lower hull with Dragon upper hull is impossible without some serious plastic surgery.
 |
 |
| Tamiya complete
lower hull and bottom part of Italeri multi-part hull. There are many motorization holes in Tamiya part and the shape is incorrect in the center. Note the shape of two small plates molded on the rear plate of the lower hull - in Tamiya kit they are simple rectangles, but it was only correct for early M1 tanks. Click on the picture to enlarge it. |
Dragon and
Trumpeter parts are quite similar. Trumpeter part has motorization holes in
it, but there are plugs to cover them included in the kit. Dragon molded
strange groove on the front plate (white arrow) - it should not be there and
should be filled. You may also notice that Dragon hull is wider. Click on the picture to enlarge it. |
 |
 |
| The bottom of
Academy kit hull. Note that the shape is almost identical to this of Tamiya
kit. Also note the old style T-156 tracks. The same pattern vinyl tracks
were included in older M1 and M1A1 Tamiya kits. Click on the picture to enlarge it. |
Side view of
lower hull parts. In case of Italeri kit it is a separate part. As you can see
suspension arms are molded separately in Trumpeter kit. Final drive housing
covers are separate parts in Trumpeter and Tamiya kits. Note that towing
eyes are molded solid in Tamiya kit (and also in almost identical Academy part). Click on the picture to enlarge it. |
 |
 |
| Close-up
comparison of suspension details. Click on the picture to enlarge it. |
Idler wheel axle.
Italeri kit with track adjuster is way ahead of the rest in terms of
accuracy. Click on the picture to enlarge it. |
 |
|
| Warped lower hull
part in Dragon (Revell) kit. Click on the picture to enlarge it. |
|
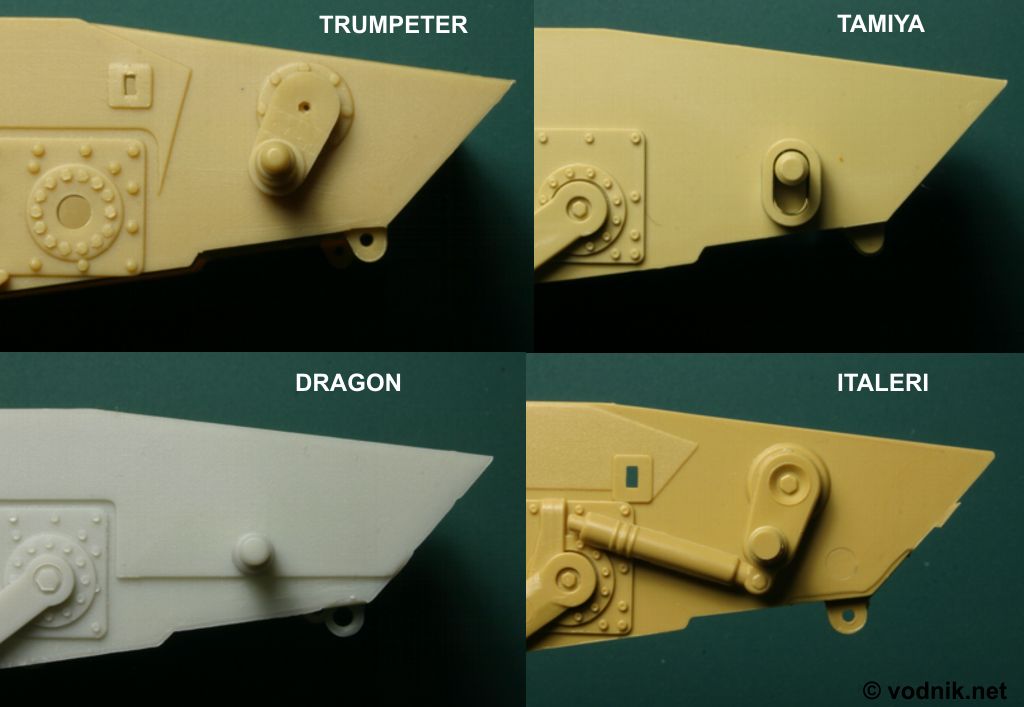
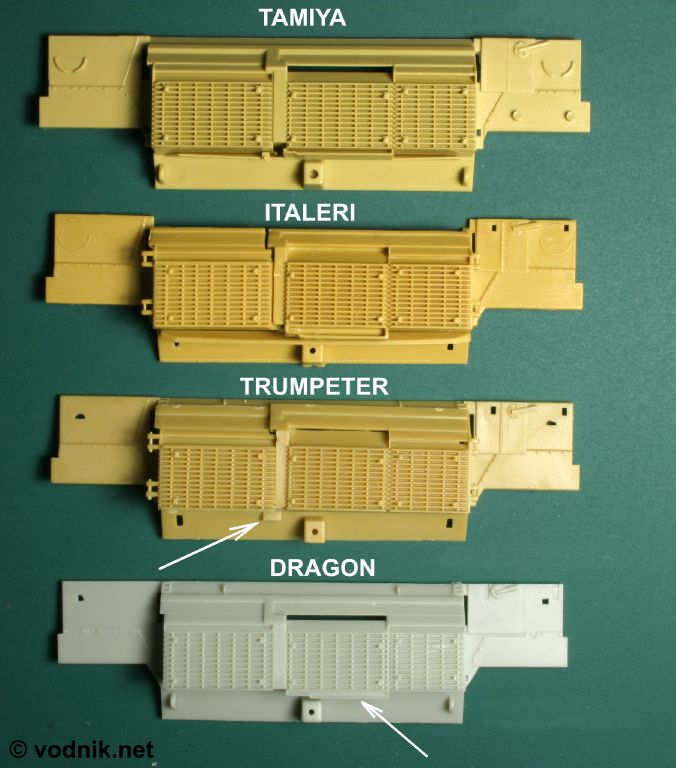
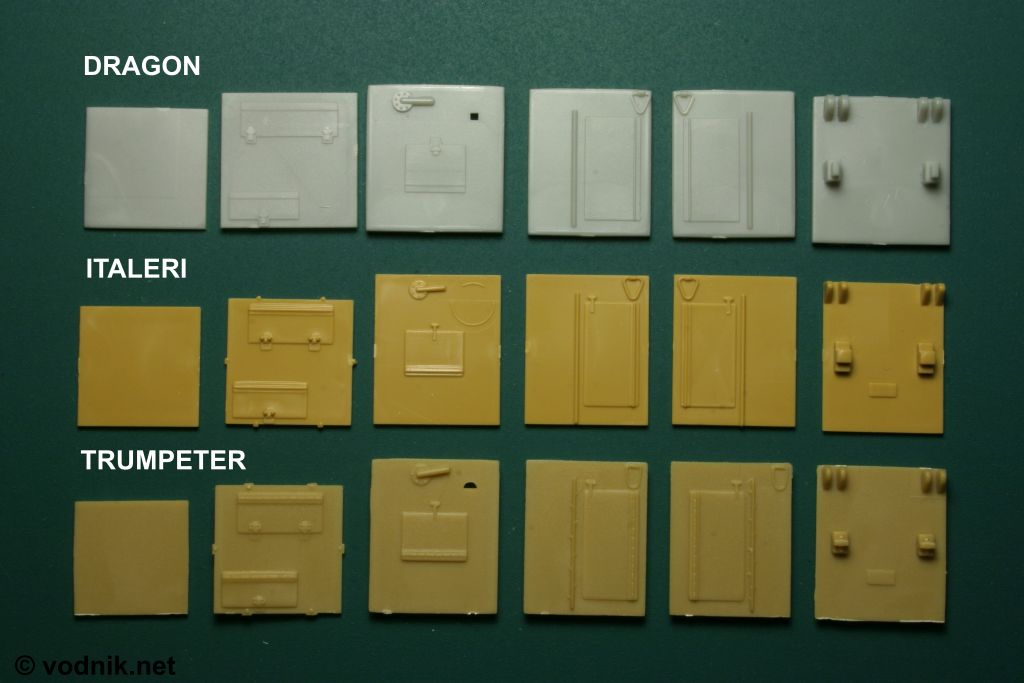
REAR PLATE with engine exhaust grilles
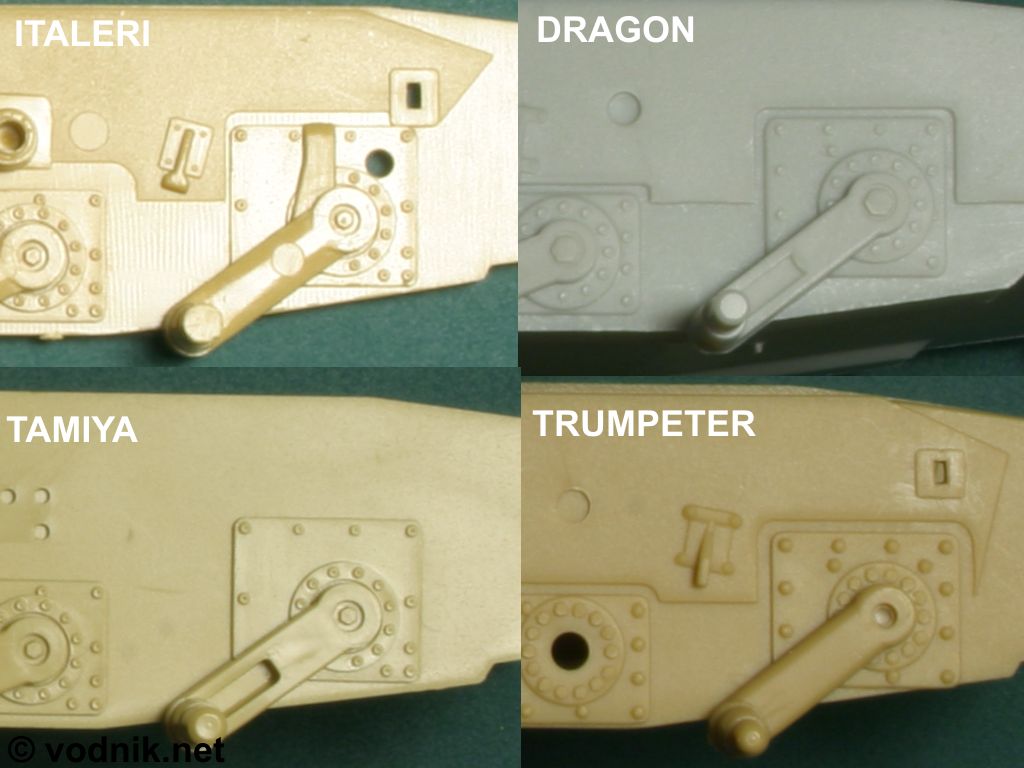
Italeri and Trumpeter kits come with separate, two-part rear engine exhaust grille doors, what makes it easy to display them open if you plan to use aftermarket engine set. Italeri kit is more accurate here as the upper part of the rear plate in Trumpeter kit, visible on the photo below, should actually be a part of upper main engine access plate, as correctly molded in Italeri kit. Engine access doors in Italeri kit are also more accurately separated from the hull, as the side and bottom "walls" of the opening are molded with doors, not with the hull as in Trumpeter kit. There are two round pins molded on the right mud flap on Tamiya rear hull part - they were used in their older M1A1 kit to attach external APU, but are marked to be removed in M1A2 kit instructions. Older Tamiya M1, M1A1 and Academy M1A1 kits had rear plate part similar to Tamiya M1A2 model, but with tail lights clusters and their guards molded on. I was told that the rear hull part in old Tamiya M1A1 kits had also two small slots open near the right tail light, where the APU was supposed to be attached, which had to be filled if you were not installing the APU. Those slots are no longer there in M1A2 kit.
 |
 |
| Rear plates of
four kits. Academy kit part is similar to Tamiya part, but has the tail lights clusters and their guards molded on. Towing eyes are molded on Tamiya and Dragon parts and are solid. Click on the picture to enlarge it. |
Tamiya and
Italeri kits include additional parts to be attached to the rear hull, under
the engine exhaust. Other kits
do not have this detail. Click on the picture to enlarge it. |
 |
| Various ways of
detailing the bottom of engine exhausts. Dragon kit has the "lip" molded
under the exhaust. Trumpeter kit lacks this "lip", but has the left engine
door lock added. Italeri kit has the "lip" and also has the wide flat part
added under exhaust, but lacks door locks. In Tamiya kit the lip under
exhaust and one door lock (again only the left one) are molded with the
additional wide plate part, shown on previous photo. This part was not
present in older M1A1 Tamiya kits, so they lacked door locks and the "lip".
Academy kit does not have any of mentioned details. Click on the picture to enlarge it. |
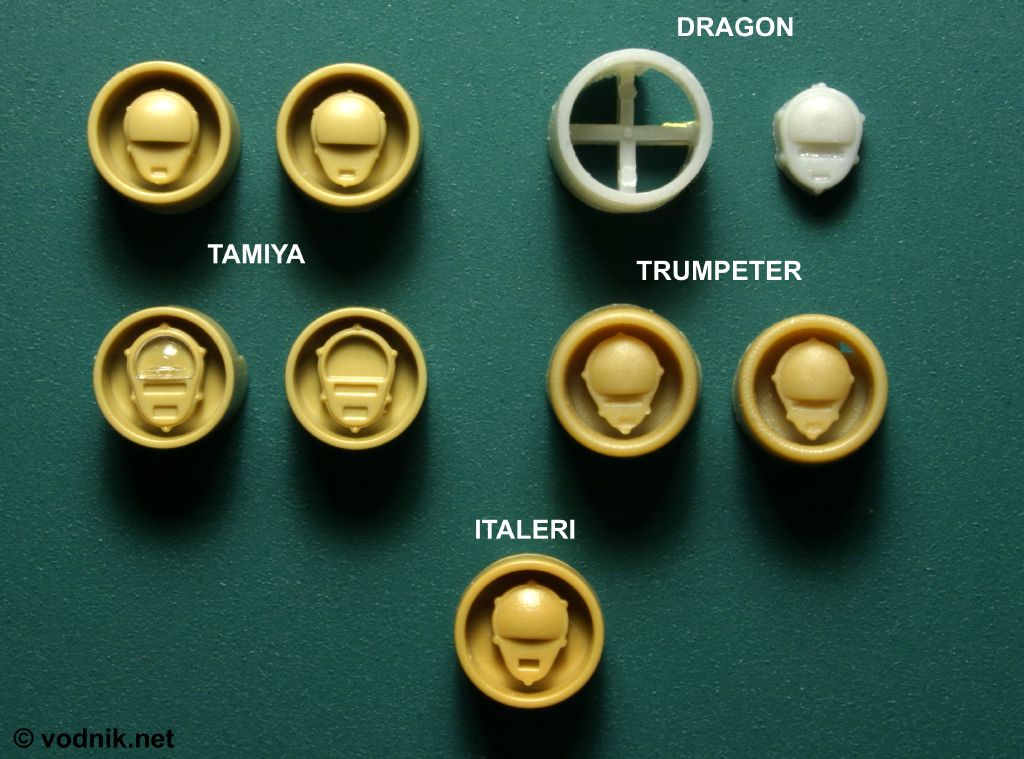
Dragon kit is the only one in the set with tail lamps and their guards molded
separately. Italeri and Trumpeter kits have those parts molded together. In
Tamiya kit for some reason we get two sets of tail lamps on sprues: one set is
similar to those from Italeri and Trumpeter (this set is marked as not used in
instructions) and the other set is much nicer, with lenses molded separately as
clear parts. This second set of lamps from Tamiya kit is also the only one that
has reasonably detailed back side of lamps - this area is partially visible
through the cutouts in the lamp guards. This second set also has correct double
blackout lights in each tail light cluster - the other set has just one blackout
light. Italeri light clusters also have just one blackout light instead of two.
Tamiya and Dragon guards have just one cutout in each tail light guard, what is
correct for a vehicle not prepared for carrying APU on the back of the hull. If
tank is modified to carry APU, the second cutout is needed as the mounting eye
for APU box welded to the armor makes it impossible to install regular light
guard when the APU is not carried. Trumpeter kit comes correctly equipped for an
APU-ready vehicle - left light guard has one cutout, while the right one has two.
Cutouts in Trumpeter guards don't look as they should, as they are too small,
but at least their number is correct. Italeri made a small mistake, as they
molded both tail light identical and each has two cutouts in guards - the left
guard should have only one cutout.
Tamiya lights are the only ones in the set to have the back surface molded at an
angle to the front one. This means that after attaching them to the rear of the
hull the lights will remain horizontal, while in all other kits lights will
point slightly downwards, what is not correct.
 |
 |
| Tail lights. Two
sets of lights are given in Tamiya kit - note the clear plastic lens in the
second set. Click on the picture to enlarge it. |
Only the second
Tamiya set has some reasonable details on the back side. Click on the picture to enlarge it. |
 |
 |
| Various numbers
and sizes of cutouts in light guards. Click on the picture to enlarge it. |
Note that all
Tamiya lights have the back surface molded at an angle to the front one. Click on the picture to enlarge it. |
 |
|
| Tail
lights in Academy kit - molded on the rear plate of the hull. There are no
cutouts in guards. Tail lights in original Tamiya M1 and M1A1 kits were molded the same way. Click on the picture to enlarge it. |
|
Other parts to be attached to the rear hull plate include lifting eyes and engine access door hinges. Those parts are included in all kits. All kits also include towing hook, although the part in Dragon kit doesn't resemble towing hook at all... Trumpeter and Italeri kits also include separate towing eyes - in other kits towing eyes are molded on rear hull plate. Both Trumpeter and Italeri kits also have small eyes for mounting APU included - in case of Italeri M1A2 kit this is inaccurate, as this variant of tank was from the beginning equipped to carry APU in the turret bustle rack and didn't have provisions to install APU on the hull. Dragon kits also include two parts that are supposed to be APU mounting eyes, but they hardly resemble ones.
 |
| From the top:
APU mounting eyes, lifting eyes with upper engine door hinges, lower engine door hinges, towing eyes and towing hooks - yes, this grey part on the right was also meant to be towing hook... Parts in Academy kit look like those in Tamiya kit. Click on the picture to enlarge it. |
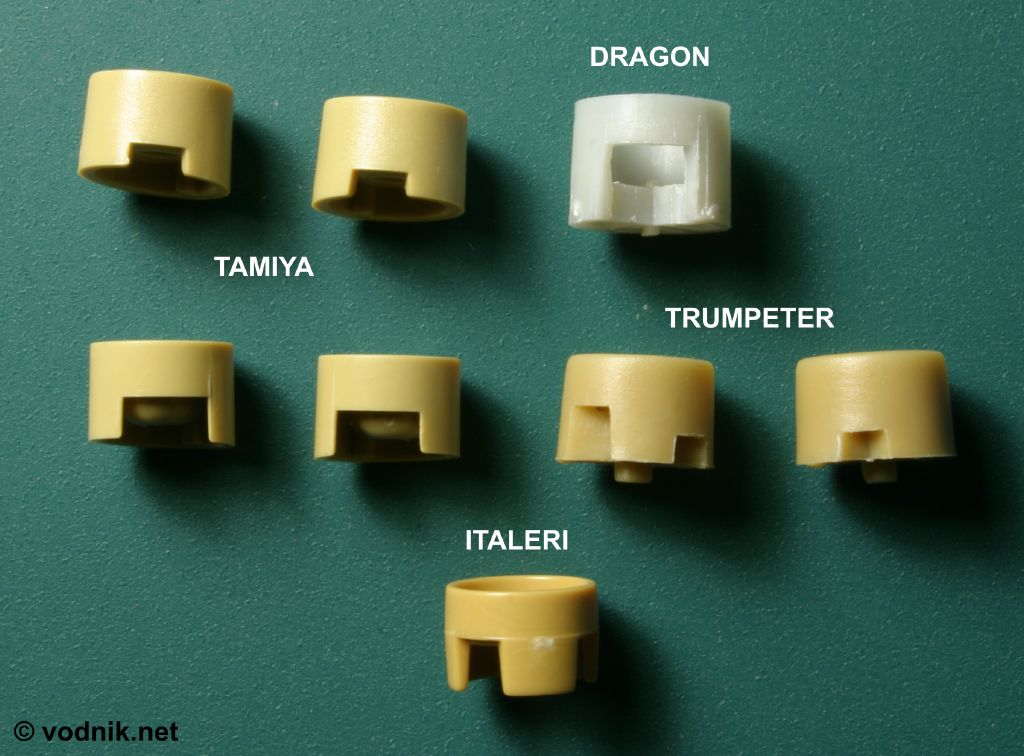
Three of the kits come with old style hull mounted APU boxes: Trumpeter, Italeri and Dragon. In Italeri kit this APU is not needed, as M1A2 tanks can't even use it. Older Tamiya M1A1 kits also included hull mounted APU - biggest difference between APU in Tamiya kits and those shown on the photo below was tail light molded on the back APU wall. Also as old Tamiya kits had tail lights molded on back hull armor, there was a hole in the APU part designed to hide this hull mounted light inside APU box.
 |
| Hull mounted
APUs from three kits. Trumpeter parts seem to be most accurate, with correctly placed lifting eyes (although they should be more triangular). Click on the picture to enlarge it. |
PART1 PART2 PART3 PART4 PART5 PART6
![]()
![]()
![]()
Copyright © 2004 VODNIK, mail to: pawel.k at vodnik dot net
