|
|
|
|
Comparison
of M1A1/M1A2 Abrams kits.
PART
2
UPPER HULL
 |
 |
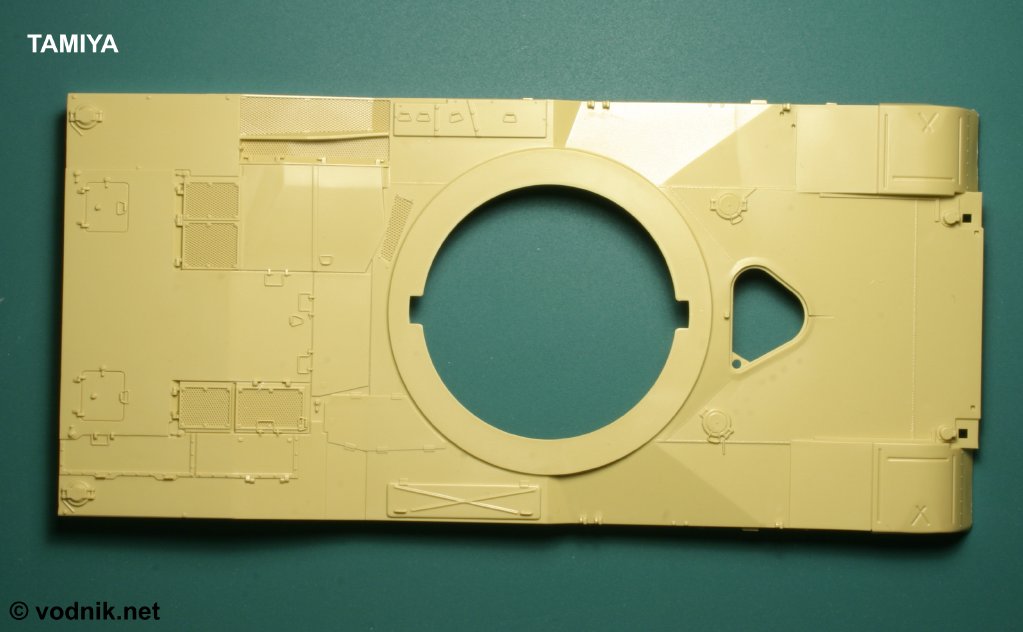
| Tamiya upper hull
part. The biggest problem here is the lack of non-slip surfaces, which are
quite prominent feature of the real tank. The engine deck is molded as one
part with the hull. Click on the picture to enlarge it. |
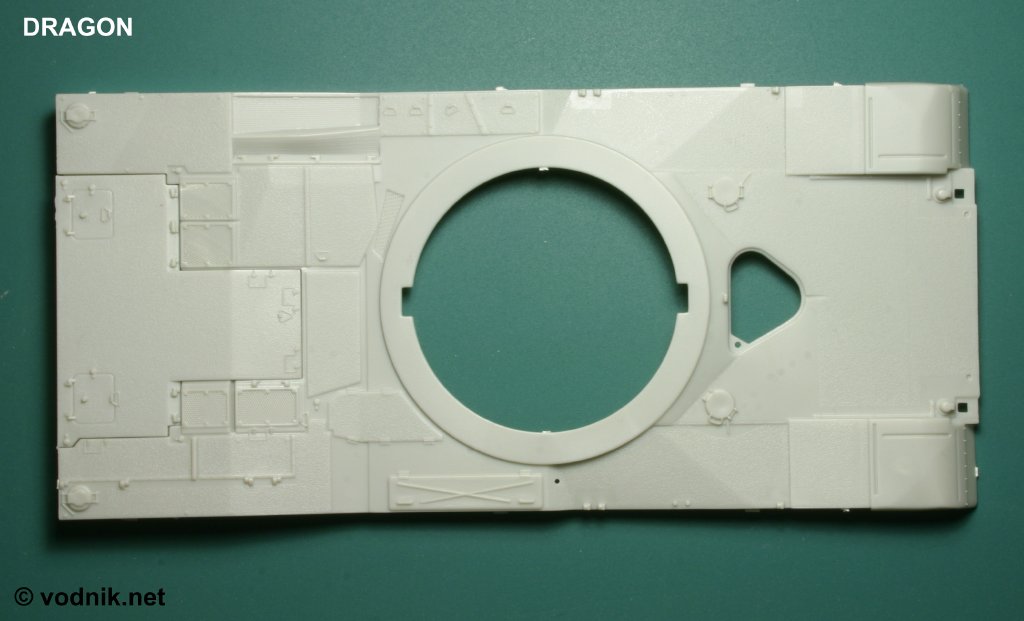
Dragon hull has
nice non-slip coating molded on. Engine access cover is separate part. The
hull
part is really badly warped in my Revell/Dragon kit and I predict it to be
very difficult to fix. Click on the picture to enlarge it. |
 |
 |
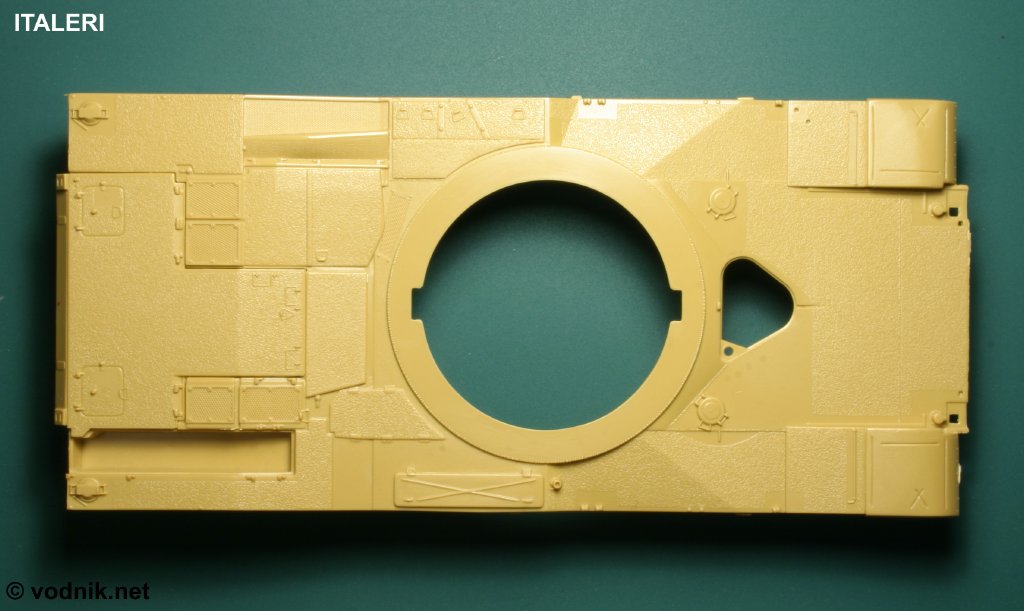
| Italeri upper
hull part also has engine cover molded as separate part. Additionally the
battery compartment and hydraulics compartment covers are molded separately.
Non-slip coating is very pronounced - many modelers say it is exaggerated. Click on the picture to enlarge it. |
Trumpeter upper
hull has the engine cover molded separately and front fenders/mudguards are
also separate parts. Additionally one stowage box on the right side of the
hull has separately molded cover. Non-slip coating is a bit less pronounced
than in Italeri kit. Click on the picture to enlarge it. |
 |
 |
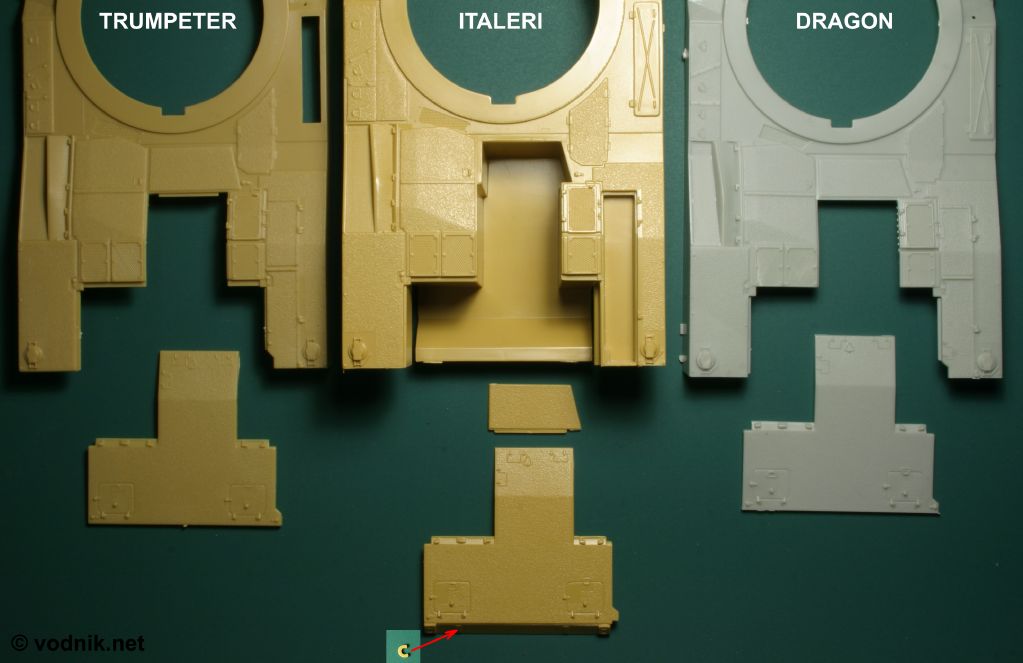
| Three kits have
engine cover plates molded separately and all are inaccurate! Grille/mesh
plates on both sides of the cover are hinged to it and are removed with it
in the real tank. Only Italeri kit has the "lip" on the back of the plate
molded with it - other kits have this part molded as part of rear hull
plate, what is incorrect. Also note small lifting eye - two such parts are
included in Italeri kit only. Italeri kit additionally has a hydraulics
compartment cover as separate part, but this is also inaccurate as the cover
should reach forward to the turret ring. This is also the only kit with
walls and floor of engine compartment added to upper hull part,
unfortunately the shape is completely inaccurate. Click on the picture to enlarge it. |
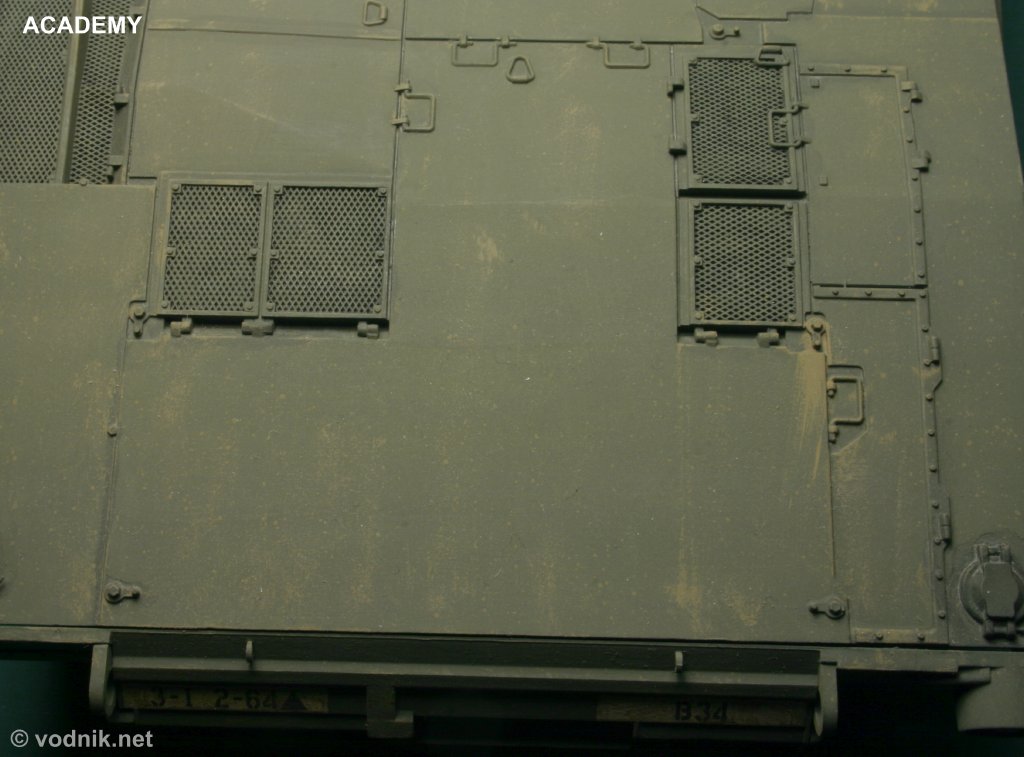
This is how the
rear hull of the Academy M1A1 looks like - note that there is no non-slip
coating on hull parts and two small access hatches are missing from the
back of engine cover. Engine access cover is molded as one part with upper
hull. (This photo actually shows Tamiya M1 kit, but Academy M1A1 kit parts look exactly the same) Click on the picture to enlarge it. |
 |
 |
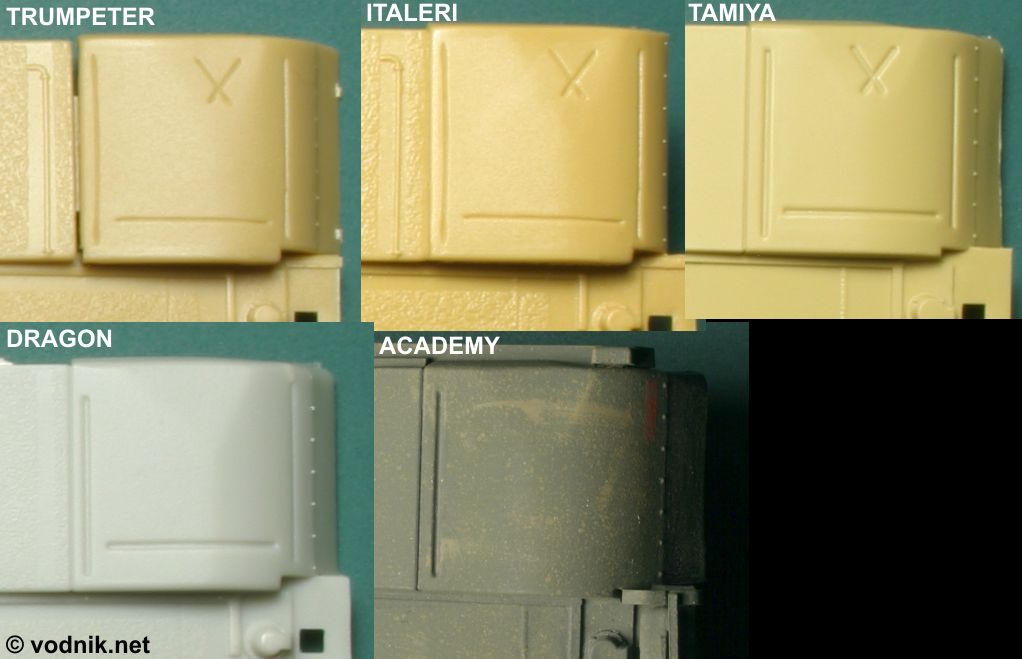
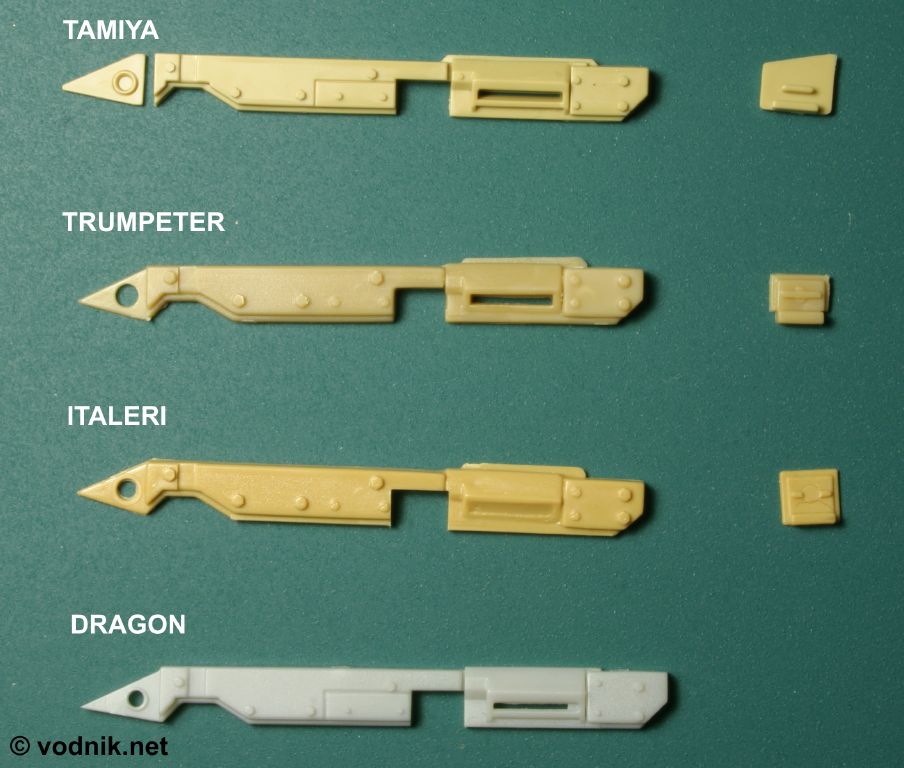
| Close-up
comparison of fender/mudguard details. Only in Trumpeter kit this is a
separate part. Note that only Trumpeter and Italeri kits have the fender
wire spring molded on. Dragon part lacks the "x"-shaped stiffening grooves,
while Academy part copied from old Tamiya M1 part lacks also two straight
line grooves. While Dragon part is rather inaccurate, the Academy one is
acceptable, as old M1 style "smooth" fenders can be often seen on M1A1 tanks
(e.g. take a look at
this
photo and you will see that the right fender is "smooth", while the left
one has impressed stiffeners). In Revell kit instructions there is a
suggestion to use a knife to scribe the "x"-shaped grooves, but template
provided looks completely wrong. Original Dragon kit instructions don't
include this information. Click on the picture to enlarge it. |
Italeri, Trumpeter and Tamiya kits have the cutout for engine extinguisher
handle. Dragon and Academy parts do not have it. Older Tamiya M1A1 kits also
lacked this detail - this is probably the only modification Tamiya made to
the upper hull part in M1A2 model. Click on the picture to enlarge it. |
 |
 |
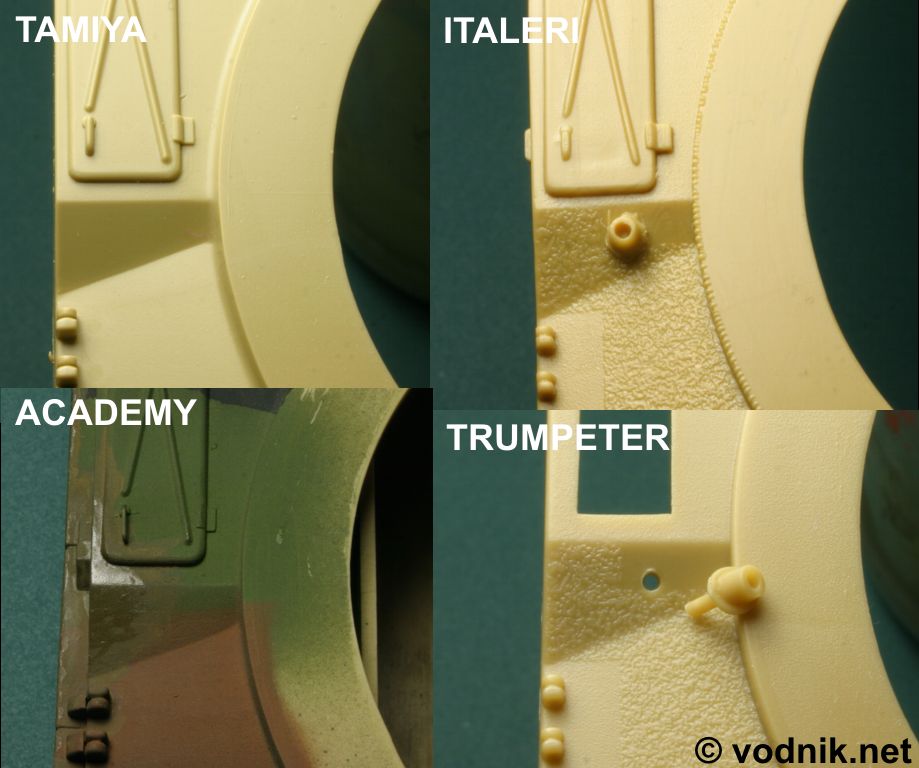
| On the right side
of the hull, next to the turret ring should be a small detail missing from
Tamiya and Academy kits - the outlet for the Bilge Pump that is mounted in
the Sub Turret Floor. It is molded on the hull part in Italeri kit and
provided as separate part in Trumpeter and Dragon (not shown, but looks
almost like in Trumpeter kit) kits. This pipe shaped detail is not
vertical, but canted to the side of the tank and
it
is covered by a piece of rubber that looks like it is cut off flat, but
actually when pressure is applied it pushes the end apart and what ever
liquid is in the subturret is pushed out (thanks for this information,
Ric!). Click on the picture to enlarge it. |
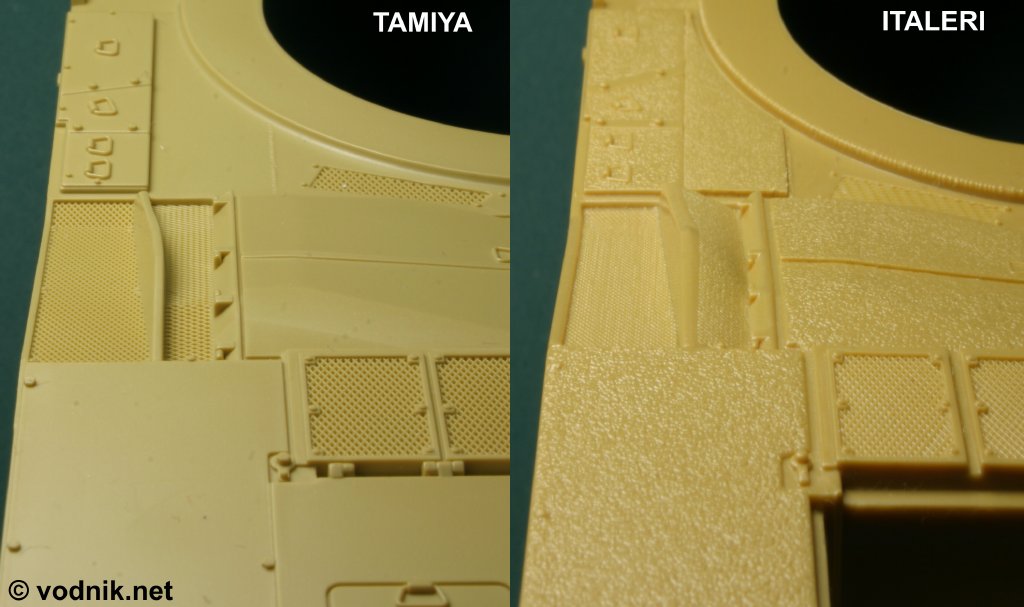
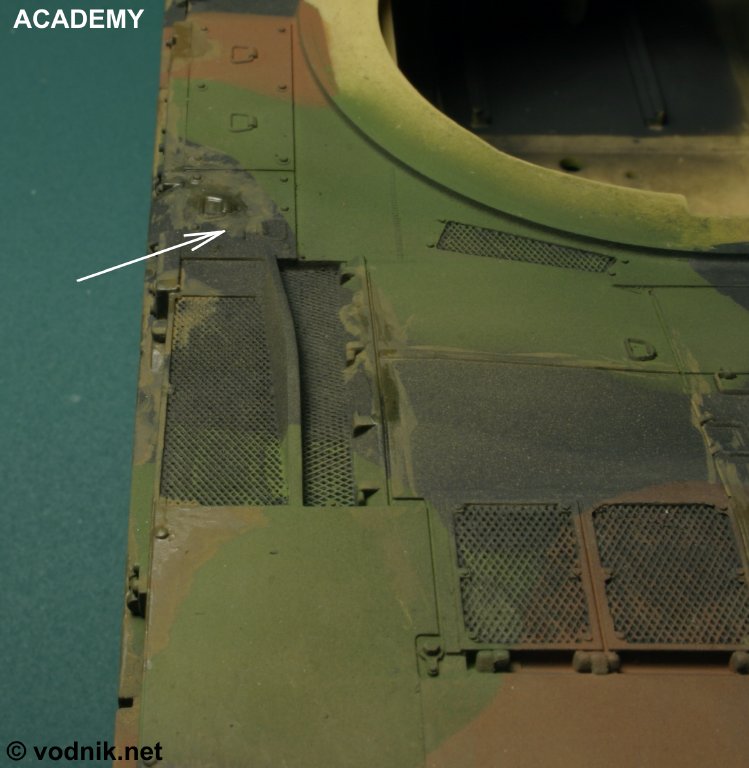
Another
significant inaccuracy of Tamiya hull is visible here. One of the grilles on
the left side of the hull should be sloped, but Tamiya molded it
horizontally. Trumpeter, Dragon and Italeri kits correctly portray this
part. But mesh detail on Tamiya kit is much better than on any other. On the
photo of Italeri kit above you may notice additional plate with non-slip
coating, added between the NBC unit and turret ring. It is Italeri's way to
correct the shape of NBC unit covers, but not particularly effective, as
added part is separate from those covers. But it is true that all kits have
too small NBC unit covers - they should be much deeper, reaching closer to
turret ring. Click on the picture to enlarge it. |
 |
 |
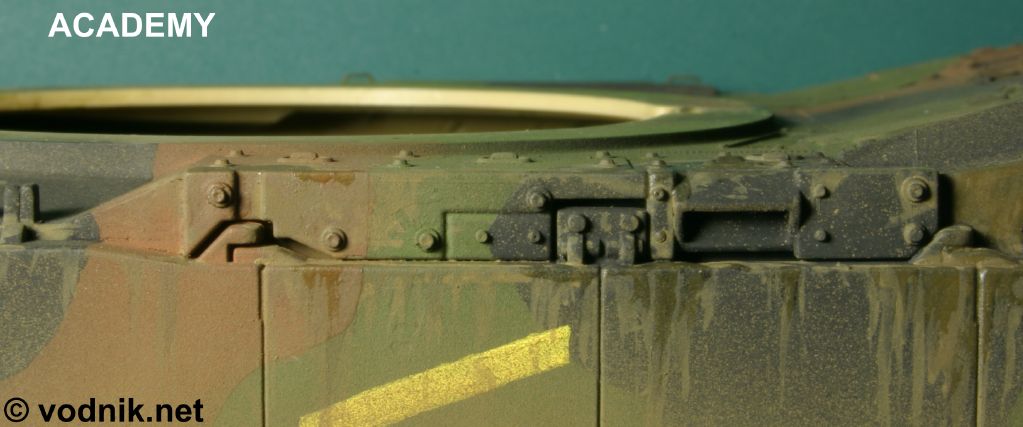
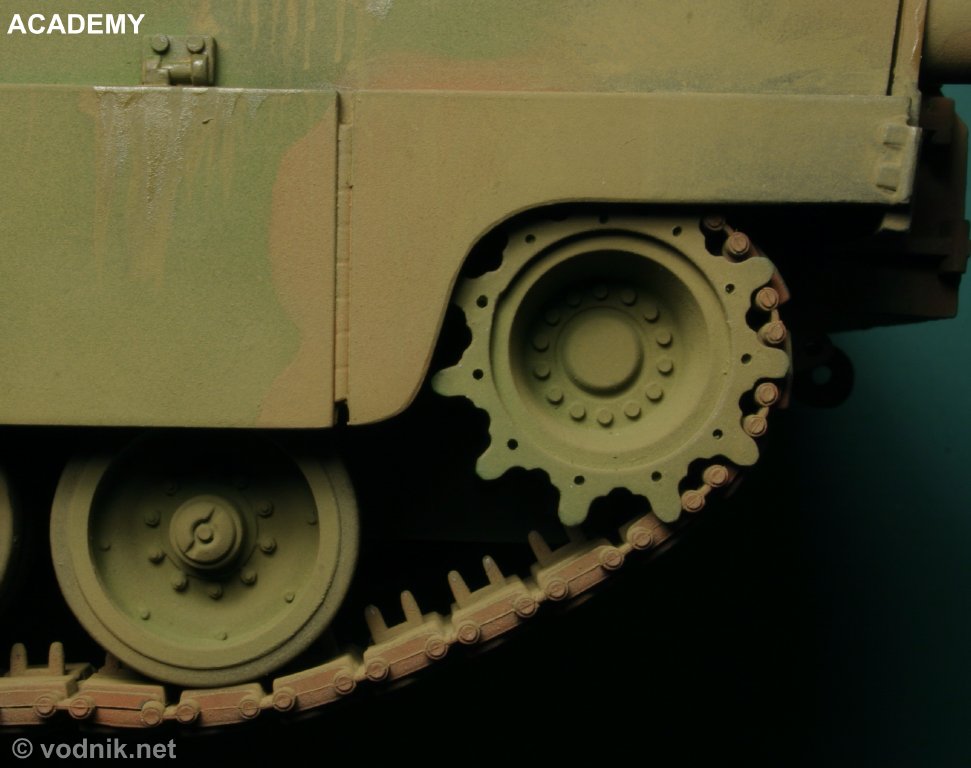
| As you can see on
this picture of Academy model, they repeated Tamiya error and molded all
grilles horizontally. Also note that handles on NBC unit in this kit are
inaccurately positioned (arrow). Other details of NBC unit are not correct either. Click on the picture to enlarge it. |
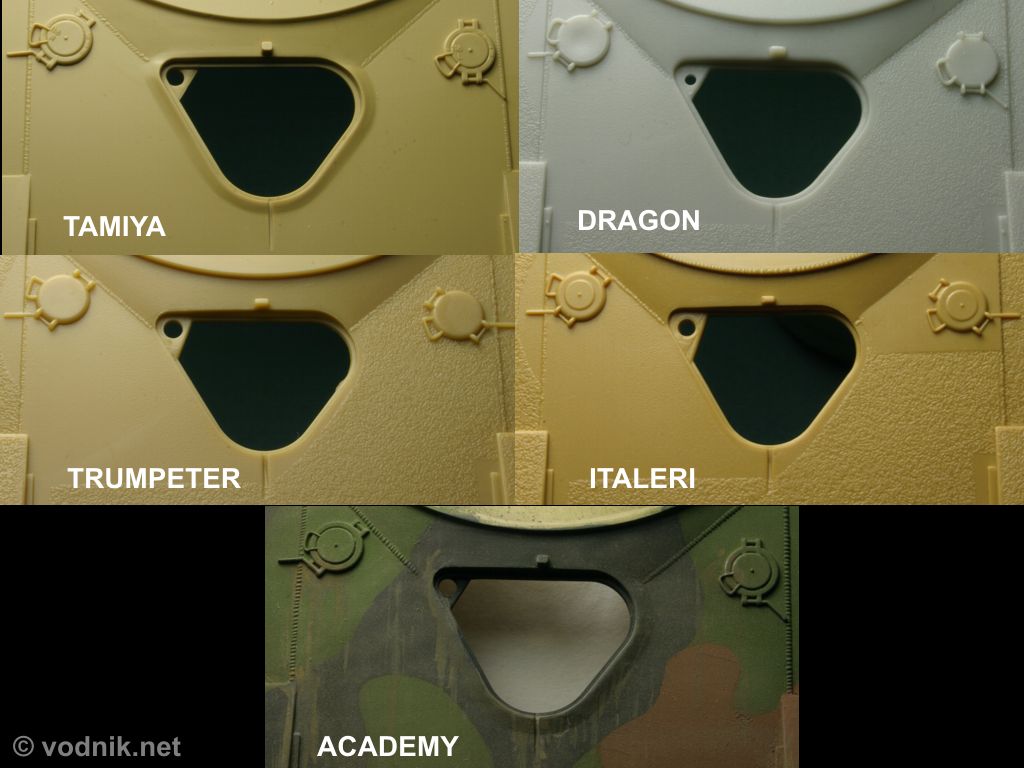
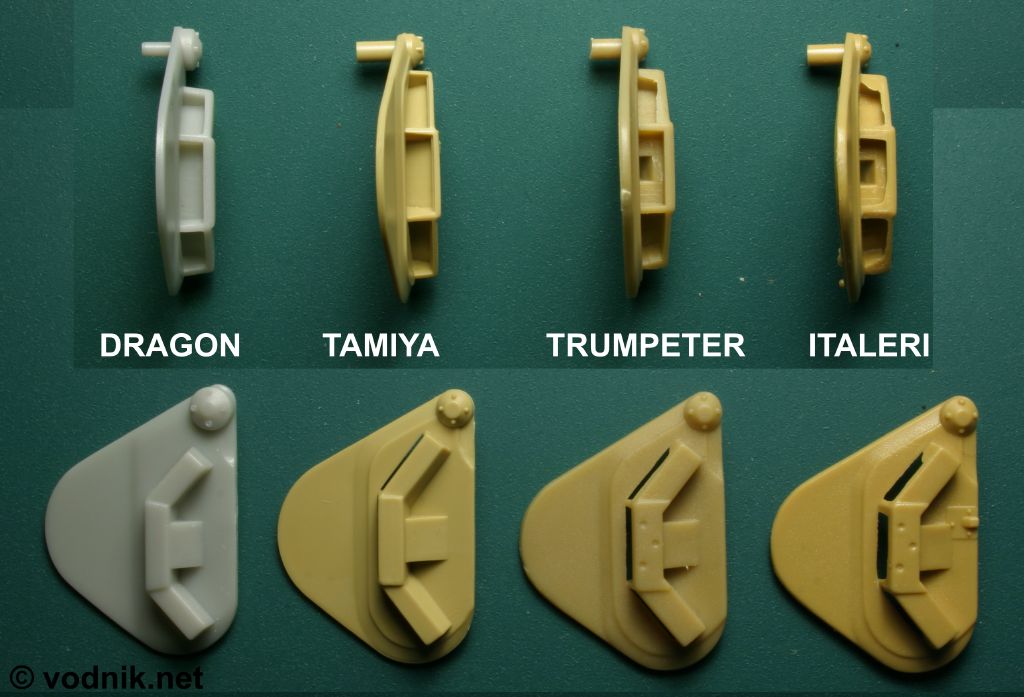
Comparison of
driver's hatch area. Tamiya and Academy kits have raised lip around the
hatch - it should not be there. Fuel filler caps in Tamiya kits are most
detailed (even have mold numbers on them), but the left cap (right one on
the picture) has the hinge positioned as it was in old M1 tanks. The same
error is repeated in Dragon and Academy kits. In M1A1 tanks the hinge is at
different angle - the whole cap with hinges and handles should be rotated
45° counterclockwise in Tamiya kit. In Trumpeter and Italeri kits the hinges
are molded at corect angle, but the lifting handle is in the wrong place. Click on the picture to enlarge it. |
Early M1A1 Abrams tanks had the intake port for the heater present on the left upper hull armor. Photo below shows where it should be - it is however missing from all reviewed kits. In first M1A1 tanks it looked like a small square metal plate welded flat to the armor, with a round hole in the middle of it (it is clearly visible on photos in Verlinden Publications M1 Abrams book from Warmachines series). Early M1A1 Heavy Common tanks had the mushroom shaped cover installed over the intake (visible on photos of those tanks during Gulf War 1991, like this one). This intake was later deleted - first by welding round metal plug over the hole in armor (see this photo from Rob Gronovius' Motor Pool on Armorama), then the hole was just no longer there at all, so late M1A1 HC and M1A2 should not have any trace of this intake. The lack of this detail is then correct for M1A2 model kits, like Tamiya and Italeri ones. However you can also build M1A1 HC model from Tamiya kit - in this case you may either leave the kit hull part as it is, add a small round piece of styrene to simulate welded plug, or scratchbuild mushroom shaped cover and attach it to the hull - it all depends on the period from which your modeled tank is. You have the same three options in Trumpeter and Dragon M1A1 HC kits, as none of them has this detail on the hull. Academy kit also lacks this detail and is the only one for which this can be called inaccuracy, as this kit portrays early M1A1 (not HC) and all of them had this intake port in form of flat square metal plate with a hole. The same is true for old Tamiya M1A1 kits, as they are also early versions of M1A1.
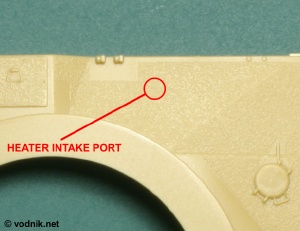 |
| In early M1A1
tanks the heater intake port should be present in location marked on the photo. |
The most interesting discovery I made while comparing upper hull parts, came as a real surprise! I discovered that Italeri upper hull part is a modified copy of Trumpeter part! There are many changes made to this part, but the basic mold is the same. I wonder if Italians bought molds from Trumpeter? It certainly looks like they did. Non-slip coating is more pronounced on Italeri kit, but the pattern is the same as on Trumpeter parts. The proof is on photos below:
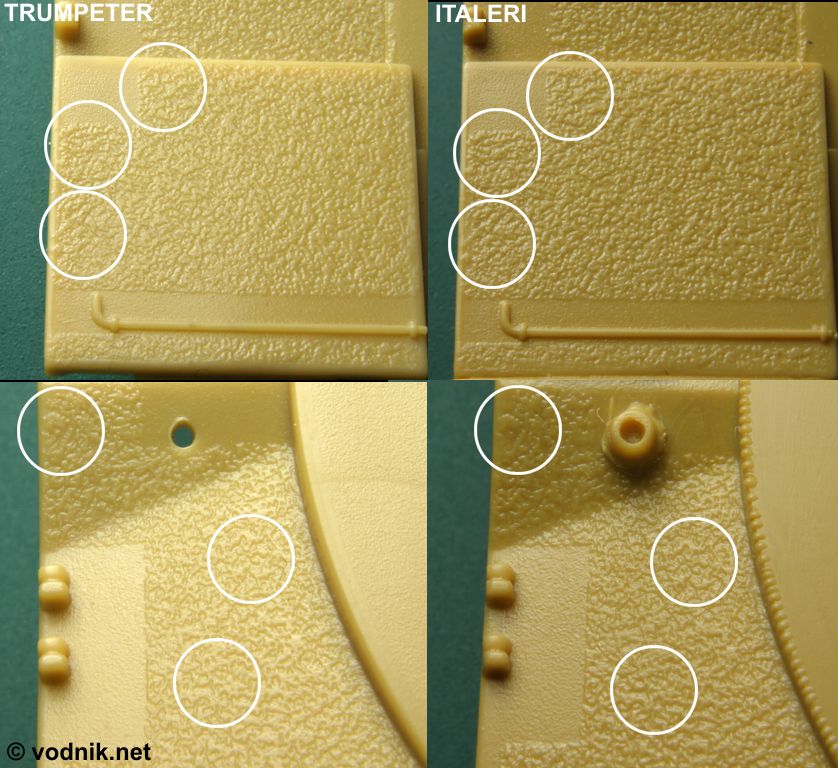 |
| Take a close look
at the pattern of non-slip surfaces of Trumpeter and Italeri hull parts. To make it easier, I drew circles - compare what is in corresponding circles on left and right photos and you will see that the pattern is identical! There is only one explanation: Italeri part was based on Trumpeter molds. Click on the picture to enlarge it. |
On the left side of the hull of M1A1 and M1A2 tanks is an NBC unit and some details associated with this unit have to be added to the hull side. In all kits there is a separate part included with those details, to be attached to main upper hull part. In Trumpeter, Italeri and Dragon kits this part also includes a triangle part with small round hole - the crew heater drain. Tamiya originally forgot about this detail in their earlier M1A1 kits, but corrected this error and added small triangular part with round drain to M1A2 kit. On the photo below I also shown small inserts to the hull part with fire extinguisher handles - cutouts for those inserts are shown on one of photos above.
 |
 |
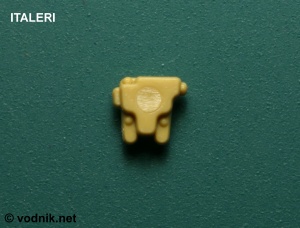
| NBC unit side
details and engine extinguisher handles. Note that in Italeri kit the
ejector pin mark completely ruined the handle part. Click on the picture to enlarge it. |
Academy kit part
- note that there is no crew heater drain hole. Click on the picture to enlarge it. |
Various other detail parts are attached to upper hull parts in all kits. Some of them appear in all models, others were included only by some manufacturers. See photo captions below for more information.
 |
 |
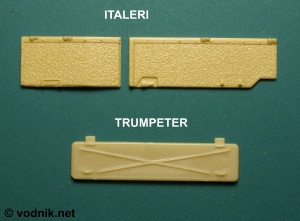
| Italeri molded battery compartment covers as separate parts. Trumpeter molded right storage box cover separately. | All manufacturers
included small grab handles to be attached on left sponson box. In Dragon
and Tamiya kits locating points for grab handles are molded in the wrong
place - too far aft. In Academy kit it looks similar to Tamiya kit, so is
also inaccurate. Click on the picture to enlarge it. |
 |
 |
| Academy hatch,
not shown above, looks like Tamiya hatch. Italeri hatch is
most detailed, but there is a lot of flash to remove in vision block holes.
In Academy, Tamiya M1A2, Trumpeter and Italeri kits you get a piece of clear styrene to
make glass parts for visors. In Academy, older Tamiya M1A1 and Trumpeter
kits the sheet is partially pre-cut.
In new Tamiya M1A2 kit instructions you get 1:1 scale templates to cut clear styrene,
and in Italeri instructions there are dimensions of clear parts given
in millimeters. Only Dragon/Revell kits do not include any clear parts to
fill visor holes. Click on the picture to enlarge it. |
Of two M1A2 Abrams kits, only Italeri one includes a part for mine plow power socket (Armor Junction Box). This part is to be attached between driver's hatch and left fuel filler cap. Tamiya missed this detail in their M1A2 kit. In M1A1 tanks mine plow power cable was routed through the right visor hole in driver's hatch, but it was changed in M1A2 variant by addition of mentioned Armor Junction Box. |
 |
|
|
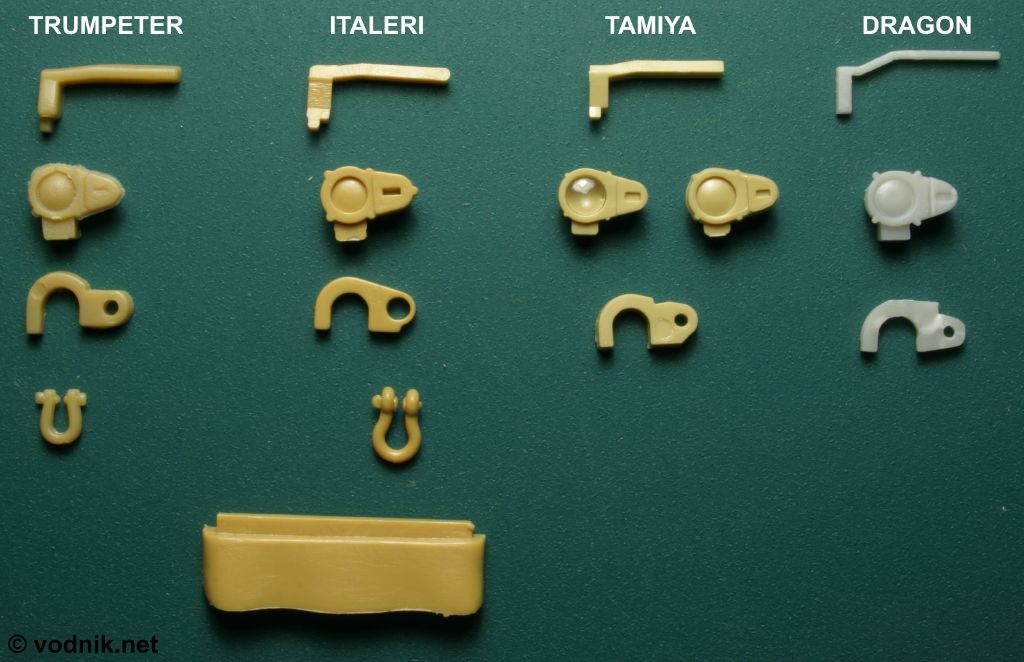
Parts for headlights, headlight guards and front towing/lifting eyes are
similar in all kits. Dragon guard part is the thinnest and very fragile, but is molded flat and is a bit too big. Academy part, not shown on photo, is similar is size to Tamiya part, but is flat - however as the only one has the bolt head molded over the vertical part of the guard, missing from other kits. Trumpeter headlight part is poorly molded with some flash and soft details. Tamiya M1A2 kit includes two different sets of headlights - the original parts from older M1A1 kits with solid lenses (similar part is in Academy kit) and new parts with separate clear lenses. Trumpeter and Italeri kits include four shackles each to attach to towing eyes - Italeri ones are much nicer. Italeri kit is the only one with the front mud flaps molded as separate parts. Click on the picture to enlarge it. |
|
SIDE SKIRTS
All kits have the mounting elements on top of side skirts simplified in much the same way, so similar detailing is needed to all to make them more accurate in this area. Two kits, Italeri and Trumpeter, include internal support bars for first skirt sections, but lack all remaining ones. In Trumpeter kit you even have a see-through hole molded in the first skirt section in which you insert the pin on the end of support bar, just like in the real tank. Other kits do not have any support structure parts included. This is not really a problem in case of Tamiya and Academy kits, where each skirt is molded as one long part, covering the whole vehicle side. In Dragon kit however skirts are split to separate sections, so the lack of support structure is more noticeable in case you leave any of separate sections open. Trumpeter side skirts are designed for puzzle-lovers, as each is split into five pieces! In all kits the last, number 7 skirt section is molded as one part with other sections - this is not very smart, as this particular skirt section is most likely to be seen missing from the real tank... Crews usually remove them to prevent mud buildup around drive sprocket wheels. By the way: Tamiya kit is the only one with correct outline of the last skirt. Academy part is almost correct (see this photo), others are a bit misshapen.
 |
 |
| Side skirts in
Dragon kit are molded in a way, which gives you option to leave first or
second section open in your model. But lack of any internal support
structure makes this option less interesting. In Tamiya kit each side skirt
is molded as one part. Note correct outline of the last skirt in Tamiya kit.
Academy parts look almost identical to Tamiya ones. Click on the picture to enlarge it. |
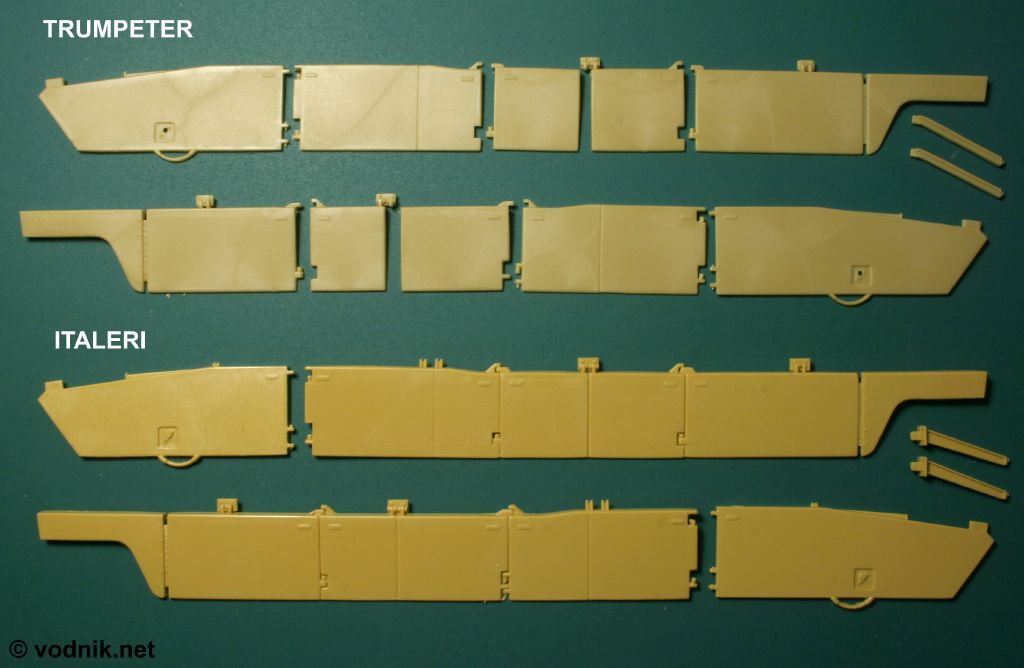
Over engineered
Trumpeter parts are shown here. They split their skirts into five pieces,
but still left the seventh skirt molded as one part with number 6 section.
Italeri molded only first skirt sections separately and included nice
support bars for them, better than those in Trumpeter kit. Unfortunately
none of kits includes support structure for hinges between first and second
skirt sections, which is clearly visible in a real tank when any of those
skirts is open. Click on the picture to enlarge it. |
PART1 PART2 PART3 PART4 PART5 PART6
![]()
![]()
![]()
Copyright © 2004 VODNIK, mail to: pawel.k at vodnik dot net