|
|
|
|
Comparison
of M1A1/M1A2 Abrams kits.
PART
3
THE TURRET
 |
 |
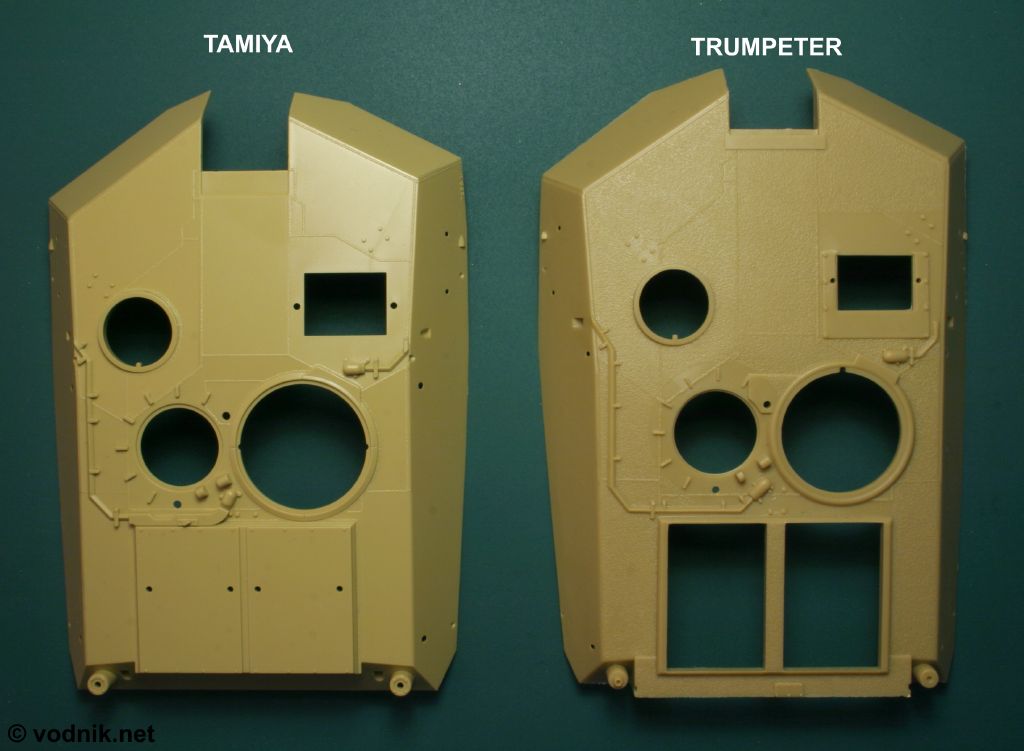
| Tamiya and
Trumpeter turrets. The size difference is clearly visible. Blast panels are
molded on turret top of Tamiya kit, but lifting eyes are separate parts. Tamiya part is
the only one with the extension at the rear of the turret, behind blast
panels, molded as separate part. Too match the hull from their older M1A1
kit, Tamiya omitted the non-slip coating also from the new turret surface. Click on the picture to enlarge it. |
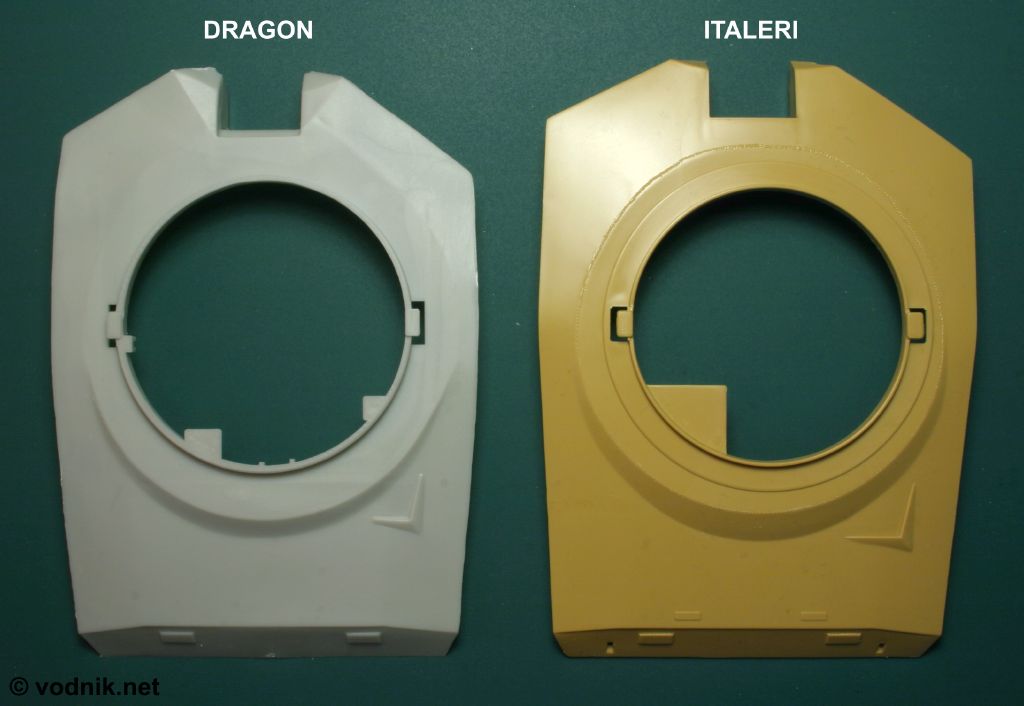
Dragon and
Italeri turrets. Again there is noticeable size difference. Italeri turret
is the only one with "the doghouse" molded on top of turret part. Blast
panels are also molded on, but with lifting eyes this time. Click on the picture to enlarge it. |
 |
 |
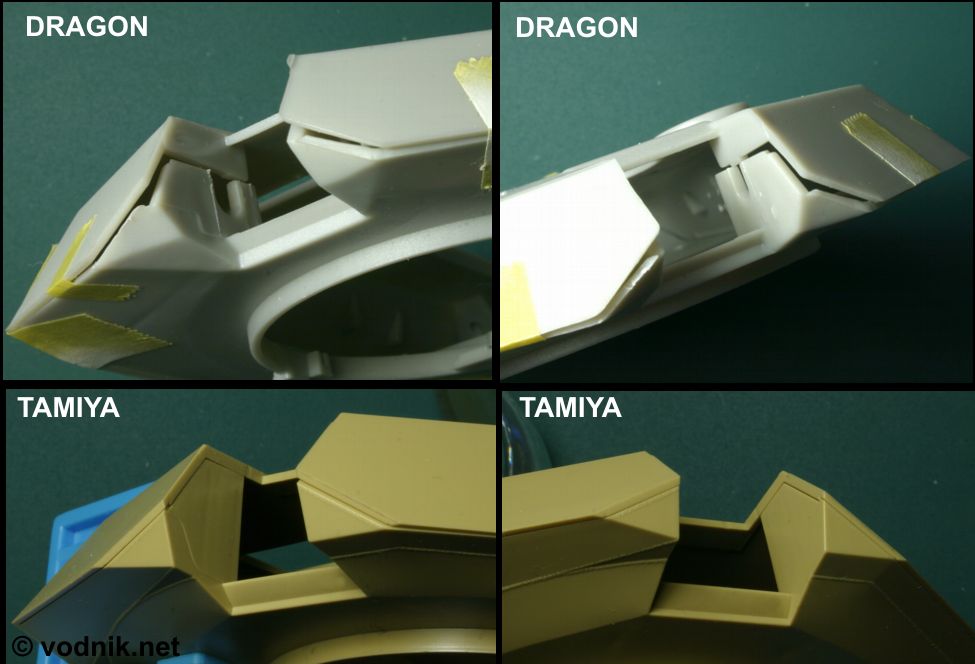
| Bottom of Tamiya
and Trumpeter turrets. The shape of Tamiya part is much more complex. It is
also the only kit with weld seams on the bottom of the turret. Click on the picture to enlarge it. |
Dragon and
Italeri lower turret parts. Dragon molded the front of the turret, around the
gun mantlet, incorrectly - they added additional angled surfaces, which
should not be there. Click on the picture to enlarge it. |
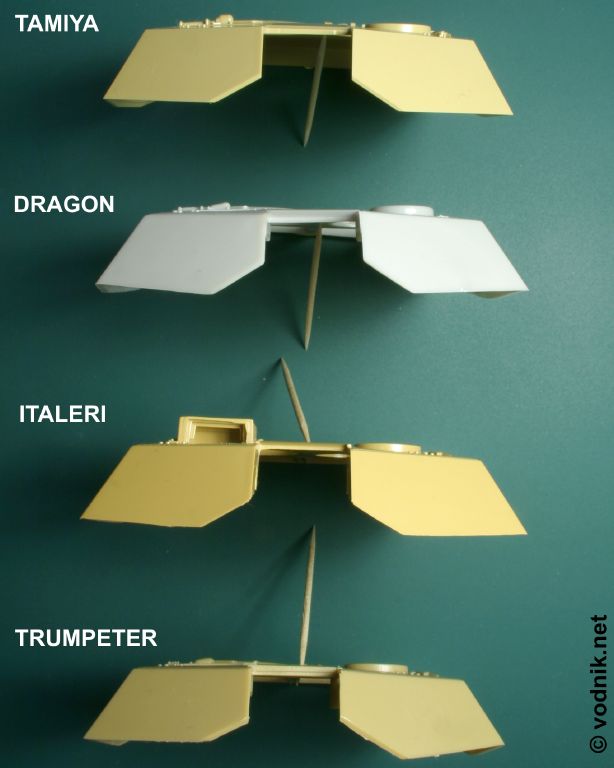 |
| The
front of turret in four kits. The infamous shape problem of left front
turret slope of Trumpeter kit is clearly visible here. But if you look
closely, also the right (left side of the photo) front slope in this kit is
not quite correct - it is slightly narrower near the center of the turret,
than on the edge (bottom edge of this plate is higher near the gun mantlet
than on the other end, while it should be parallel to the top edge). Click on the picture to enlarge it. |
On the picture below is a comparison of shapes and sizes of all turrets. Academy kit turret is shown only as the outer outline (yellow) as this kit in my collection is already built and I was not able to measure this turret better. As you can see Tamiya and Dragon turrets are similar in size and shape. Also Italeri and Trumpeter turrets are similar to each other. Academy kit part is much smaller than in any other kit - it was based on turret from old Tamiya M1 kit and Academy didn't bother to enlarge it to make it accurate for M1A1. Tamiya made the same mistake in their first release of M1A1 kit, but they quickly fixed this problem and later re-releases of Tamiya M1A1 kits had corrected, bigger turret. I compared dimensions of turret parts from all kits with scale plans available on Yahoo M1_Abrams Group web site (http://groups.yahoo.com/group/M1_Abrams/). If those plans are reliable, then Italeri turret seems to be the most accurate in length. Tamiya and Dragon turrets are too small. On the drawing below you can clearly see the shape problem of Trumpeter turret front slopes. Italeri based their kit, including turret, on Trumpeter model, but they corrected the turret shape. Considering this, Italeri turret had potential to be the best of all, but unfortunately the shape of the front of right side armor panel is wrong - see one of the photos below. Drawing also reveals serious problem in shape of the back of each side panel in Trumpeter kit.
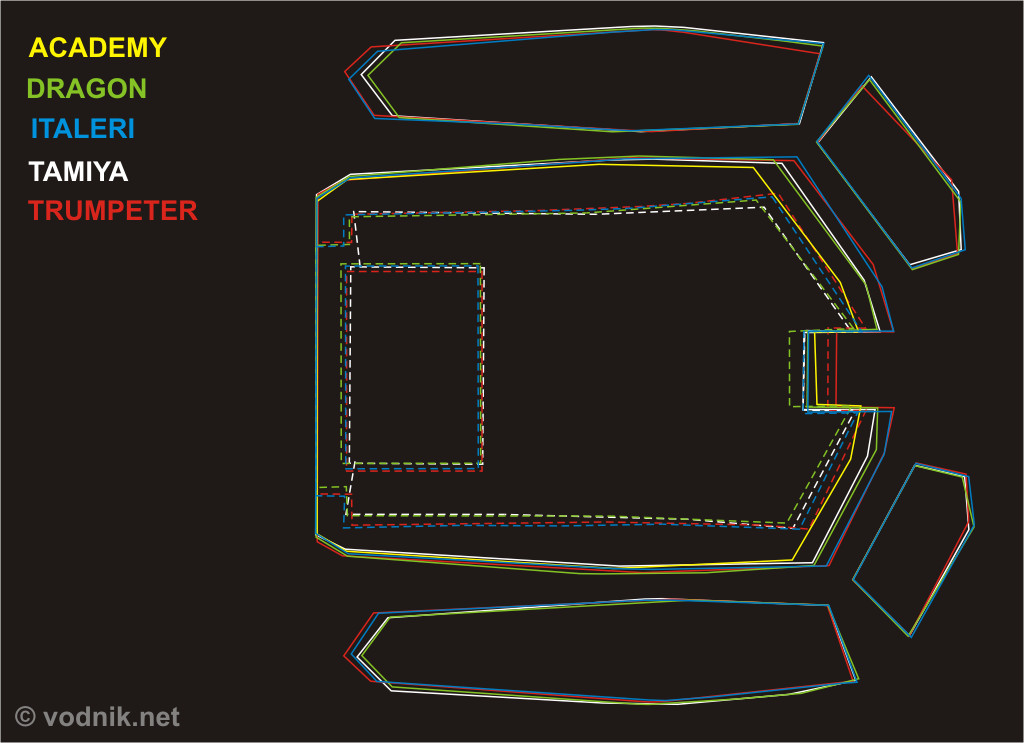 |
| Comparison of
sizes and shapes of all turrets. This is not exact scale drawing, but I was trying to make it as accurate as possible. Click on the picture to enlarge it. |
The fit of turret parts ranges from perfect in Tamiya part to just bad in Dragon one. Fit in Italeri kit is acceptable, although not very good. Trumpeter kit is (surprisingly) better in this regard. Dragon kit requires a lot of elbow grease, putty, sanding and swearing to make turret parts meet. Tamiya M1A2 kit turret is simply perfect in this regard. To see so complex shapes fitting so well is just amazing! This is truly 21st century injection molding technology at work. Remember however that turret parts in Tamiya M1A2 kit are completely new. Turret parts in older M1A1 Tamiya kits were different. I can't say anything about them unfortunately, as I never had any of those earlier Tamiya kits.
 |
 |
| The good, the bad
and the ugly. Well, actually the bad and the ugly are one: Dragon (Revell)...
I had too use a lot of masking tape to hold Dragon parts together and they
still didn't quite want to meet. To take photos of Tamiya turret I used a
single plastic clamp to hold halves together - nothing more was needed. Click on the picture to enlarge it. |
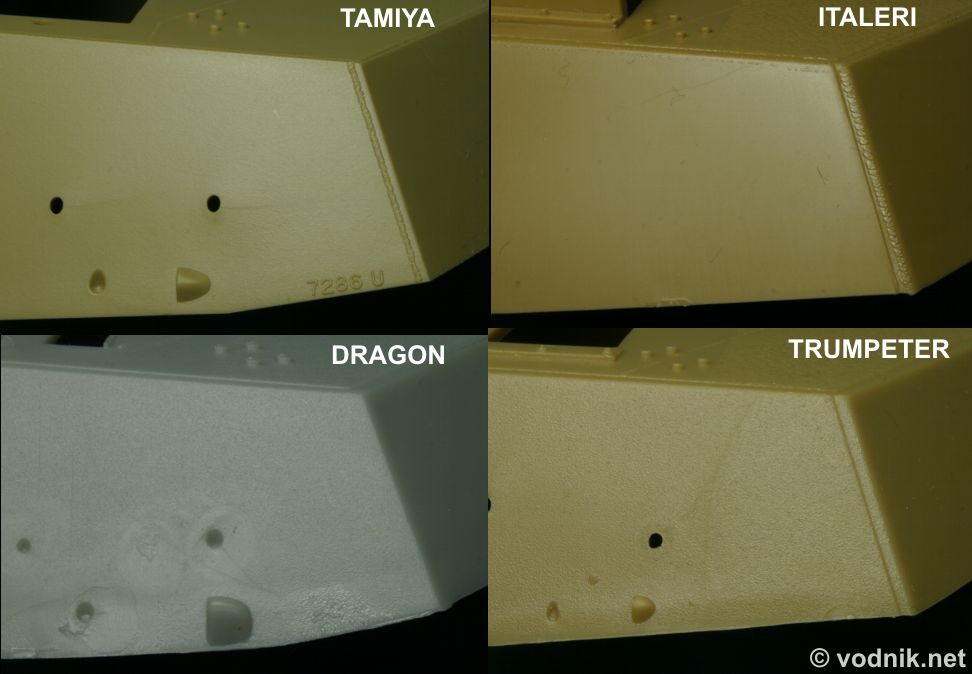
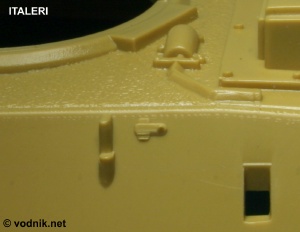
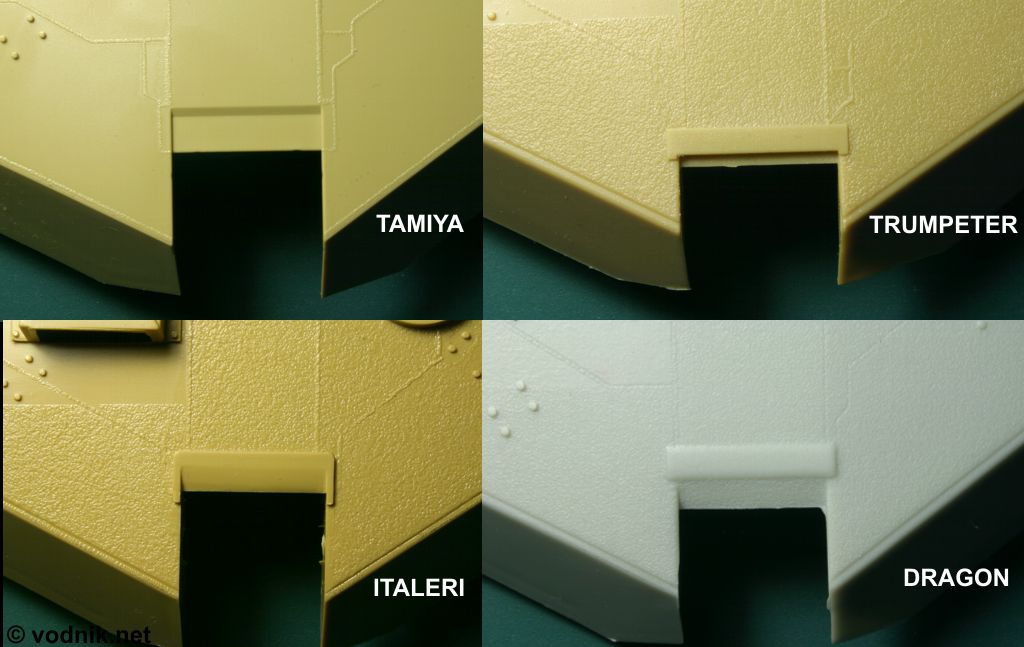
The front part of
the right side of the turret. Italeri omitted the towing cable guard, present
in other kits. Dragon (and also Academy, not shown) kit does not have the
weld seam molded along the front. Only Tamiya added the serial number on the
turret - I don't know however if it is correct for M1A2. Also note the shape
of the lower edge of the turret. Tamiya kit is the most
accurate, Dragon is close and Italeri and Trumpeter parts are wrong. Click on the picture to enlarge it. |
 |
 |
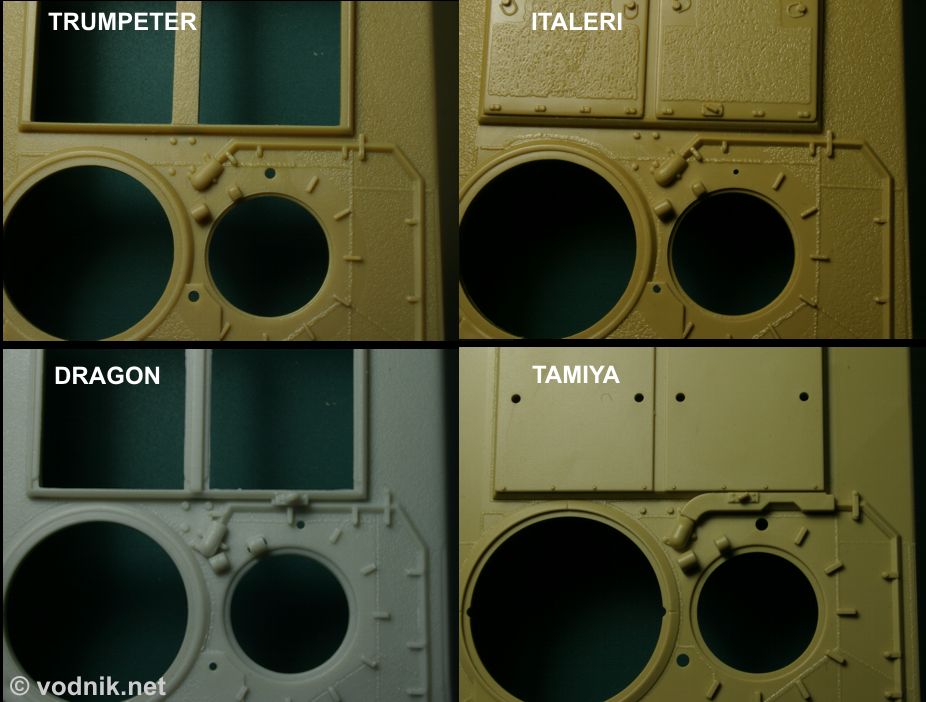
| The left smoke
grenade launcher cable guard, routed around the loader's hatch, looks similar in Trumpeter, Italeri, Dragon and
Academy (not shown) kits. Only Tamiya kit looks different. Tamiya part is
more accurate for a tank equipped with turret mounted APU. If you install
APU to the turret of Trumpeter or Italeri kits (it is included in both and
mandatory for early M1A2, as in Italeri kit) you should be aware that this
area in the model is inaccurate. But even Tamiya missed one detail here -
there should be a cable guard on the turret roof armor (similar to those
protecting grenade launcher cables) running back from the additional cover
behind the loader's hatch, along the left edge of the blast panel, to the
APU in the bustle rack. Also note the placement of small loader's hatch lock
(used to keep it secured in open position) - it is missing from Trumpeter
kit at all, Italeri and Academy molded it on blast panel, while Dragon and
Tamiya molded it over the cable guard. In reality the position of this lock
on M1A1 tank depends on the type of blast panels used. If panel has three
round mushroom shaped covers on it (they are parts of never used ammo
loading system in which the whole ammo rack was supposed to be replaced at
once), then the hatch lock is over the cable guard, not on the panel. If the
panel is regular "smooth" type, then the lock is on the panel. But even in those kits, which have the hatch lock in the
right place, it is too small. Click on the picture to enlarge it. |
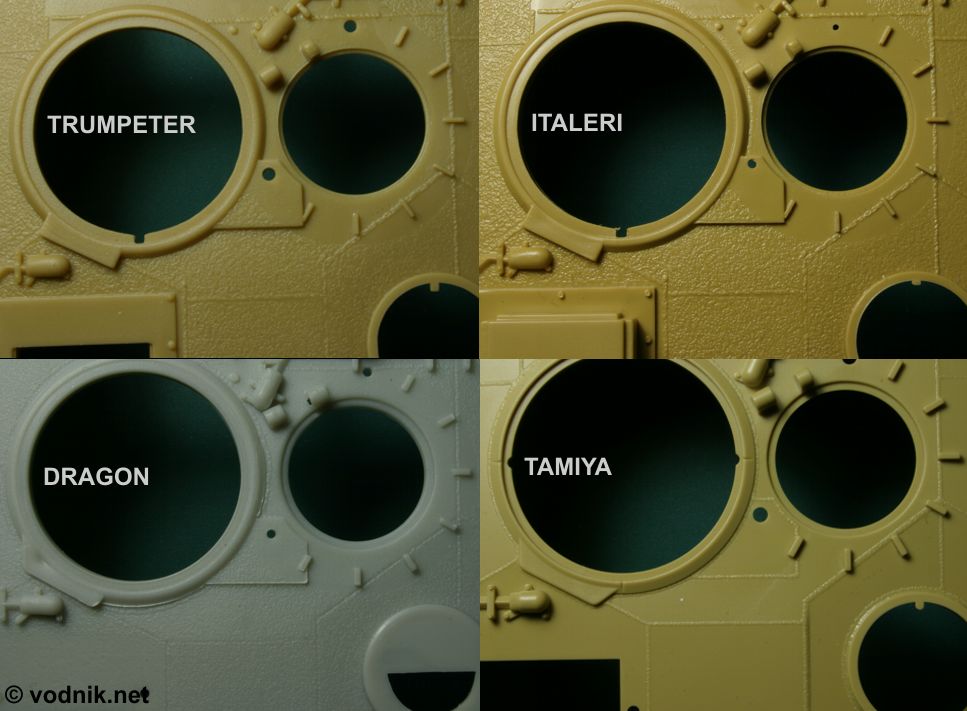
Between TC's and loader's hatches, slightly in front of them, is a small raised
armor plate welded flat to the turret roof armor. Only Tamiya missed this
detail - the area is marked with a seam line, but is not raised.
Interestingly this detail was present on the turret of early Tamiya M1 model
(I don't know if it was also there on turrets of M1A1 kits). Click on the picture to enlarge it. |
 |
 |
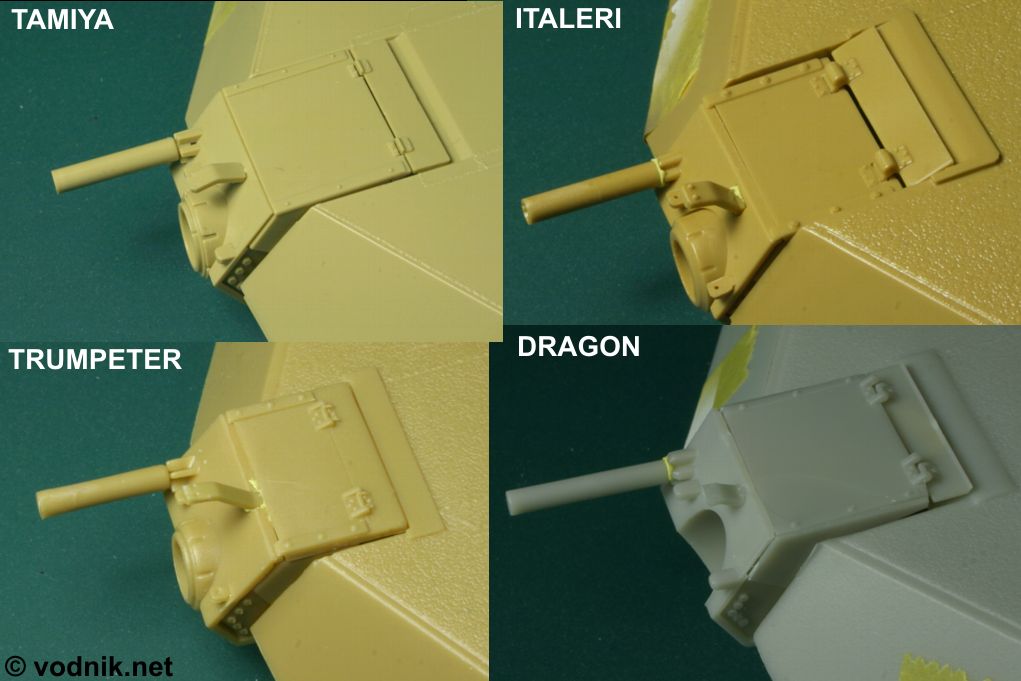
| Italeri made an attempt to mold the latch that holds the side storage bins to the turret. In Trumpeter kits there are separate parts for those latches inlcuded. Other kits lack this detail. | Each manufacturer
chose his own way to mold the area of the turret immediately behind the gun
mantlet. Those photos show that Trumpeter made the mantlet cutout in the
turret too shallow. None of kits is perfectly accurate here, but once all
mantlet parts are installed, Tamiya model looks best, as this area in real
tank is almost flat and this appearance is achieved in Japanese kit. Click on the picture to enlarge it. |
MAIN GUN
 |
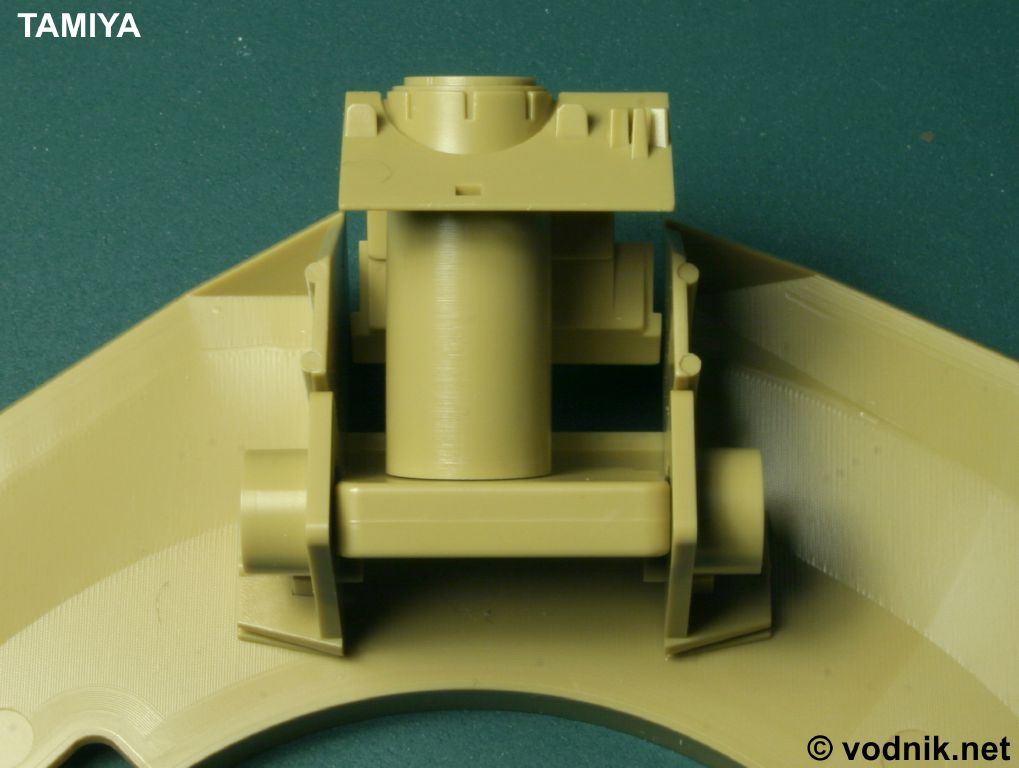 |
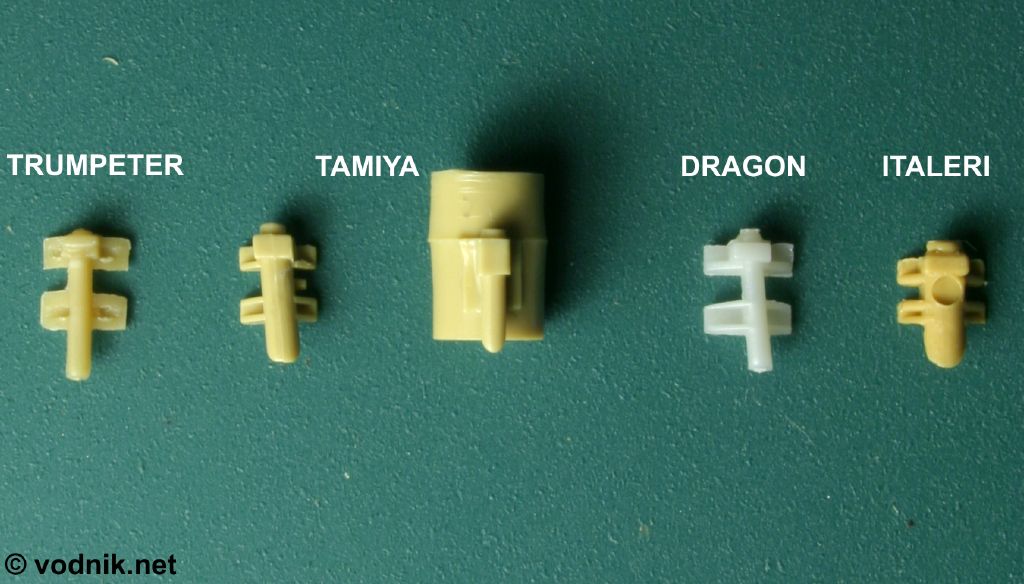
| Tamiya chose
quite complex way to attach the gun mantlet in their M1A2 kit. They decided
to use two poly caps - they allow the gun to be easily moved up and down,
and stay in the position you leave it, as they are quite tightly assembled.
Older Tamiya M1A1 kits used much simpler way of attaching the mantlet, using
screw and nut. Click on the picture to enlarge it. |
Assembled Tamiya mantlet mechanism. Click on the picture to enlarge it. |
 |
 |
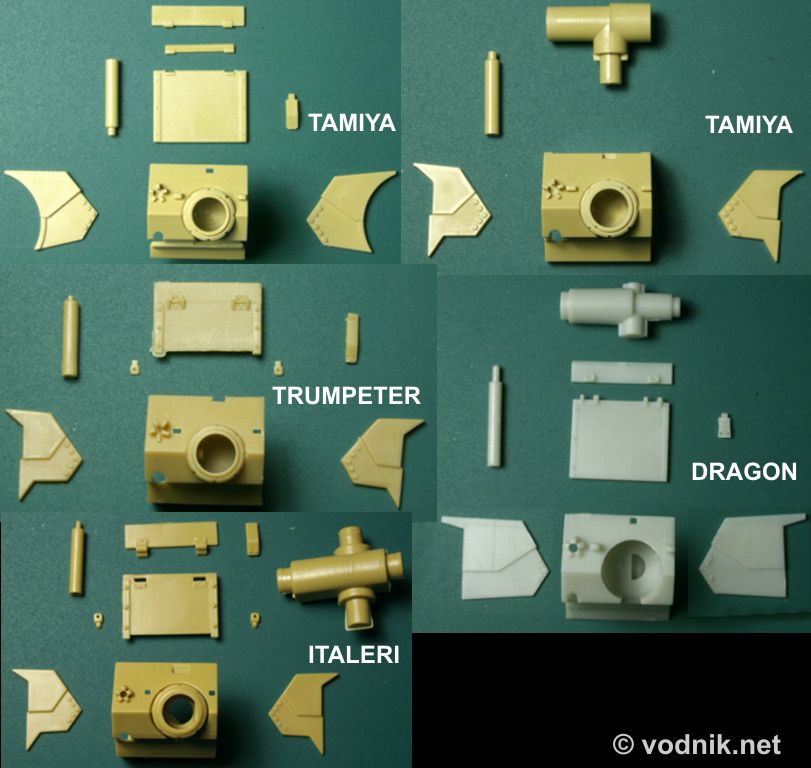
| In each kit
mantlet parts are molded slightly differently. Tamiya M1A2 parts are shown
on top of the picture on the left, and parts from older M1A1 (still present
on sprues in M1A2 kit) are on the right. Trumpeter parts were based on older
Tamiya ones, and Italeri copied and improved Trumpeter parts. In Trumpeter
kit the upper plate of the mantlet is too short, with the hinged cover
molded integrally. In old Tamiya kit (and also in Academy kit) the hinged
part was omitted completely. In all other kits this detail is present. In
Tamiya M1A2 kit it is really nicely molded in two pieces and once correctly
assembled it remains moveable, as Tamiya molded two plastic micro hinges
there! On the other hand in Italeri kit the hinges are way over scale. In
Italeri and Trumpeter kits the small lifting eyes on front of the mantlet
are molded separately. In other kits they are integral part of the mantlet,
but are molded solid. In Tamiya kit the number of bolt heads on sides of
mantlet is correct - five on the right side and six on the left. Other kits
are symmetrical with five bolts on each side - one bold head is missing from
them. Click on the picture to enlarge it. |
Parts used to install the mantlet to the turret in Tamiya, Italeri and
Dragon kits are shown on previous photos. In Trumpeter kit there are
no extra parts - the mantlet part is just slid to the cutout in the turret
and is only held in place by friction, unless you glue it in place. Tamiya
kit wins hands down in overall look of this area, even with solid lifting
eyes. Click on the picture to enlarge it. |
 |
 |
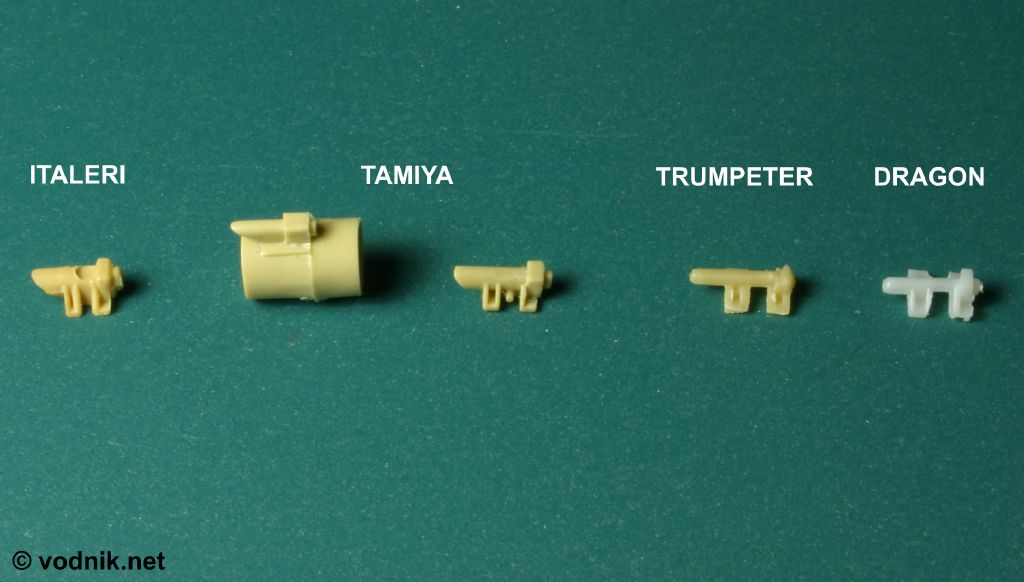
| "Business end" of the coaxial machine gun blast suppression tube. It looks best in Tamiya kit - once painted black inside it should look the part. Dragon part is just a piece of solid styrene rod. | Main gun barrels
from all kits. I used part of Academy kit barrel for something, so only a
section is shown, but it is enough to see how bad this part was - MUCH too
thick. The fume extractor shape is not exactly as it was in the box, I filed
it to more correct shape - it looked even worse before. As you can see one
half of Italeri barrel is broken - that's how it looked when I opened the
box first time. In Tamiya and Trumpeter kits, the muzzle is a separate part
(two Tamiya muzzles are shown - the old one from M1A1 kit has the Muzzle
Reference Sensor molded on it. In new M1A2 kit the MRS is molded as separate
part). On the right side of the picture is a photo of a real 120 mm gun - as
you can see none of the barrels is perfectly accurate, but Tamiya one is
pretty close, with Trumpeter one being second best. Dragon part is also
good, although looks a little under scale. Italeri part is definitely under
scale - the whole barrel is roughly the same length as Tamiya barrel without
muzzle and Italeri fume extractor is a few millimeters shorter. Dragon
barrel wins hand down in surface detailing - if only the rest of the kit
would be made to the same standard, it could be a winner! Click on the picture to enlarge it. |
 |
 |
|
Muzzle reference sensors from all kits, except Academy one. In Academy kit
the MRS was molded in two halves integrally with gun barrel parts and didn't
resemble the real part at all. In old Tamiya M1A1 kits MRS was molded on top
of the muzzle part and was very simplified. To the left of it on the photo
above is the MRS from new M1A2 Tamiya kit. It is definitely the most
detailed and accurate of all shown. It is molded at correct angle. Trumpeter
part is very poorly molded, so it is even difficult to say if it was
supposed to be straight or angled. Italeri part is molded straight, but in
kit instructions they suggest to glue it at an angle to the muzzle, what is
not quite correct, as the MRS mounting brackets should remain perpendicular
to the barrel axis. Italeri part is also ruined by ugly ejection pin mark.
The MRS in Dragon kit is molded at an angle, but is too thin. Click on the picture to enlarge it. |
Side view of all muzzle reference sensors. |
PART1 PART2 PART3 PART4 PART5 PART6
![]()
![]()
![]()
Copyright © 2004 VODNIK, mail to: pawel.k at vodnik dot net