|
|
|
|

Accurizing and
detailing
the Tamiya M2A2 IFV kit.
Tamiya
1:35
PART
5
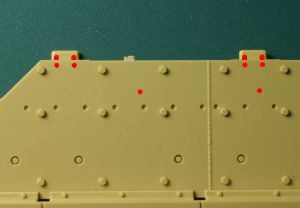
On both sides of the rear
of the upper hull, on sloped armor plates (parts E16, E17) are various brackets
and tie-downs for strapping pioneer tools, ammo boxes and water barrier posts
and tripods. There are also periscopes in M2A2 Bradley (not present on M3A2).
Generally the layout off all these details in Tamiya kit is correct. The biggest
problem is that Tamiya tell you to use two barrier tripod parts from old M2 kit
(B23, B24) and attach them on both sides of the hull. Unfortunately these parts
are not accurate for M2A2, as swim barrier is modified from older Bradleys and
much bigger and longer tripods were used - use some styrene rods to make them.
All periscopes, including those behind the cargo hatch, have metal covers bolted
to metal blocks welded to the armor, one on each side of the periscope. The lack
of covers in Tamiya model is not noticeable, as these covers are basically the
same shape as periscopes they protect, but bolt details and metal blocks should
be added to improve accuracy. There should also be some large bolt heads on the
armor plate on left side of the vehicle (part E17 - see photo). And ammo cans
are of course strapped to the armor using rubber straps and metal brackets, not
just "glued" to it, as Tamiya did it. Large lifting eyes on both sides
of the hull should each have four bolt heads on them (see photo below).
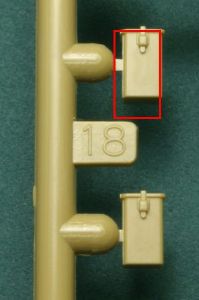
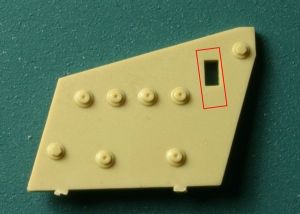
On two corners of part E16 and on one corner of part E17 are small plastic
blocks molded with small depressions on top of them. In reality these are attachment points
/ hooks to
set up a swim barrier tripods and should look like the one on photo below. Two
similar parts are on the front of the vehicle - see photos earlier in the
article. Another such part must be somewhere below the ammo cans on left side of
the hull, but I don't have a picture that would show this area on M2A2 Bradley -
but it was definitely there on older M2 vehicle, so it must also be somewhere
there on the newer ones. There should also be brackets to install the swim
barrier tripod legs in the rear left and right corner of the hull part C7. These
are however almost impossible to see on the real vehicle, covered by the rolled
swim barrier and its rubber cover, so can easily be omitted.
 |
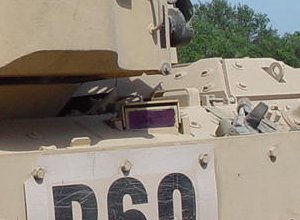
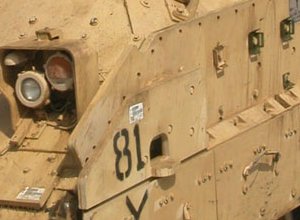
| Note how large the water barrier tripod is - this is this long green pipe partially hidden behind side armor plate. The one on the other side of the vehicle is the same size. Also note there should be some bolt heads on the armor plate (part E17 in the kit). In the right upper corner of this plate is the hook used to attach one of swim barrier tripods. Note bolts on lifting eye. No periscopes are on the hull on this photo, but there are four on the cargo hatch, as this is M3A2. Photo VP |
 |
| Note the cover
over the periscope, bolted to two metal blocks welded to the armor. This vehicle is new M2A2ODS, but this detail looks the same in older M2A2s. Similar covers are installed over all periscopes on the back of the hull. Also note the lifting eye on the cargo hatch - there is another one on the other side of hatch. Extra armor plates on the hatch on this photo are ODS modification. |
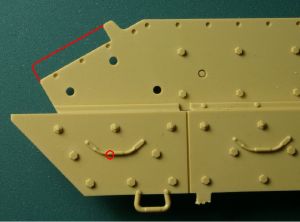
The cargo hatch in the model lacks two lifting eyes - Tamiya corrected this mistake in their M2A2ODS kit (and also added armor plates that were added to hatches of newer ODS vehicles). Between the hatch and the turret ring are brackets for strapping various tools and Tamiya arranged them correctly for early M2A2, although some PE parts would be welcome to improve their look. On the right side, behind the turret ring is some sort of vent box. It should have a mesh inlet or outlet on its left vertical wall, but it is flat plastic in the kit. I added a small piece of photo-etched mesh there in my kit, but you may leave it as it is, as it is normally hidden under the turret bustle rack. Around the hatch there are a steel bars welded to hull armor. My guess is that they limit amount of water that gets into the vehicle during the rain when the hatch is partially open. You can see these bars on the first photo above, around the hatch (this is M3A2 vehicle, so the hatch is more rounded and has periscopes on it).
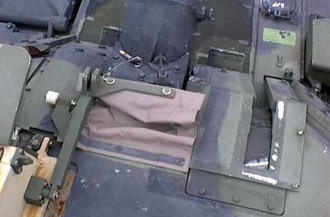
At the very end of the upper hull, above the loading ramp, is a "shelf" on which part of the swim barrier is carried. In M2 Bradleys this was actually a box with metal cover on top, so the swim barrier inside it was not visible. And this is the way it is done in Tamiya M2A2 kit (as this part is carried over from their older M2 kit). In M2A2 vehicles however this part is no longer a closed box. It is more like a trough - a long narrow open container with tie-downs and straps on it. The swim barrier is strapped to it and its bulged rubber cover is visible on top (see the first photo above and also the photo of the back wall of the vehicle >here<).
On the right side of the vehicle - on the armor plate behind the tail light is part A50 in Tamiya kit. I don't know what it is, but I know that it looks like the part of old M2 Bradley. In M2A2 vehicles there is a metal trapezoid cover attached to this thing - see photo below.
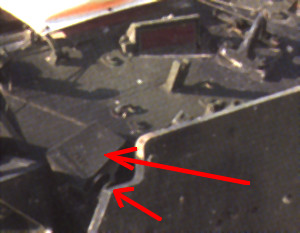 |
| Longer arrow
points to the trapezoid cover, the smaller one shows barely visible bracket for installing the swim barrier tripod in the corner of upper hull, mentioned earlier in the text. |
SIDE ARMOR PLATES
Pattern of bolt heads on parts E3 and E36 is quite accurate. There are just a few holes and bolts missing under the work platform on part E36 (see picture). On main vertical armor plates there should also be a pattern of very small holes, but they are visible only on sharp close-up photos, so they can easily be omitted. Side skirt panels in real vehicles are not single armor plate as in the kit, but are composed of two thinner metal plates with round and rectangular spacers between them - it can be easily replicated in the model using thin styrene sheet and rods for spacers. Bolt detail can be cut off kit part and attached to your scratchbuilt skirts. Also handles and steps made from steel cable in the real vehicle will need to be added to new skirts, but I suggest making your own (from Karaya 0.4 mm brass cable for example) instead of using those molded on kit's skirts.
|
|
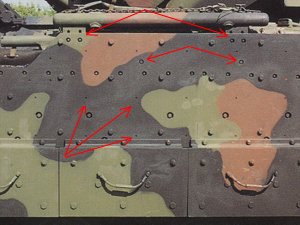 |
| Some holes and bolts missing from this armor plate. | Arrows point to various details missing from the kit part. |
 |
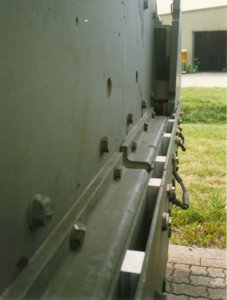 |
| Side skirt cross-section. Photo RG | Another picture of side skirts. |
Tamiya designed the side armor panel parts in a way that allows you to attach the swim barrier part E12 to them on the front of the vehicle. To do this the shape of armor panels has been modified to make place for part E12. It is OK if you want to use this part, but if you want to make your own swim barrier or you are building the newer ODS vehicle (as these parts have not been changed in Tamiya new kit), you have to correct the shape of armor plates. The right armor plate is modified only slightly and it is not noticeable at all. But the shape of the left side plate is heavily modified - see photo below. This just has to be corrected with a piece of styrene sheet.
|
|
 |
| Quite large
section of armor plate is missing! Also note one missing bolt head. |
Here you can see
the shape of the armor plate on the real vehicle. One feature of newer ODS vehicles is clearly visible on this photo - modified brackets holding side skirts and more bolt heads on skirts. |
TURRET
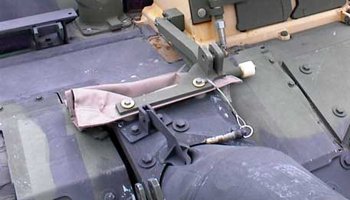
Again, I'll start from the front and move back. So obviously I have to start with the gun barrel. Well, there is actually nothing wrong with it. Of course you should drill the muzzle open and if you do it carefully and have good tools you may even be able open small holes on sides of the muzzle brake. Or you can just replace the whole barrel with the Model Point one if you want. In newer Tamiya M2A2ODS kit you get optional fluted gun barrel - both types of barrels are still in use today, so it is up to you which one you choose for your ODS vehicle. For the old M2A2 you have to use non-fluted barrel. In Tamiya kit you glue the gun barrel to the hole in cylindrical gun cover in part B3. The tubular part of the cover should have the channel on top of it and there should be a small hinged metal cover installed in this channel - see photos below. The metal arm on which the aiming sight is installed is attached to the side of cylindrical gun cover, not to the armor plate like in Tamiya kit. There should also be a small metal aiming circle on the arm (see photos).
|
|
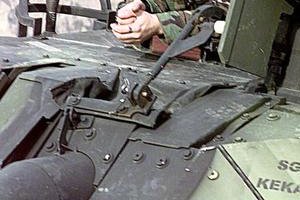 |
| On this photo you
can clearly see the channel on top of cylindrical gun cover and a hinged cover on it. The metal arm attached to the gunner's sight and on the canvas cover is a feature of late M2A2 vehicles and was added when new gunner's sight doors were installed. Photo RG |
Another picture
of late M2A2 with the additional arm between the gun mantlet and gunner's sight - this part was added to Tamiya M2A2ODS kit along with new gunner's sight doors. |
 |
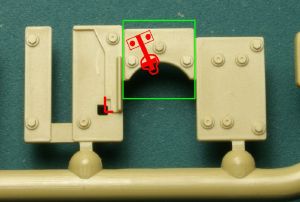 |
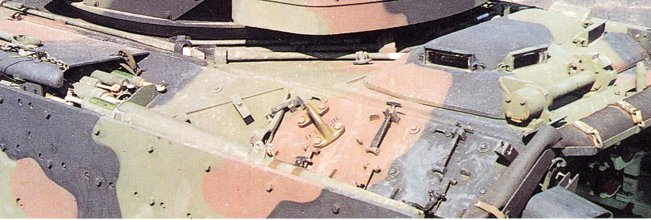
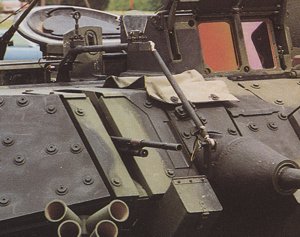
| This is older M2A2 - it has older gunner's sight doors, as in Tamiya M2A2 kit and the arm visible on previous photos is not present. Note that the arm on which the aiming sight is installed is attached to the side of cylindrical gun cover, not to the armor plate like in Tamiya kit. Also note the small metal aiming circle on the arm and support bars under open gunner's sight doors. Photo VP | This is the kit
part E35. Only the section in green rectangle is moveable in the real vehicle. Missing details are marked in red. Small square hole in the armor should be filled and the arm (part B6) should be attached to the right side of cylindrical gun cover on part B3 |
In Tamiya kit the whole part E35 moves with the gun. In reality only the small center section moves with the gun (see photos above). There are also some parts missing above and behind this part - there should be two metal sheets and a piece of canvas cover. Some plastic surgery and scratch building is necessary, but all this can be fixed.
 |
| Two metal sheet
covers and canvas cover - none of it is present in Tamiya kit. Note the small lifting eye bolted on the corner of the gunner's sight cover - there are four such eyes, one on each corner of the cover. Photo RG |
Two smoke grenade storage boxes attached under the gun mantlet are noticeably too small in Tamiya kit - compare them with the size of smoke grenade launcher tubes and imagine that you have to put four grenades to each box - impossible! I suggest using styrene 0.156" (4 mm) square rod to make new boxes.
 |
| These boxes are too small - red line shows more accurate size. |
On the left sloped appliqué armor plate Tamiya want you to attach the lifting eye. But in the real vehicle the eye is welded to the basic armor of the turret underneath the appliqué armor and there should be a rectangular hole in the bolted-on armor plate for it. It is easy to fix - just cut a hole in armor plate part and attach the eye directly to the main turret part C5.
 |
 |
| Note that the
lifting eye is welded to the armor underneath the appliqué armor plate. |
You have to cut
the rectangular (with rounded corners) hole in this part. |
GO
TO PREVIOUS PAGE
GO TO NEXT PAGE
PART1 PART2
PART3 PART4
PART5 PART6
SUPPLEMENT
|
Most of the photos of real vehicles in this article came from various sources on the Internet. I have so many of them downloaded on my computer that I lost track of where each of them came from. If you recognized some of the pictures as yours and want me to credit you for them here, or you want me to remove them, let me know - I'll sure do it. |
![]()
![]()
![]()
Copyright © 2004 VODNIK, mailto:pawel@vodnik.net