![]()

Academy
2116
1/48
MiG-29A Fulcrum
kit review
Usually model kit reviews start with the history and description of the real thing: plane, tank, car etc.. I will skip this part - there is a lot of sources on the web where you can find this information (try to search for "mig-29 history" on Google). I will immediately jump to the description of the kit. It will be basically a very detailed "in-box" review, but I will also include some information I discovered during the assembly of my model. I don't have pictures of unassembled model parts, but decided to include scans of some pictures from model instructions as they pretty well show the shape of parts.
The kit comes in a typical Academy top opening box. There is 6 sprues of light gray and one of clear plastic.
|
|
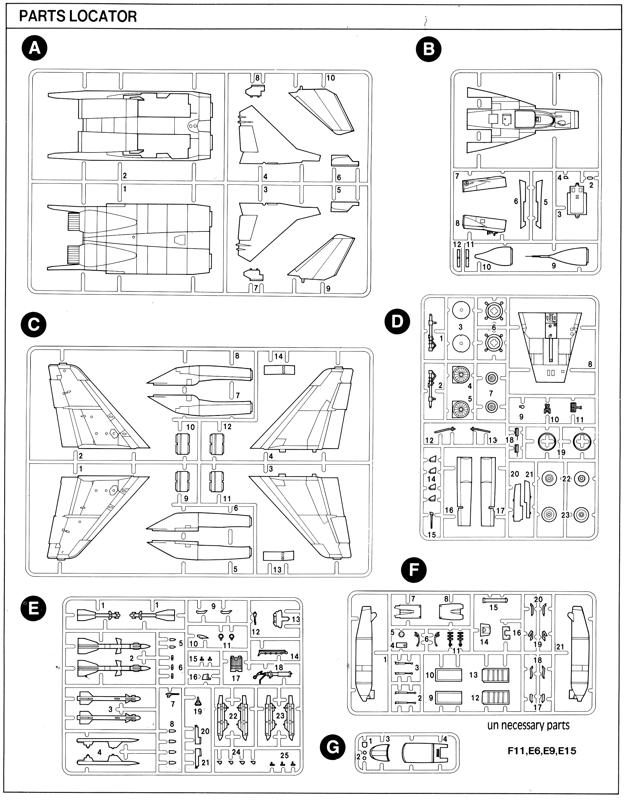
Parts
map from kit instructions. |
There is also a folded 14-step assembly instruction sheet, a single paper sheet with painting guide and a small decal sheet. Instructions are clear and easy to follow, but some suggestions regarding the order of assembly are not well thought over. There is a few black and white photos of various parts of the real aircraft printed, but unfortunately they only show how simplified these parts are in the kit.
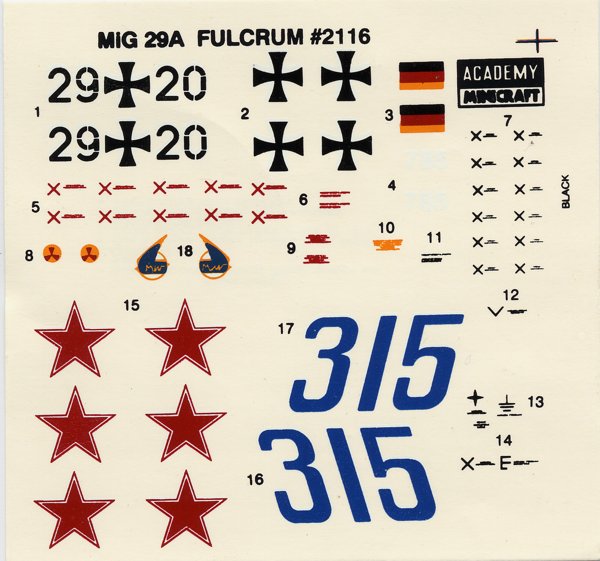
At first sight decals are the worst part of the package - they are thin, but all details are very fuzzy, colors are printed off register and they seem much too dark. Options for building two aircraft are given: "Blue 315" of Russian AF (technology demonstrator) and plane number 29+20 of Federal German Luftwaffe. There are some stencils included but very few of them and they are so poorly printed that will not be very useful.
|
|
Decal
sheet from the kit. Click on the picture to see enlarged version. |
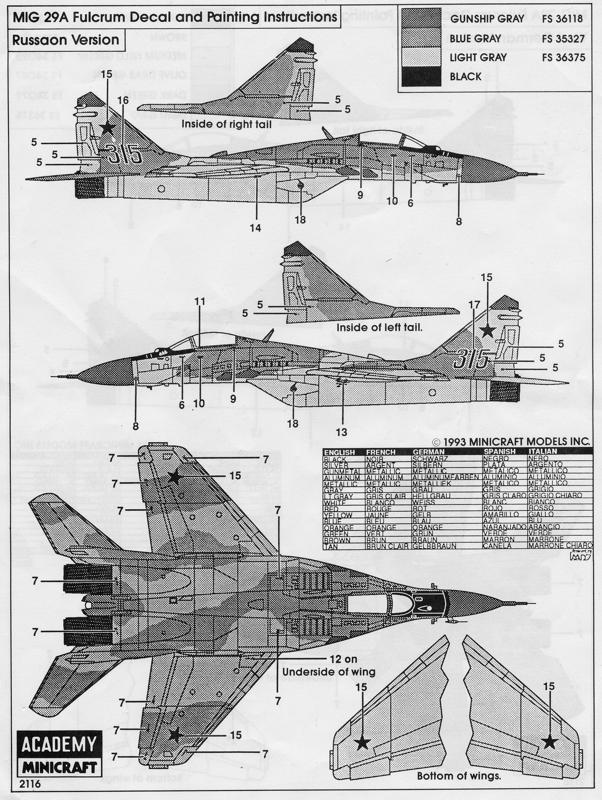
Painting guide does not include references to any brand of paints, but FS color numbers are given. I didn't check colors for German plane, but those for Russian one are not accurate. They call for "blue gray" color, while in fact it should be "gray green". Also there is just one light gray for top and bottom surfaces, while in fact the bottom color is slightly lighter than the top one. The camouflage pattern for Russian plane is almost correct with only some minor errors. I can't really comment on German camouflage pattern as I only found one black&white picture of this particular plane. There is a lot of color references throughout the assembly instructions, but these are often inaccurate (e.g. ejection seat should be all black, not gray as in instructions).
|
|
Painting
guide. You can see that FS color names are used, but suggested colors
are not correct. |
First look at plastic parts reveals some nice surface detail. All panel lines are recessed and very well defined. There is a lot of raised rivets on the model surface and it can be a problem, as it will be difficult not to damage them during model construction. They are done quite nicely however - they are small and not very high. Unfortunately most of them are meant to represent flat screw heads on the real thing. Small holes would be more appropriate here, if anything. If you compare the layout of panel lines on the model with scale plans of the real thing or some pictures of it, it becomes obvious that Academy used artistic license here - many lines are not where they should be. A lot of very characteristic panels are missing or are misshaped. For example there are two big triangular antennae covers on each LERX, marked with panel lines, that are much too small in Academy kit. There is also quite a lot of ejector pin marks on parts, but most of them are in hidden places, however there are some on landing gear doors and struts that have to be removed. I haven't noticed any flash or sink marks however.
To check the general dimensional accuracy of the model I had to first decrypt the numbers given in most publications. After measurements taken on many photos of the real plane, I was able to find out that airplane length described usually just as "with pitot probe" is the total length of the plane including the pitot tube, horizontal stabilizers and even small static dischargers at the end of those stabilizers. The second number given usually as "without pitot probe" is the fuselage length without stabilizers and the pitot probe (but including the tube on the tip of the radome that the pitot probe and two vertex generators are attached to). As soon as I established this, I was able to compare the kit's dimensions to those numbers. And what I've found was quite acceptable.
| original dimensions of MiG-29 | original dimensions reduced to 1/48 scale | finished Academy model | |
| length (with pitot probe) | 17 320 mm | 360.8 mm | 361 mm |
| length (w/o pitot probe) | 14 875 mm | 309.9 mm | 314 mm |
| wingspan | 11 360 mm | 236.7 mm | 235 mm |
| stabilizers span | 7 780 mm | 162.1 mm | 159 mm |
The model is a tiny bit too long and too narrow, but the difference is negligible. Only the length without pitot probe is too long - it suggests that the fuselage itself is 4 mm too short, but it is compensated by pitot probe and stabilizers dimensions.
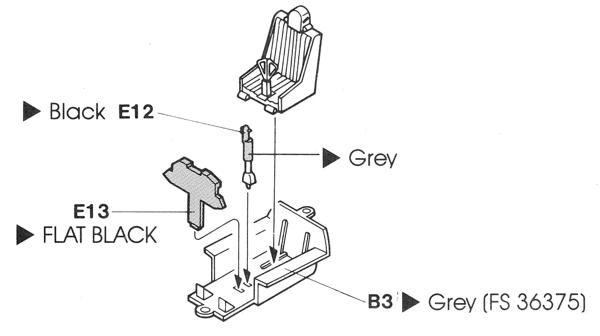
Cockpit details are very basic. The cockpit tub is much too shallow to look convincing and ejection seat looks nothing like the K-36. There is no harness on the seat. Instrument panel and side consoles have some raised detail, but still there is a lot to be desired. The HUD is made of three parts, including one clear, but it doesn't look like the original part at all. I suggest replacing the cockpit with the great set offered by Aires (resin and PE parts). Eduard PE set can also be used to improve cockpit, but it alone will not make the cockpit look correct (I refer to the old Eduard set in my review, no longer in production. Eduard has just released two new PE sets for this model, but I have not seen them yet).
|
|
Cockpit
assembly instructions. Parts in the kit look exactly like those on the
picture. The seat doesn't look particularly convincing. Suggested
color is not a good match for the cockpit interior. |
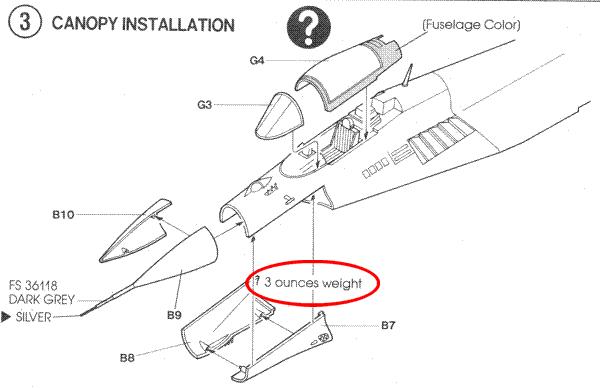
The canopy and windshield are rather nice - clear plastic is quite thin and overall shape is correct. Only the shape of framing on the front part of windshield is not quite correct, but it is very minor detail. Also there are no interior detail parts present to add on the canopy - Aires cockpit set corrects it, also Eduard PE set addresses this problem. Opening the canopy requires significant thinning of the plastic on the rear part of it, as it sits tightly over the fuselage in the real plane and kit parts cannot be put this way without modification.
The nose section of the kit's fuselage is composed of no less but six parts. They fit together rather well, but still it is quite a lot of work to put it all together. You must remember to add some nose weight to avoid tail sitting of the model, but don't follow Academy's advice - you don't need 3 ounces! One tenth of it will probably be enough, particularly if you decide to use resin cockpit. The KOLS (IR seeker and laser rangefinder) station in front of the windshield was molded as one part with the upper front fuselage part. It hardly resembles the real thing - it has the wrong shape, size (too small) and is in the wrong place (too much forward). You may want to scratch build a new part - just as I did on my model. Academy provided parts for angle of attack sensors on their sprues (parts E6) that should go on both sided of nose fuselage, but lists them as "un necessary". These parts are very oversized, but it is strange that Academy decided to remove them from instructions. Similarly oversized AoA sensor on the bottom of the nose is molded with one of the nose parts (B8).
|
|
3
ounces?... They must be kidding! |
The shape of the radome is not accurate. The radome of MiG-29 has a very distinctive shape - the front part, about one third of the length of it, is a perfect cone. Further aft the shape of the profile is rounded. Academy realized that the front part of the radome should be something special, but they missed the point completely - they made the outline slightly concaved in this area, what makes the radome look very odd (check pictures in my feature article about my MiG-29 model build). It can be corrected, but it is not an easy task. Most modelers leave the radome unchanged and it makes the finished models look a bit strange. For me it looks just ugly.
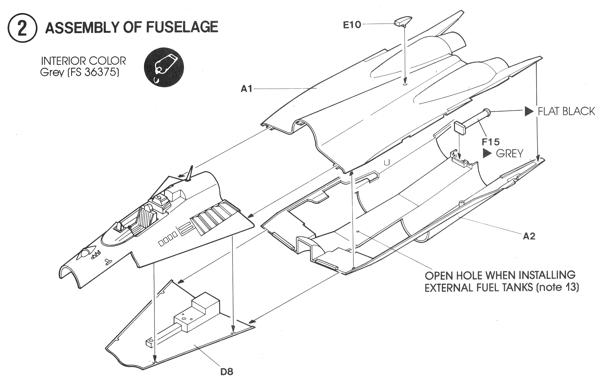
The main fit problem of the kit may appear between four main sections of the fuselage. Academy instructions in step 2 are not clear if you should first assemble the front and rear fuselage sections separately and then glue them together, or glue first upper front and upper rear sections together, the same for bottom front and rear ones, and assemble the fuselage from two bigger top and bottom parts created this way. First method creates two sections that fit badly on vertical plane. The joint line has a complex profile and it is very difficult to fill and sand. Better idea is to use the second method - you will still get a large seam to fill, but it will be along the LERX leading edge and it is easier to get rid of. Fit of the wings is much better and only the bottom side requires some filler. There should be two small white antennae (ECM?) on leading edge of each LERX and they are missing.
|
|
Instructions
step 2 - not clear about the order of operations. |
Outline of wings and horizontal stabilizers is correct. All control surfaces on the wings are molded together with wings in neutral position - it is a pity as MiG's ailerons are ALWAYS a bit raised when hydraulic power is shut down. It can be easily corrected, but still would be easier with separate ailerons. The wingtip details with position lights and RHAW (radar homing and warning system) antennae are simplified and wrong shape. Check pictures in my feature article for more information. Under the wing there is one important panel line missing: the slats are split in two sections on the upper side of the wing, just as they should be, but the split line disappears on the bottom.
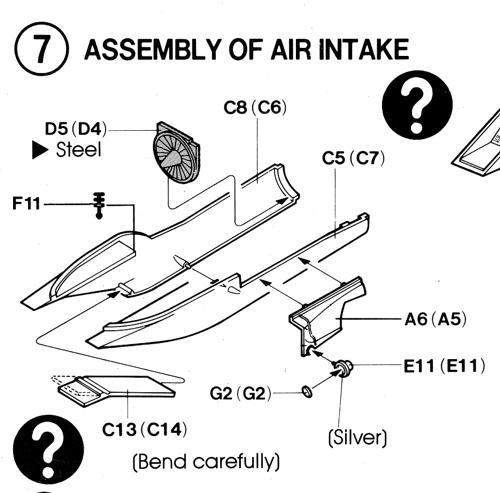
You get an option of open or closed auxiliary engine air intakes on the upper side of LERX, but parts for "open" option are poorly represented and I suggest using the "closed" part. Main engine air intakes can also be open or closed as the part for supersonic shock ramp (acting also as FOD screen) can be modified according to instructions to fully closed position. I suggest closing it (but using PE part from Eduard set will be a better idea than using kit parts) as while the engine turbine faces are present, the intake ducts are not and there is a lot of ejector pin marks and locating pins to remove on the inside of the air intake parts, even if you accept the lack of full ducts. The fit of the intakes to the lower fuselage is not great and requires some trimming to make them sit correctly. Small opening (some auxiliary exhaust?...) is missing from outer side of portside air intake just ahead of main gear well.
|
|
Engine
faces present, but no air intake ducts... |
Dorsal spine profile is perfectly flat in the model, while in fact is should be slightly concaved in MiG-29A. Small openings (exhaust pipes, vents?) are missing from sides of the dorsal spine. There should also be a small round glass inspection window on starboard side of the spine and it is not there. The APU air intake scoop located at the back of dorsal spine is too "square" and has vertical front edge, while it should be slanted. Also you need to open the face of the intake scoop as it is molded solid. The airbrake can be built open or closed. Upper airbrake hinges are oversized and much to thick for the scale. If you decide to open the brake, there are some basic details inside of it present.
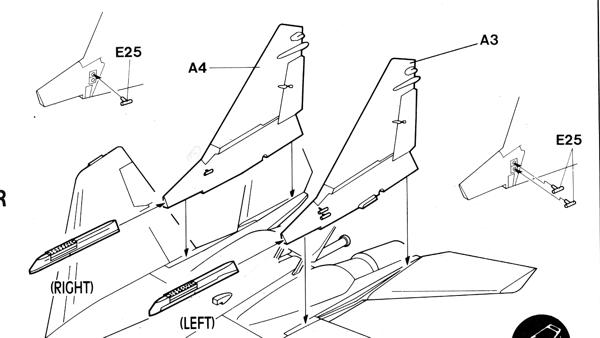
Tail fins are a bit too small and have slightly incorrect shape. The trailing edge of the rear part under the rudder plate is inclined too much - it should be more vertical. Some small details like various antennae are also missing from tail fins. Lower rudder hinges are not present. There should be small pitot probes - two on outer side of portside tail fin and one on outer side of starboard fin. Academy provided all these probes, but wants you to attach one of them to the inner side of starboard fin, what is not correct.
|
|
This
is not quite correct - pitot probe on starboard fin should be on its
outer side. |
Engine nacelles don't have many panel lines engraved that should be there, but there are some that should not. Small openings (drains?) on bottom of nacelles are missing - there should be three on each. Engine exhaust nozzles are simplified and hardly resemble real things. These should be replaced with resin or PE parts for better look (I used PE nozzle sets from Part).
All landing gear wells have very little and mostly inaccurate details inside. The shape of the main gear wells is incorrect, both the inside and the outline of the cutout in the fuselage. Gear doors have the shape matching this of the cutouts in fuselage, so they also are not quite correct. Also the internal details of doors while present do not match the real thing. The main gear doors retraction mechanism parts are included, but they look nothing like the originals. Landing lights are placed in the wrong place on main gear doors - too high. The transparent part for the light lens is much to thick it is almost a half of the sphere! The most noticeable problem with the front gear well is the shape of the rear part of the cutout in the fuselage and rear wall of the well. The rear of opening in fuselage should be almost square, but Academy made it very rounded. Of course the rear parts of the doors are also incorrectly rounded. The shape of the fuselage directly behind the well is not quite correct either, but all this is hidden deep behind engine air intakes and hardly visible (unless you look at the model directly from underneath), so should not be considered a real problem for most modelers. There should be a distinctive "tooth" shape on the front part of the portside door and it is not there. As mentioned before Academy have chosen to place the ejector pin marks on the inside of all doors. Some rivets are already missing under pin marks and more rivets will be destroyed if you try to remove these pin marks.
Nose landing gear is generally correct in shape, but lacks some detail. Particularly wheel steering unit could be more detailed, but on the other hand scizzors on front side of the strut are very well molded. Mudguard is present, but does not look convincing as solid plastic part and will look much better if you decide to use PE part from some aftermarket set. Main landing gear is also quite well done, although there are some ejector pin marks on struts that have to be removed. The only problem I noticed is that when built out of the box, the model, particularly the rear part, seats too high above the ground (see picture below). It may be almost correct for completely empty plane, but on most pictures of operational planes they seat much lower. This suggests that either the nose gear strut of the model is too short, or main gear struts are too long (my measurements suggest that the latter is true, so I shortened main gear struts by 2 mm). There are no hydraulic lines or cables molded on gear struts. All wheels have nice details on them, including lettering on sides of tires. Tires are not bulged or flattened.
 |
 |
|
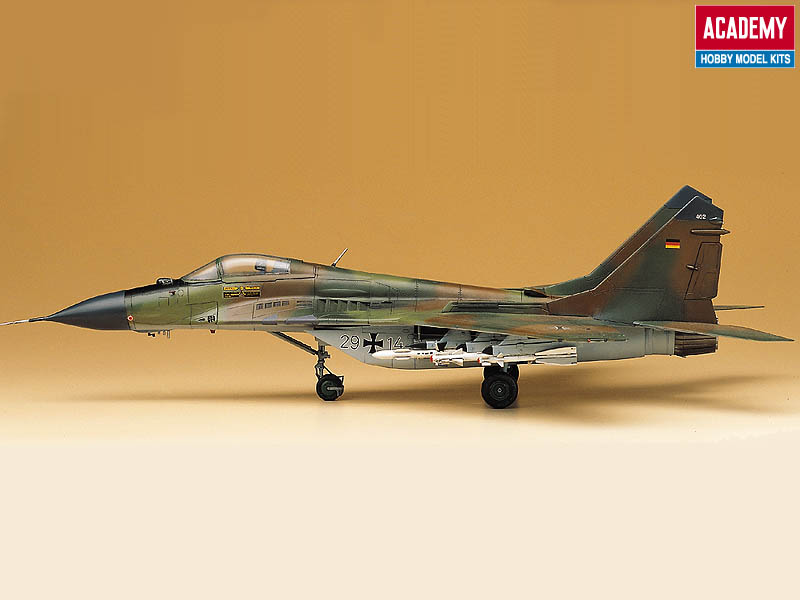
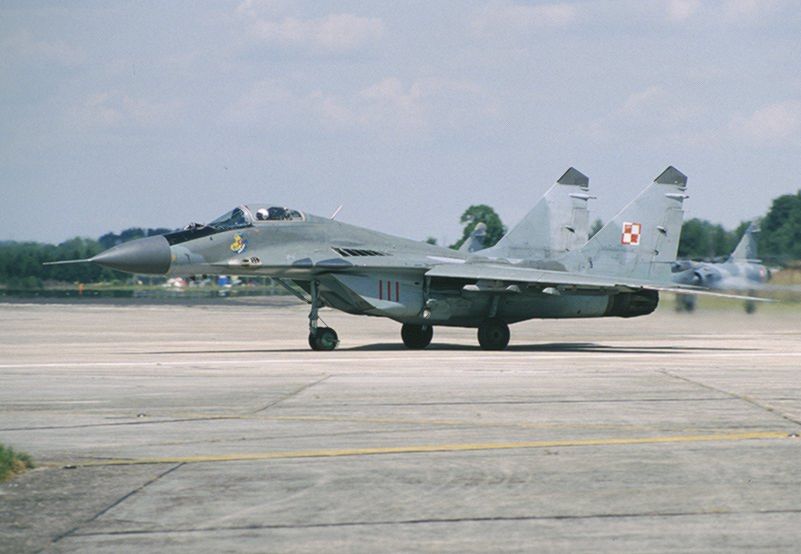
Academy
model built out of the box (picture from Academy web page) on the left
and the real thing on the right. Real plane sits much lower above the
ground (this particular MiG has external fuel tank attached, but it
does not have any missiles - these would make it seat even lower). |
|
One external fuel tank is provided that can be hung under the fuselage. It looks correct to me, but I didn't plan to use it so I didn't take any measurements.
Following armament is provided by Academy:
-
two R-60MK missiles with APU-60 pylons/launchers.
Launchers are very simplified but their general shape is
more or less correct and they can be improved with some filing and sanding. R-60 missiles have correct length and almost correct
fuselage diameter (a bit too thick), but all fins are much to big. Fins should
be replaced with smaller copies to give the missile correct appearance, but at
this point you can just as well scratch build the whole missile, using slightly
thinner styrene rod for the missile body (as I did in my model).
-
two R-73E missiles with APU-60 pylons/launchers.
These missiles are quite well reproduced. Of course as
usual with plastic molded fins, they could be a bit thinner. Unfortunately
APU-60 launchers are only for R-60 missiles and cannot be used for R-73. Academy
has not provided APU-73 launchers... While slightly similar in shape to APU-60's
they are not the same.
-
two R-27R missiles with APU-470 pylons/launchers.
Launchers are simplified but except for the nose part,
they could be used. Nose part of the launcher is much too long - I guess
designers of this model used the shape of the nose of APU-68 launcher by
mistake. This can be easily corrected with the file. R-27R missiles are very
accurate in shape and all dimensions, but... in 1/55 scale!!!.
They are just much too small (see pictures in my "build
article" in Features section).
As you see unfortunately with pylons and missiles given by Academy you are not able to display correctly looking ordnance load...
So, is this model completely useless? Well, if you want to build 1/48 scale Fulcrum there is no real choice. This is THE BEST injection molded 1/48 MiG-29... The only alternative is Monogram kit (and Hasegawa reboxes of it), but it has even more serious accuracy problems, as it's molds were prepared in 1980s, when little was known on the West about this airplane. Academy kit is much closer to the real thing. If you decide to build it out of the box you will find only a few fit problems, mentioned earlier, but in general you will get pretty good looking model with very nice surface detail. Of course some aftermarket decals are the must. Still if you aim for accuracy, be prepared for A LOT of work. Many aftermarket detail sets are available for this kit, but some parts still have to be scratch built. No-one offers corrected radome (but sometimes I think that I'm the only one who sees the problem with Academy part). I have not seen any resin landing gear wells. There are also no R-60 and R-27 missiles available in 1/48 scale at the moment (resin R-73's with correct pylons for MiG-29 are available from SOL Models company - you can get them at http://www.victorymodels.com/catalog.htm. UPDATE: Now from the same source you can also get resin + PE R-60 missiles by TallyHo! company, and R-27 bodies by ModelPoint - probably turned aluminum. I have not seen any of them yet, so I cannot comment on their quality).
When building my model I decided to correct some of the kit's inaccuracies, but left some others. For example I scratch built all the missiles, but I left the gear wells unmodified. I also admit to making some mistakes when adding detail to the model. You can read how I built my MiG-29A model in my article in Features section. You can also see many detailed pictures of my finished model in Gallery section.
![]()
![]()
Copyright © 2003 VODNIK, mailto:pawel@vodnik.net